Showing posts with label Hyper-V Server 2008. Show all posts

Monday, 9 April 2012

Microsoft Updates for Hyper-V RSS Feeds

Here are some Microsoft updates Web lists with RSS feeds for the Hyper-V Role and Server:

There will be additional feeds once Windows Server 8 gets its name and is released to manufacturing.

Hat Tip: Susan Bradley

Philip Elder
MPECS Inc.
Microsoft Small Business Specialists
Co-Author: SBS 2008 Blueprint Book

*Our original iMac was stolen (previous blog post). We now have a new MacBook Pro courtesy of Vlad Mazek, owner of OWN.

Windows Live Writer

Tuesday, 17 January 2012

Server Core–How to Properly Move the Swap File

We have posted on this subject before though the pieces of the puzzle were a bit incoherent due to the comments providing the proper methodology and eventually a link to Sander Berkouwer’s blog post with up to date information.

As is indicated in the second blog post’s comments we find the following methodology:

  1. Create the dedicated partition after the OS partition using DiskPart.
    • We install Server Core to a 50GB partition and FULL to a 75GB partition.
    • We use RAM * 2.5 as a rule.
    • For larger GB where only the Hyper-V Role is running then RAM * 1.
    • We assign the letter S:
  2. wmic computersystem where name=”MyCoreServer” set AutomaticManagedPagefile=False
  3. wmic.exe pagefileset create name="S:\pagefile.sys"
  4. wmic.exe pagefileset where name="S:\\pagefile.sys" set InitialSize=12288,MaximumSize=32768
    • Note the double slash in the file path.
  5. wmic.exe pagefileset where name="C:\\pagefile.sys" delete
  6. shutdown –r –t 0 –f

As per Sander we can check the registry for the settings as well:

  • HKEY_LOCAL_MACHINE\SYSTEM\CurrentControlSet\Control\Session Manager\Memory Management

Some additional reading:

Philip Elder
MPECS Inc.
Microsoft Small Business Specialists
Co-Author: SBS 2008 Blueprint Book

*Our original iMac was stolen (previous blog post). We now have a new MacBook Pro courtesy of Vlad Mazek, owner of OWN.

Saturday, 14 January 2012

TechNet Partner Forums: Hyper-V Failover Cluster Network Recommendations

This is a post on the TechNet Forums:

A direct copy and paste from the forum post with emphasis added by us:

Thanks for your post. I'm Lamb from Microsoft Partner support team.

From your description, you need an official recommendation of how we design the Hyper-v Cluster Networks. If I misunderstand it, please correct me.

First, I'd like to answer your question:

Q: "whether or not Microsoft still recommends a dedicated heartbeat / cluster network"

A: Yes, we recommend. But the requirement is removed.

Simply speaking, it is just an option.

Client access does not interfere with heartbeat, etc. Heartbeat can be running on either network ,where clients can access.

The suggestions below should help you more.

If you have more questions, please feel free to post back.

More suggestions:

1. I think that this article should solve your problem in the post, perfectly:

Hyper-V : How many network cards do I need?
http://blogs.technet.com/b/gavinmcshera/archive/2011/03/27/3416313.aspx

2. To understand how heartbeart co-works with client-access, I think that you need to read the following article.

This article tells you how to decide how we use a Network in a cluster.

Modify Network Settings for a Failover Cluster
http://technet.microsoft.com/en-us/library/cc725775.aspx

3. And, each network has a priority/metric.

Normally, this metric is decided by cluster itself.

And, for CSV&Live-migration, you can decide which network to use.

For CSV:
Designating a Preferred Network for Cluster Shared Volumes Communication
http://technet.microsoft.com/en-us/library/ff182335(WS.10).aspx

For live-migration:
search for "To configure a cluster network for live migration" in:
Hyper-V: Using Live Migration with Cluster Shared Volumes in Windows Server 2008 R2
http://technet.microsoft.com/en-us/library/dd446679(WS.10).aspx

4. And, we can manually change the metric, according to this article:

Configuring Network Prioritization on a Failover Cluster
http://blogs.msdn.com/b/clustering/archive/2011/06/17/10176338.aspx


Best regards,
Lamb Shu
Partner Online Technical Community
-----------------------------------------------------------------------------------------
We hope you get value from our new forums platform! Tell us what you think:
http://social.microsoft.com/Forums/en-US/partnerfdbk/threads
------------------------------------------------------------------------------------------
This posting is provided "AS IS" with no warranties, and confers no rights.

Hat Tip: Susan Bradley

Philip Elder
MPECS Inc.
Microsoft Small Business Specialists
Co-Author: SBS 2008 Blueprint Book

*Our original iMac was stolen (previous blog post). We now have a new MacBook Pro courtesy of Vlad Mazek, owner of OWN.

Monday, 9 January 2012

A Quick Way to Find Server Up-Time in Server Core or Hyper-V Server

Open an elevated command prompt and:

  1. systeminfo | find “System Boot Time:”

Our report:

C:\>systeminfo | find "System Boot Time:"
System Boot Time:          1/3/2012, 11:22:30 AM

Hat tip: Petri: Seven Simple Ways to Find Your Uptime in Windows Server 2008

Note that this command can be run on almost any Windows OS.

UPDATE: Thanks to vNiklas we have the following PowerShell command run via an elevated PowerShell session:

  1. (get-date)-([System.Management.ManagementDateTimeconverter]::ToDateTime((Get-WmiObject win32_operatingsystem).lastbootuptime)) [Enter]

Our output:

PS C:\>  (get-date)-([System.Management.ManagementDateTimeconverter]::ToDateTime((Get-WmiObject win32_operatingsystem).lastbootuptime))


Days              : 6
Hours             : 4
Minutes           : 44
Seconds           : 31
Milliseconds      : 872
Ticks             : 5354718724344
TotalDays         : 6.19759111613889
TotalHours        : 148.742186787333
TotalMinutes      : 8924.53120724
TotalSeconds      : 535471.8724344
TotalMilliseconds : 535471872.4344

Philip Elder
MPECS Inc.
Microsoft Small Business Specialists
Co-Author: SBS 2008 Blueprint Book

*Our original iMac was stolen (previous blog post). We now have a new MacBook Pro courtesy of Vlad Mazek, owner of OWN.

Friday, 30 December 2011

Setting Server Core to MiniDump

When it comes to troubleshooting spontaneous reboots on Server Core we need to make sure that we have some sort of memory dump file.

In some cases we saw dump files such as when we were initially dealing with the CLOCK WATCHDOG TIMEOUT (blog post) issue. But that has not been consistent.

So, to set the Server Core installation to create a MiniDump file we do the following:

  • wmic RECOVEROS set DebugInfoType = 3

Some further reading:

We use the Crash Analyzer for MSDaRT Tool included in the Microsoft Desktop Optimization Pack to work with the dump files.

Philip Elder
MPECS Inc.
Microsoft Small Business Specialists
Co-Author: SBS 2008 Blueprint Book

*Our original iMac was stolen (previous blog post). We now have a new MacBook Pro courtesy of Vlad Mazek, owner of OWN.

Wednesday, 28 December 2011

Hyper-V: Apply Hotfix Before Running Export on Production Server

It seems that there is a bit of a bug in the Hyper-V export function if the destination for the export is receiving data slower than the source is sending it. The export function will continue to cache the export in all available memory until the server stops responding due to memory being exhausted.

Prior to running any export processes on a production server this hotfix should be applied.

Examples where the problem hits is when the export is being run to a USB hard disk that runs at 30MB/Second or across a slower LAN link to another server.

Hat Tip: Tim Barrett of No Geek Left Behind.

Philip Elder
MPECS Inc.
Microsoft Small Business Specialists
Co-Author: SBS 2008 Blueprint Book

*Our original iMac was stolen (previous blog post). We now have a new MacBook Pro courtesy of Vlad Mazek, owner of OWN.

Saturday, 10 September 2011

WMIC pagefileset create Error: Provider does not support put extensions

Now this was a funky bit of brain busting to figure out just what this error message was saying:

image

C:\>wmic.exe pagefileset create name="S:\PageFile.sys"
ERROR:
Description = Provider does not support put extensions

We did a quick search for “WMIC pagefileset create” and came up with:

We went to the Workaround section and found the correct syntax for working with page files in Server Core. Now, the _only_ difference that we could see between what we inputted above and what was in the KB was the case of the file name?

Okay, so maybe WMIC commands are case sensitive?

Sure enough:

image

C:\>wmic pagefileset create name="S:\pagefile.sys"
Instance creation successful.

Kewl! :)

Lesson learned and it is great to see the proper syntax for working with page files on Server Core is available on a Microsoft document with the _correct_ syntax.

Note that a search on the error itself turned up very little.

Philip Elder
MPECS Inc.
Microsoft Small Business Specialists
Co-Author: SBS 2008 Blueprint Book

*Our original iMac was stolen (previous blog post). We now have a new MacBook Pro courtesy of Vlad Mazek, owner of OWN.

Windows Live Writer

Wednesday, 24 March 2010

An Updated Hyper-V Monitor Vista/7 Gadget And The Hyper-V Nehalem Update Status Is Good

The server we were having a great deal of issues with has been running since yesterday afternoon with no further freezes.

It looks as though version 4 of the update has truly dealt with the timing issue Hyper-V has with the Nehalem processors.

Also, the Windows sidebar gadget we have mentioned in the past has received a substantial update:

image

In addition to showing the available RAM on the Hyper-V server, we now see the CPU utilization as well as which VMs have Integration Services installed (green) and which ones do not (gold).

image

We also have the ability to TS into the Hyper-V box to manage it, open a VM direct desktop session, and manage the VM’s power status among other things.

This tool is truly useful for at-a-glance views of all Hyper-V servers running on the network. Shown is the one server, we just have not had the time to add the others we also have on our network.

Philip Elder
MPECS Inc.
Microsoft Small Business Specialists
Co-Author: SBS 2008 Blueprint Book

*Our original iMac was stolen (previous blog post). We now have a new MacBook Pro courtesy of Vlad Mazek, owner of OWN.

Windows Live Writer

Monday, 22 March 2010

ShadowProtect Restore Of Windows 7 To Hyper-V Tips And More

We jumped the gun on the last post.

Using the Hardware Independent Restore feature of ShadowProtect we were able to get some Windows 7 OSs into Hyper-V via P2V along with some troublesome Windows Server 2003 OSs.

We needed to extract the .MSI contents of the VMGuest.iso into individual folders and ISO them. We inserted those drivers using the HIR feature of ShadowProtect and were greeted with the Windows 7 logon screen not too long afterwards.

The post is here:

Philip Elder
MPECS Inc.
Microsoft Small Business Specialists
Co-Author: SBS 2008 Blueprint Book

*Our original iMac was stolen (previous blog post). We now have a new MacBook Pro courtesy of Vlad Mazek, owner of OWN.

Windows Live Writer

ShadowProtect Restore to Hyper-V VM Tips

Here are a couple of tips to get the restore working relatively quick:

  1. Use the Legacy NIC in Hyper-V if the restore files are on a network share.
  2. Use only 1 virtual CPU to run the restore.
  3. Use the Integration Services drivers as part of a Hardware Independent Restore for the guest OSs:
    1. Extract the contents of the VMGuest.iso to an architecture specific folder.
      1. msiexec /a Windows5.x-HyperVIntegrationServices-x86.msi /qb targetdir=c:\temp\x86
      2. msiexec /a Windows5.x-HyperVIntegrationServices-x64.msi /qb targetdir=c:\temp\x64
    2. Use a utility like CDBurnerXP to place the extracted content into an ISO file.
    3. Mount that ISO file when it comes time to run the restore in SP.
    4. Install _every_ driver that is in the \Hyper-V Integration Services folder for the required architecture.
      • image
    5. Boot into the OS and clean things up HIR style (previous blog post).

The WinRE used by ShadowProtect will not pick up the Hyper-V NIC by default. So, run the restore with the Hyper-V legacy NIC in place. Once the restore is complete, shut down the VM and switch out the Legacy NIC for the Hyper-V native NIC.

This is what a restore looks like with 2 virtual CPUs for throughput:

image

This is what a restore looks like with only 1 virtual CPU:

image

So, somehow having anymore than 1 virtual CPU enabled causes a real problem with not only the restoration process, but navigating around the ShadowProtect recovery GUI too. Things are a lot more responsive with just 1 vCPU.

Using the above procedure will yield the following on a Windows 7 P2V:

image

The 100MB system partition that Windows 7 creates during its install routine is not needed to restore the OS as a Hyper-V guest. We needed to use the Hardware Independent Restore process to get beyond a BSOD 0x0000007E.

Philip Elder
MPECS Inc.
Microsoft Small Business Specialists
Co-Author: SBS 2008 Blueprint Book

*Our original iMac was stolen (previous blog post). We now have a new MacBook Pro courtesy of Vlad Mazek, owner of OWN.

Windows Live Writer

Wednesday, 17 March 2010

NIC Binding Order On Server Core or Hyper-V Server 2008 RTM/R2

For those of us that have worked with SBS 2003 Premium in a 2 NIC setup, we know the importance of having the binding order correct for those 2 NICs are things really don’t work right.

The same is true for our Hyper-V implementations. There is a need to have the correct binding order for all of the NICs on a server that will be utilized by the host OS, cluster heartbeat, the Hyper-V virtual switches, and if needed iSCSI.

So, what order do we need to have those NICs in and how do we figure out which NIC is which?

Have a look at the following screenshot taken from the first node in a four node Hyper-V Server 2008 R2 cluster:
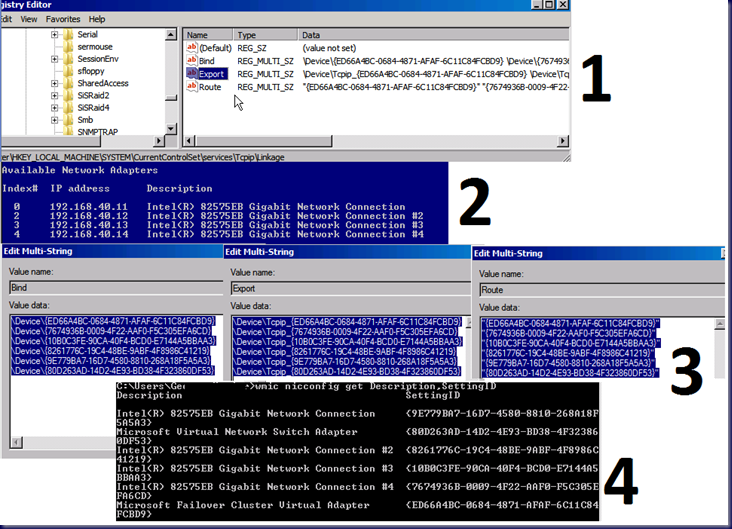
image

The images in order from top to bottom (numbers to the right of each one):

  1. HKLM\System\CurrentControlSet\services\TCPIP\Linkage
    1. Bind: Contains NIC GUIDs
    2. Export: Contains NIC GUIDs
    3. Route: Contains NIC GUIDs
  2. NIC report via the Hyper-V Server 2008 R2 menu
    • The Intel Modular Server compute modules have a maximum of 4 NICs as indicated here.
  3. NIC GUIDs in each Linkage key
    • Bottom most GUID is _first_ in the binding order.
  4. wmic nicconfig get Description,SettingID [Enter]
    1. WMIC command gives us a GUID to NIC name association.

So, to change the binding order on Server Core and Hyper-V Server 2008 RTM/R2, one moves the order of the GUIDs in each registry key:

  1. Bind
  2. Export
  3. Route

Once the GUID orders have been changed, reboot the server to get the changes to take affect.

The binding order we put the NICs in:

  1. NIC 0: Management
  2. NIC 1: Cluster Heartbeat
  3. NIC x: iSCSI (if needed)
  4. Microsoft Virtual Network Switch Adapter
  5. NIC 2+: Bind the MS Virtual Switch.
    1. NICs disappear from the binding keys after the Virtual Switch is bound to them and the host OS no longer has access.
  6. Microsoft Failover Cluster Virtual Adapter

Please make sure to take a screenshot of the default settings as above along with an export of that registry key just in case! A backup might be a good thing too.

IMS Ethernet Switch Ports To Node NICs

And one more thing when it comes to the IMS Ethernet Switch port structure relative to the NIC order listed in Hyper-V Server 2008 R2 or any other Server Core OS for that matter.

There is no direct correlation between which NIC comes in at 0, 1, 2, and 3 in the Hyper-V OS listing and the physical NIC to node NIC port in the IMS Ethernet Switch setup.

This is important to know since we already went ahead and set the NIC binding order according to the list in the Hyper-V OS but the _wrong_ NIC went down when we changed the VLAN setting in the IMS Ethernet Switch port management for port 1 on SWM 1!

In the screenshot below, we have VLAN 98 set up to be the heartbeat and migration network on physical NIC 2 on each node.

However, when we do an IPConfig /release && IPConfig /renew on the nodes the NIC assigned a 169.x.x.x IP was actually NIC 0!

image

As a result, we leave all of the node NICs connected to the management network to pick up an IP from the SBS VM. We can then change the VLAN setting to figure out which NIC in the OS belongs to which physical port in the IMS Ethernet Switch.

UPDATE: The proper binding order has finally been found! According to Chris Adams of Microsoft:

Now we have a pretty conclusive answer as to what order we need to put those NICs in:

  1. Microsoft Failover Cluster Virtual Adapter
  2. NIC 0: Management
  3. NIC 1: Cluster Heartbeat
  4. NIC x: iSCSI (if needed)
  5. Microsoft Virtual Network Switch Adapter
  6. NIC 2+: Bind the MS Virtual Switch.
    1. NICs disappear from the binding keys after the Virtual Switch is bound to them and the host OS no longer has access.

Thanks Chris!

Philip Elder
MPECS Inc.
Microsoft Small Business Specialists
Co-Author: SBS 2008 Blueprint Book

*Our original iMac was stolen (previous blog post). We now have a new MacBook Pro courtesy of Vlad Mazek, owner of OWN.

Windows Live Writer

Tuesday, 9 June 2009

Hyper-V Error – Access Denied. Unable to establish communication between Hyper-V and Client

While setting up a Hyper-V server for Wayne and Justin to work with some VMs to troubleshoot the SBS 2003 to 2008 replication error, we ran into a roadblock with getting the Hyper-V Manager connected to the Hyper-V Server 2008 box:

image

Virtual Machines

Access denied. Unable to establish communication between ‘Hyper-V Server’ and ‘Hyper-V Manager’.

This is puzzling since the workstation has been connected to this particular Hyper-V server many times using other network profiles. The profile we created for the Microsoft folks was seemingly giving us the connection issue.

The fix took a bit of searching to find and needed to be accomplished on the Windows Vista system where the Hyper-V Manager was installed:

  1. Close the Hyper-V Manager
  2. Click Start and type: %windir% [Enter].
    • A Windows Explorer window will open to the Windows directory.
  3. Type: dcomcnfg in the Search Windows field at the top right hand of the Explorer window.
    • You will see the following in your search results:image
  4. Right click on dcomcnfg and Run As Administrator.
    • Authenticate with the local admin credentials if UAC prompts for credentials, or Continue if it does not.
  5. Open the Component Services node, then the Computers node, then right click on My Computer and click on Properties.
  6. Click on the COM Security tab.
    • You will see the following:image
  7. Click the Edit Limits button under Access Permissions.
  8. Enable Remote Access for Anonymous Logon
    • Before and after shot:image
  9. Click Apply and OK.
  10. Close the Component Services console and the Windows Explorer window.
  11. Start the Hyper-V Manager and continue through the UAC.

The virtual machines, if any, will show up in the Hyper-V Manager console after that.

Thanks to Augusto Alvarez for the clearest and exact explanation for the fix:

Philip Elder
MPECS Inc.
Microsoft Small Business Specialists
Co-Author: SBS 2008 Blueprint Book

*All Mac on SBS posts will not be written on a Mac until we replace our now missing iMac! (previous blog post)

Windows Live Writer

Saturday, 30 May 2009

Vista SP2 on Hyper-V SP1 – Integration Services Install Error Code 1

When trying to install the Hyper-V Integration Services on a newly installed Windows Vista Enterprise VM, this is the error we received:

image

Error

An error has occurred: One of the update processes returned error code 1.

Apparently, we need to Service Pack 2 our Hyper-V box too (Kit Kai’s Tech Blog).

In the mean time, if connected to the Hyper-V manager via an RDP session, there will be no mouse access to the VM.

To shut the VM down, do the following:

  1. Click the image button.
  2. Hit the down arrow on the keyboard to get to Start Task Manager and hit the Enter key.
  3. Type ALT+N to hit the New Task button.
  4. shutdown –s –t 0 [Enter]

The VM will shut down. We shut down all of the desktop VMs on this Hyper-V box before installing the service pack.

image

You folks in the US sure have it good with your Internet connections!

The update took a while on the dual Xeon E5420 series Dell 2950 2U. There were 5x 300GB 15K SAS drives in RAID 10 with a hot spare.

image

We shut the VMs ahead of applying the update to give the server as much dedicated processing and disk I/O as possible. Even though we are working with a Server Core install, the update is quite large.

At about 5 minutes:

image

And here we are about 17 minutes after the update was initiated:

image

Keep in mind that any Hyper-V server that hosts Windows Vista Service Pack 1 will need to be updated to Service Pack 2 prior to service packing the Windows Vista VMs.

When the Integration Services disk gets inserted into the VM the AutoPlay feature should pop up a window that enables us to hit the Enter key to initiate the setup routine and an ALT+A to continue through the UAC prompt.

If the VMGuest.ISO was already mounted, then make sure to dismount and click Insert Integration Services Setup Disk in the VM’s Action menu.

Once installed, we will see:

image

After the reboot, our remote mouse movements will be enabled. If the above menu gets lost behind the default Vista Welcome window, hit the CTRL+ALT+DLTE button in the VM manager and bring up the Task Manager to switch to the Hyper-V setup.

Another reason Windows 7 in a VM is way ahead of Windows Vista! Windows 7 has the Hyper-V Integration Services already installed!

Philip Elder
MPECS Inc.
Microsoft Small Business Specialists
Co-Author: SBS 2008 Blueprint Book

*All Mac on SBS posts will not be written on a Mac until we replace our now missing iMac! (previous blog post)

Windows Live Writer

Thursday, 7 May 2009

RSAT for Windows 7 x86 or x64

RSAT for Windows Vista will not work on Windows 7.

There is a version for Windows 7, though we needed to dig around for it:

image

The links on the Microsoft Download site do not work.

But, this site has a direct link to the downloads themselves (x86 and x64) that work as of this writing: Remote Server Administration Tools (RSAT).

After downloading and installing them, note that they need to be enabled in the Windows 7 Programs and Features on or off.

image

Note the lack of a check mark beside the Remote Server Administration Tools feature.

Once in, we have access to the Hyper-V Manager which is what spurred the search on in the first place.

Philip Elder
MPECS Inc.
Microsoft Small Business Specialists
Co-Author: SBS 2008 Blueprint Book

*All Mac on SBS posts will not be written on a Mac until we replace our now missing iMac! (previous blog post)

Windows Live Writer

Wednesday, 15 April 2009

ShadowProtect Image Recovery into a Hyper-V VM

We need to get to images restored into VMs running on Hyper-V for the test Swing Migration we are doing for the messed up “Professional” SBS in this post.

The deeper we are digging into this the more and more it may be a good idea to start fresh and work the client workstations from there.

But, we have committed to the business owners to run through the Swing test anyway, so we are well into it now.

The existing SBS was imaged using ShadowProtect and has been restored to one of our lab servers using the Hardware Independent Restore feature. We cleaned up the IBM XServe hardware pieces in the Device Manager and made sure that the lab server hardware drivers were installed and stable.

We are running a portion of the Swing virtually with the NewSBS ending up on the same lab server we have the restored SBS on now which is a Swing Off and Swing On again.

On this particular SBS network there is a Terminal Server. So, we took an image of it as well as one critical workstation. We are restoring both images to VMs running on Hyper-V Server 2008 (yes, we got it up and running though with no add-in RAID controller).

When we went to boot from the ShadowProtect I.T. Edition ISO in the VM, the WinRE would choke on the networking portion of the ShadowProtect startup routine. We ended up needing to uninstall the standard Hyper-V NIC and use a Legacy NIC to get things rolling. We were using the Windows Vista WinRE version too.

We placed the two ShadowProtect images on a network share to run the restore process in the Hyper-V based VMs using drive mapping feature in the ShadowProtect recovery environment.

When it comes to restoring an encrypted ShadowProtect image that is password protected using AES 128bit security, CPU crunching capabilities and GHz speed sure make a huge difference on the restore times.

Philip Elder
MPECS Inc.
Microsoft Small Business Specialists
Co-Author: SBS 2008 Blueprint Book

*All Mac on SBS posts will not be written on a Mac until we replace our now missing iMac! (previous blog post)

Windows Live Writer

Saturday, 11 April 2009

VMC to Hyper-V Import Tool

The March issue of the TechNet magazine had a Utility Spotlight on an excellent tool by Matthijs ten Seldam called the VMC2HV Import Tool: TechNet Magazine: Utility Spotlight VMC to Hyper-V Import Tool.

This is a screenshot from the above article:

VMC to Hyper-V Import Tool

The tool enables us to take a Virtual Server based virtual machine along with the requisite VMC file settings and import them into Hyper-V so that there is very disruption to the virtual machine.

Matthijs also has a blog post on the tool: VMC to Hyper-V Import Tool Available.

The tool can be downloaded via the TechNet article, or Matthijs’s blog post.

From Matthijs’s blog:

So what does the tool offer? In a list of features:

· Import of VMC files of both VS2005 and VPC2007

· Creation of VM on local Hyper-V host

· Creation of VM on remote Hyper-V host

· Validation of virtual disk and ISO files in local scenario

· Editing of virtual drive image paths (vhd, vfd, iso)

· Swapping of the first SCSI disk with the first IDE disk

· Specification of static MAC addresses

· Specification of either legacy (emulated) or enhanced network adapter

· Specification of # of virtual processors and resource control

· Specification of management settings

· Specification of COM ports

· Specification of device boot order

· Specification of alternate Virtual Machine path

· Built-in help in CHM file

· Support for both x86 and x64 Vista and Server 2008

For those of us still in the process of migrating VMs from Virtual Server to Hyper-V without the use of System Center Virtual Machine Manager, this tool is quite handy.

Philip Elder
MPECS Inc.
Microsoft Small Business Specialists
Co-Author: SBS 2008 Blueprint Book

*All Mac on SBS posts will not be written on a Mac until we replace our now missing iMac! (previous blog post)

Windows Live Writer

Wednesday, 1 April 2009

Intel SR1625UR 1U Dual Xeon 5500 Series Configuration

The image looked good in Windows Live Writer when putting together yesterday’s post on the new Intel 5500 Series Xeons and related components (previous blog post).

But, I see now that the Intel Server Configurator screenshot turned out to be quite illegible.

So, there is that server configuration:

Description

Part Number

MM #

QTY

Intel® Server System SR1625UR (1U Passive Backplane) SR1625URNA (Includes power cord for North America) and R1625UR 901132 (power cord included) or 900986 1
Intel® Xeon® Processor X5560 (Heat Sink not included) BX80602X5560 901026 2
SR1625 Standard front panel accessory kit ASR1625FP 900991 1
Quad port GbE I/O module AXX4GBIOMOD2 901359 1
Intel® Remote Management Module 3 AXXRMM3 900961 1
Intel® RAID Controller SRCSASJV (8 internal/external SAS/SATA ports, up to 1GB cache) SRCSASJV 892602 1
AXXRSBBU3 Intel® RAID Smart Battery Backup Module (Use with Intel® Integrated Server RAID) AXXRSBBU3 900954 1
Slimline SATA DVD ROM - AXXSATADVDROM AXXSATADVDROM 893637 1
Black Bezel (Standard Control Panel) ASR1550BEZ 879406 1
Full extending Rail Kit AXXHERAIL2 901082 1
RJ45 To DB9 Cable AXXRJ45DB92 881944 1
650W Hot-Swap power supply module ASR1625PS 901016 1
2.5" Hard Drive Carrier FXX25HDDCAR 881681 2

Intel SR1625UR 1U 8 x 2.5” SAS Configuration

The above configuration would be implemented with the Hyper-V Role set up on Server Core where the VMs would have high load performance requirements.

Note that there are a few typos in the actual Server Configurator results. Make sure to verify the part numbers with distribution. We corrected the mistakes in the above grid.

Philip Elder
MPECS Inc.
Microsoft Small Business Specialists
Co-Author: SBS 2008 Blueprint Book

*All Mac on SBS posts will not be written on a Mac until we replace our now missing iMac! (previous blog post)

Windows Live Writer

Friday, 6 March 2009

Hyper-V – Installing Windows 2000 Server

We have need for a temporary legacy setup here at the shop.

We used a Windows Server 2000 Standard SP2 CD ISO to install the base OS.

We have an ISO based DVD with every conceivable Microsoft service pack and needed critical update on it that we use to service our VMs. We needed to mount that ISO and update to Service Pack 4 before we could get the Hyper-V Integration Services installed.

Once we had the Integration Services installed, we were able to configure the new VM on our SBS network.

After a few minutes, we saw this:

09-03-02 Hyper-V - Win2K VM with 72 Updates

Windows 2000 Server with 72 Updates Waiting

WSUS picked up on all of the needed updates and the downloads began!

One of the updates in that list was Update Rollup 1 for Windows 2000 SP4 and known issues (KB891861). In the description for the Rollup, it was indicated that the update was a pre-package of previous Windows 2000 updates.

So, we ran the Rollup first to see what was left over. It turns out that there were still 68 updates waiting for us after what was an extended reboot and subsequent logon procedure.

Note that the logon procedure took quite a bit of time after the Rollup was applied so there will be a need to be patient.

When the new Win2K VM was connected to the domain and its needed services and LoB (Line of Business) applications were installed, the VM ran flawlessly.

Philip Elder
MPECS Inc.
Microsoft Small Business Specialists
Co-Author: SBS 2008 Blueprint Book

*All Mac on SBS posts will not be written on a Mac until we replace our now missing iMac!

Windows Live Writer

Tuesday, 3 March 2009

Hyper-V and SCSI Hard Disks – No Drives Were Found During OS Setup

When configuring a new VM in Hyper-V, take note that the OS will not see any disks if they are attached to a SCSI controller:

09-03-03 Hyper-V - SCSI Drives and SBS 2008 - No Drives Found

Hyper-V – Server 2008 VM: No drives were found

The drive that an OS will be installed into must be connected to one of the two available IDE Controllers. This is usually Controller 0.

Apparently, the primary reason for this is due to the way the driver is handled for the SCSI controller. It is loaded on OS boot, and cannot be inserted via the Integration Services disk into the setup portion of the OS.

Some further reading:

Philip Elder
MPECS Inc.
Microsoft Small Business Specialists

*All Mac on SBS posts will not be written on a Mac until we replace our now missing iMac!

Windows Live Writer

Friday, 27 February 2009

Hyper-V Monitor Gadget for Windows Sidebar Updated

This is a neat little tool:

09-02-27 Vista Hyper-V Monitor Gadget Hyper-V Monitor Gadget for Windows Sidebar

We can start, stop, reset VMs on Hyper-V, or even double click on one to bring up a VM console session.

It is a really kewl tool!!

Some of its features from Tore’s blog:

  • Hyper-V Monitor title
    Double click on the title to launch the Hyper-V Manager*.
  • Host title
    Double click on the host title to launch a new Remote Desktop connection to the host.
  • Host title RAM amount
    Displays the RAM amount the host has left.
  • VM title
    Double click to launch VMConnect* to the VM.
  • VM Status
    Displaying the status of the VM in both color and text.
  • VM Control
    Hover over the status to get a set of buttons for the current VM. (Start, Turn Off, Shut Down and Save)
  • Large Size (Undocked)
    You can make the gadget bigger by using the Large Size (Windows 7) or Undock it from the sidebar (Vista).

It can be had from here: MINDRE.NET Tore Lervik: Hyper-V Monitor Gadget for Windows Sidebar.

Our original post: Hyper-V Gadget for Windows Vista Sidebar.

Philip Elder
MPECS Inc.
Microsoft Small Business Specialists

*All Mac on SBS posts will not be written on a Mac until we replace our now missing iMac!

Windows Live Writer