Showing posts with label Windows Server 2008 R2. Show all posts

Friday, 20 September 2013

System Uptime on an SQL Server

We are in the process of running some maintenance on a series of servers we rarely get to touch.

image

We have the LoBs offline or in limited usage at the moment:

image

This particular physical server’s sole purpose in life is to host SQL database instances.

So, while it is has been a good run for the server we are about to terminate the close to two year run. :)

For obvious reasons it is our preference to keep things up to date in the server operating system and the server services running on top of that OS. However, sometimes business dictates that we do not touch unless there is a very good reason to.

We do have a number of such situations. In this case, the LoBs provided us with the opportunity to reboot, run some updates, reboot, and then service pack the various SQL instances.

We now have a fairly happy SQL server that will probably keep running for another year or so until we move this particular client over to a Hyper-V failover cluster.

Have a great weekend everyone and thanks for reading. :)

Philip Elder
MPECS Inc.
Microsoft Small Business Specialists
Co-Author: SBS 2008 Blueprint Book

Chef de partie in the SMBKitchen
Find out more at
www.thirdtier.net/enterprise-solutions-for-small-business/

Windows Live Writer

Monday, 20 May 2013

SMBKitchen Project Open Chat Today

We will be having an open chat with the SMBKitchen Authors this afternoon/evening at 1600Hrs Mountain (1800Hrs Eastern).

Please make sure to use the full Lync client as the Web based client seems to not pick up audio streaming properly.

The feedback on my How-To video for setting up Hyper-V on Windows 8 as well as a greenfield VM based DC with DNS and DHCP along with setting up the Hyper-V networking and a 2008 R2 Standard VM as a router.

I go through step-by-step for setting up the vSwitches, NIC(s) on the VMs, installing and configuring the operating systems, and then finally setting up AD/DNS/DHCP on the 2012 VM and RRAS in NAT mode on the 2008 R2 VM.

We will discuss our current content along with the content we should be posting over this coming month.

This chat is open to everyone both subscribers and not.

Philip Elder
MPECS Inc.
Microsoft Small Business Specialists
Co-Author: SBS 2008 Blueprint Book

Chef de partie in the SMBKitchen
Find out more at
www.thirdtier.net/enterprise-solutions-for-small-business/

Windows Live Writer

Wednesday, 13 March 2013

Windows 7 and Server 2008 R2 New Cumulative Enterprise Hotfix Rollup Released

Microsoft has released a series of updates that aggregate a number of hotfixes released since Windows 7/Server 2008 R2 Service Pack 1 into one spot. Note that this spot is not Microsoft Update _or_ WSUS.

Normally for hotfixes we would have to link into each hotfix’s download site and go through the e-mail return with password protected ZIP archive (in most cases) process for _each_ hotfix contained in this one update set.

To get the updates we are required to step out of our normal update routines and download them from the Windows Catalogue site.

  1. Go to the Windows Update Catalogue site.
    • Note for users running as Standard User a UAC with admin credentials will be required due to a plug-in requesting install rights.
    • image
    • IE10 on Win8 with Compatibility mode enabled ends up with:
      • image
  2. Type 2775511 in the Search field and click Search.
    • image
  3. We can then add the required update download files to our “Basket”.
    • image
  4. Click the View Basket link.
  5. Click the Download button.
    • image
  6. Click the Browse button and choose a folder to download the updates to.
    • A UAC Prompt will happen at this point.
    • Though, Win7 with IE9 seems to have stalled at this point on our download attempts. :(
    • image
  7. We ended up needing to Run As Admin and elevating Internet Explorer when starting the browser before we finally saw this:
    • image
    • But, then we get this:
    • image

Oh well, we tried Win8 with IE10, Win7 with IE9, and Win7 with IE8 with all failing.

image

We tried Run As Admin with UAC via the domain admin account to start all of the IE versions on each OS and still hit a roadblock.

We shall try again later. :(

Once we do have the files we will be able to see about how we will deploy them at client sites.

Hat Tip: Susan Bradley the SBS Diva

Philip Elder
MPECS Inc.
Microsoft Small Business Specialists
Co-Author: SBS 2008 Blueprint Book

Chef de partie in the SMBKitchen
Find out more at
www.thirdtier.net/enterprise-solutions-for-small-business/

Windows Live Writer

Friday, 21 December 2012

Remote Desktop Services Error: One or more RD Licensing certificates has expired. Please re-register.

We have an Remote Desktop Services server that did the following when users tried to log in:

image

Since this particular system was headless we tried the /admin switch on an MSTSC command line start and fortunately we got into the server. A regular RDP file launch or MSTSC GUI client connection would fail with the above.

From the server’s Event Logs:

Log Name:      System
Source:        Microsoft-Windows-TerminalServices-Licensing
Date:          12/21/2012 6:16:51 PM
Event ID:      46
Task Category: None
Level:         Warning
Keywords:      Classic
User:          N/A
Computer:      RDSServer.DOMAIN.LOCAL
Description:
One or more RD Licensing certificates has expired. Please re-register.

And:

Log Name:      System
Source:        Microsoft-Windows-TerminalServices-Licensing
Date:          12/21/2012 5:50:42 PM
Event ID:      4105
Task Category: None
Level:         Warning
Keywords:      Classic
User:          N/A
Computer:      RDSServer.DOMAIN.LOCAL
Description:
The Remote Desktop license server cannot update the license attributes for user "FirstLast" in the Active Directory Domain "DOMAIN.LOCAL". Ensure that the computer account for the license server is a member of Terminal Server License Servers group in Active Directory domain "DOMAIN.LOCAL".
If the license server is installed on a domain controller, the Network Service account also needs to be a member of the Terminal Server License Servers group.
If the license server is installed on a domain controller, after you have added the appropriate accounts to the Terminal Server License Servers group, you must restart the Remote Desktop Licensing service to track or report the usage of RDS Per User CALs.
Win32 error code: 0x80070005

According to our search results we need to do the following:

  1. Log onto the RD Licensing Server.
  2. Start the RD Licensing Manager (LicMgr.exe).
  3. Right click on the ServerName and Advanced –> ReActivate Server.
  4. Make the following choices:
    • image
  5. Click Next
    • image
  6. We then had a successfully re-activated server.
    • image

RemoteApps and RDS Desktop sessions were then available!

image

  • QuickBooks via RemoteApp.

Philip Elder
MPECS Inc.
Microsoft Small Business Specialists
Co-Author: SBS 2008 Blueprint Book

Windows Live Writer

Monday, 26 November 2012

Hyper-V in a Multi-Core Hyper-Threaded World

Here are some points on how we configure our physical Hyper-V hosts:

  • Hyper-Threading is disabled.
    • Logical “cores” will not help with performance where the CPU will still need to juggle between physical and virtual cores (the Hyper-Thread).
  • TurboBoost is disabled.
  • SpeedStep and Wait States are disabled.
    • See Hyper-Threading.
  • Cooling Profile: Set to Maximum Performance
    • We may pay a few pennies more for not bringing things down with all of these settings but our priority is the stability of our systems plus their instantly available performance characteristics.

Now, for the virtual machines we need to keep the following in mind as far as a rule of thumb in our SMB/SME space:

  • Number of Physical Cores on one CPU = Maximum Number of vCPUs.
  • Amount of RAM on one CPU –1GB = Maximum RAM assigned to 1 VM.

Physical Cores

Some perspective:

  • A vCPU = a Thread to the physical CPU.
  • Multiple vCPUs = multiple threads to the physical CPU.
  • All Hyper-V vCPU threads must be processed simultaneously by the CPU physical Cores.
    • Therefore: Performance is impacted if more vCPUs/Threads are assigned to 1 VM than physical cores are available on 1 physical CPU.

System Memory

This subject is a bit more tricky since the information that we can gather on NUMA spanning is quite limited in scope. From what we can tell, the number of NUMA Nodes depends on the number of memory controllers in the system or on the CPU.

  • Rule of Thumb: Assign RAM associated with 1 physical CPU – 1GB to VM.
    • If there is more than 1 NUMA node per CPU then factor in RAM assignments accordingly.

Performance Configurations

Given the above we can surmise that:

  1. A VM will perform at its best if the number of vCPUs assigned to it equals or is less than the number of physical cores on one CPU.
    • And:
  2. A VM will perform at its best if the amount of RAM assigned to it is equal to or less than the amount managed by one NUMA node.

Conclusion

Any time the physical server needs to juggle threads across CPUs or fetch memory content from other NUMA Nodes or RAM managed by another CPU’s memory we run into performance hits.

Philip Elder
MPECS Inc.
Microsoft Small Business Specialists
Co-Author: SBS 2008 Blueprint Book

Windows Live Writer

Friday, 26 October 2012

Lab: Using Windows Server 2008 R2 as a Simple NAT Router

We have a number of lab setups that require the VMs to be on their own Private Network in Hyper-V but still have access to the Internet.

In some cases we need to have access to that private network and the VMs just as we would a product network.

In comes Windows Server 2008 R2 SP1. We set up the VM with two vNICs. One is connected to the Private Network while the other is connected to the Internet via our internal production network (gives us quick access to the lab VMs).

  1. We install the OS
  2. Install Integration Services.
  3. Install the Network Policy and Access Services Role.
  4. Run the Configure and Enable Routing and Remote Access.
  5. Choose VPN and NAT
    • image
  6. Set the WAN connection.
  7. Allow DHCP to be set automatically.
  8. No RADIUS for authentication
    • image
  9. Click OK to the DHCP Relay warning.

We now have an internal router that will allow the VMs on the Private Network to reach out to the Internet.

Finally, to publish internal services via the WAN connection:

  1. Click on NAT under IPv4
    • image
  2. Right click on the WAN Interface in the centre pane and click Properties.
    1. Click on HTTPS (443) and a window pops up.
    2. Enter the IP address of the server hosting HTTPS and click OK.
  3. Tick the check to the left of HTTPS and then click Apply (if it did not do so).
    • image
  4. Repeat for the needed published services.
  5. Test the connections:
    • image
    • image

In the end, it should take no more than 20 minutes to have the first router configured.

Philip Elder
MPECS Inc.
Microsoft Small Business Specialists
Co-Author: SBS 2008 Blueprint Book

Windows Live Writer

Monday, 30 July 2012

One Little Feature Where In-House/On-Premises Kills Cloud

This is a tweaked post that was made to the Yahoo SBS2K forum.

***

This is how in-house based Search works when set up properly:

  • Server side:
    • Windows Server 2008 RTM/R2+ hosts files.
    • Win2K8 RTM/R2 set up with Search and indexes file shares.
  • Client side (Win7+):
    • Library created and called whatever (we use SharedFolders)
    • Shared Folders on above server(s) added to library.
      • Use Index Options to add additional folders.
    • Outlook 2010 set up and updated on client.
    • Can add as many mailboxes as allowed by admin.
  • Search process:
    • Click START
    • Type "Cloud or not - comparison ... " (SBS2K topic for this post)
      • As an example, this thread would start showing up in the results for e-mail hosted in Outlook.
      • Now, if we were also shipping Excel/Word/PP/Publisher files back and forth those would show up in the search results under FOLDERS.

And now the clincher?

  • Type "Philip" in the search field and the following results:
    • Any e-mail to/from name
    • Any contacts with that name.
    • Any Word/Excel/PP/Publisher file title with name
    • _ANY_ Word/Excel/PP/Publisher file with name IN it

That's the biggest advantage an in-house solution has over Cloud. Period.

Search is the one killer-app that saves users gobs of time in a year. That translates to a lot of $$$ for the company in efficiencies gained.

As a result, our in-house/on-premises solutions become a lot more attractive. :)

IMNSHO, working remotely via RemoteApp or OWA feels wrong. I can't search for things as quick as I can when working from a connected desktop. If there is a need to search one needs to jump between OWA and SharePoint Online in order to find it. That is a huge drawback.

Now, with Server 2012 we get DirectAccess. Guess what?

SEARCH ANYWHERE!

In-house just took a _giant_ leap forward. :D

Philip Elder
MPECS Inc.
Microsoft Small Business Specialists
Co-Author: SBS 2008 Blueprint Book

*Our original iMac was stolen (previous blog post). We now have a new MacBook Pro courtesy of Vlad Mazek, owner of OWN.

Windows Live Writer

Wednesday, 9 May 2012

Group Policy Settings Reference for Windows and Windows Server Excel Spreadsheets

Microsoft downloads:

image

Note the new spreadsheet for Windows Server 2012 (8).

image

The spreadsheets support Pivot Tables so it is fairly straightforward to find a specific or group of settings. The Excel Find feature allows for a quick search of the content.

Philip Elder
MPECS Inc.
Microsoft Small Business Specialists
Co-Author: SBS 2008 Blueprint Book

*Our original iMac was stolen (previous blog post). We now have a new MacBook Pro courtesy of Vlad Mazek, owner of OWN.

Windows Live Writer

Tuesday, 24 January 2012

Stuck at Configuring Windows updates – Do not turn off your computer. Try This First Before Anything Else

Lately when setting up a new server or updating a production server that has been up for a few months we have been seeing the following:

image

Windows Server 2008 R2 Enterprise

Configuring Windows updates
32% complete
Do not turn off your computer.

What we have discovered is that after waiting five minutes we can CTRL+ALT+DLT and the log on screen will show up. Sometimes it may take 10, 20, or even 30 minutes or more before we see the log on screen but it does eventually come up.

For whatever reason though the server can be left all to itself in the above state and stay there until we hit the keys.

This is our first step now before running into the update recovery steps that may be required if this does not work.

Philip Elder
MPECS Inc.
Microsoft Small Business Specialists
Co-Author: SBS 2008 Blueprint Book

*Our original iMac was stolen (previous blog post). We now have a new MacBook Pro courtesy of Vlad Mazek, owner of OWN.

Windows Live Writer

Tuesday, 17 January 2012

Server Core–How to Properly Move the Swap File

We have posted on this subject before though the pieces of the puzzle were a bit incoherent due to the comments providing the proper methodology and eventually a link to Sander Berkouwer’s blog post with up to date information.

As is indicated in the second blog post’s comments we find the following methodology:

  1. Create the dedicated partition after the OS partition using DiskPart.
    • We install Server Core to a 50GB partition and FULL to a 75GB partition.
    • We use RAM * 2.5 as a rule.
    • For larger GB where only the Hyper-V Role is running then RAM * 1.
    • We assign the letter S:
  2. wmic computersystem where name=”MyCoreServer” set AutomaticManagedPagefile=False
  3. wmic.exe pagefileset create name="S:\pagefile.sys"
  4. wmic.exe pagefileset where name="S:\\pagefile.sys" set InitialSize=12288,MaximumSize=32768
    • Note the double slash in the file path.
  5. wmic.exe pagefileset where name="C:\\pagefile.sys" delete
  6. shutdown –r –t 0 –f

As per Sander we can check the registry for the settings as well:

  • HKEY_LOCAL_MACHINE\SYSTEM\CurrentControlSet\Control\Session Manager\Memory Management

Some additional reading:

Philip Elder
MPECS Inc.
Microsoft Small Business Specialists
Co-Author: SBS 2008 Blueprint Book

*Our original iMac was stolen (previous blog post). We now have a new MacBook Pro courtesy of Vlad Mazek, owner of OWN.

Monday, 9 January 2012

A Quick Way to Find Server Up-Time in Server Core or Hyper-V Server

Open an elevated command prompt and:

  1. systeminfo | find “System Boot Time:”

Our report:

C:\>systeminfo | find "System Boot Time:"
System Boot Time:          1/3/2012, 11:22:30 AM

Hat tip: Petri: Seven Simple Ways to Find Your Uptime in Windows Server 2008

Note that this command can be run on almost any Windows OS.

UPDATE: Thanks to vNiklas we have the following PowerShell command run via an elevated PowerShell session:

  1. (get-date)-([System.Management.ManagementDateTimeconverter]::ToDateTime((Get-WmiObject win32_operatingsystem).lastbootuptime)) [Enter]

Our output:

PS C:\>  (get-date)-([System.Management.ManagementDateTimeconverter]::ToDateTime((Get-WmiObject win32_operatingsystem).lastbootuptime))


Days              : 6
Hours             : 4
Minutes           : 44
Seconds           : 31
Milliseconds      : 872
Ticks             : 5354718724344
TotalDays         : 6.19759111613889
TotalHours        : 148.742186787333
TotalMinutes      : 8924.53120724
TotalSeconds      : 535471.8724344
TotalMilliseconds : 535471872.4344

Philip Elder
MPECS Inc.
Microsoft Small Business Specialists
Co-Author: SBS 2008 Blueprint Book

*Our original iMac was stolen (previous blog post). We now have a new MacBook Pro courtesy of Vlad Mazek, owner of OWN.

Thursday, 5 January 2012

VM Dynamic VHD Performance On Shared LUNs/Partitions

Many years back we did a lot of performance testing on NT4 and Windows Server 2000 on standalone SCSI and RAID based SCSI arrays for server swap file performance.

It was not uncommon for the swap file to get quite fragmented over time in our experience with no no utilities beyond very expensive third party ones that would help us get things back together.

We got into some very animated discussions with the lead technician out our number 1 client at the time because setting aside a partition for a dedicated swap file was _expensive_.

As a result of that experience we _always_ build all of our servers and high end workstations with a dedicated partition for the OS swap file and Adobe Scratch Files (sometimes with their own SSD).

We carried that experience into our current methodology for configuring the storage setup for a VM’s VHD(s).

Shared Storage and VHDs

When VHDs are going to be hosted on shared storage that will have a number VHDs we set up static VHDs using VHDTool. The VHD files remain contiguous thus avoiding performance degradation over time due to fragmentation that would be experienced with dynamic VHDs.

It is our preference to set up dedicated partitions/LUNs on shared storage for dynamic VHDs when they are required. This leaves room for expansion without concern for fragmentation.

We create dynamic VHDs where portability gives us the option to move the file around. For example we can copy 120GB instead of 1.5TB.

  • Rule of thumb for Hyper-V Storage: Total Storage – 1GB = Available for VHD(s).

We have seen the behaviour where a Hyper-V VM or VMs go into Paused-Critical mode due to storage being full.

So, we make sure that the sum total GB/TB of our static and/or dynamic VHDs stored on that LUN/Partition never exceed the total amount of storage available minus 1 Gigabyte.

Philip Elder
MPECS Inc.
Microsoft Small Business Specialists
Co-Author: SBS 2008 Blueprint Book

*Our original iMac was stolen (previous blog post). We now have a new MacBook Pro courtesy of Vlad Mazek, owner of OWN.

Friday, 30 December 2011

Setting Server Core to MiniDump

When it comes to troubleshooting spontaneous reboots on Server Core we need to make sure that we have some sort of memory dump file.

In some cases we saw dump files such as when we were initially dealing with the CLOCK WATCHDOG TIMEOUT (blog post) issue. But that has not been consistent.

So, to set the Server Core installation to create a MiniDump file we do the following:

  • wmic RECOVEROS set DebugInfoType = 3

Some further reading:

We use the Crash Analyzer for MSDaRT Tool included in the Microsoft Desktop Optimization Pack to work with the dump files.

Philip Elder
MPECS Inc.
Microsoft Small Business Specialists
Co-Author: SBS 2008 Blueprint Book

*Our original iMac was stolen (previous blog post). We now have a new MacBook Pro courtesy of Vlad Mazek, owner of OWN.

Wednesday, 28 December 2011

Hyper-V: Apply Hotfix Before Running Export on Production Server

It seems that there is a bit of a bug in the Hyper-V export function if the destination for the export is receiving data slower than the source is sending it. The export function will continue to cache the export in all available memory until the server stops responding due to memory being exhausted.

Prior to running any export processes on a production server this hotfix should be applied.

Examples where the problem hits is when the export is being run to a USB hard disk that runs at 30MB/Second or across a slower LAN link to another server.

Hat Tip: Tim Barrett of No Geek Left Behind.

Philip Elder
MPECS Inc.
Microsoft Small Business Specialists
Co-Author: SBS 2008 Blueprint Book

*Our original iMac was stolen (previous blog post). We now have a new MacBook Pro courtesy of Vlad Mazek, owner of OWN.

Wednesday, 9 November 2011

A Live Wiki Based Microsoft Update List for Hyper-V

Microsoft has a TechNet Wiki that lists all of the relevant updates and hotfixes for the Hyper-V Role or Hyper-V Server 2008 RTM/R2.

The last update to the Wiki was October 26, 2011.

Also, the Wiki has an RSS feed:

A snip of the Wiki page:

image

//

image

The second from the bottom update dated October 20th looks to be one of the latest on this list as of this writing.

For those of us running virtualization solutions on Hyper-V and failover clusters on Hyper-V this list is very important to monitor.

Philip Elder
MPECS Inc.
Microsoft Small Business Specialists
Co-Author: SBS 2008 Blueprint Book

*Our original iMac was stolen (previous blog post). We now have a new MacBook Pro courtesy of Vlad Mazek, owner of OWN.

Windows Live Writer

Tuesday, 8 November 2011

A Virtualized SBS 2011 and RDS Setup Completed With Some Pics

One of the projects we are just in the process of closing up was the following:

  • Intel Server System SR1695GPRX2AC
    • Intel Xeon X3470 CPU, 32GB Kingston 1066MHz ECC, Intel RS2BL040 RAID + BBU, 300GB 15K SAS in RAID 10
    • Intel Remote Management Module 3 (RMM3LITE) for KVM/out-of-band access to host.
  • Cisco SA520-K9
  • Cisco 48 Port Small Business Series Gigabit Switch
  • APC SMT1500RM2U UPS
    • Provides clean power to the networking components.
  • APC SMT2200RM2U UPS + AP9630 Remote Management
    • Provides clean power to the Intel Server System
  • APC NetShelter VX 24U Enclosure (AR3104)

The software for this solution (Open Value Agreement with the 3 year spread payment option) that covers all users:

  • Small Business Server 2011 Standard
  • Small Business Server 2011 Premium Add-On
    • Windows Server 2008 R2 Standard 1+1 for the host OS.
  • Windows Remote Desktop Services CALs
  • Office Standard
  • Windows Desktop OS Software Assurance + MDOP

Here are some shots of the finished server deploy:

image

  • APC AR3104 from the front.

image

  • APC AR3104 from the rear.

The finished product:

image

We are using SBS 2011 native backup and Windows Server Backup on the RDS server to back up the VMs to Microsoft iSCSI Software Target based VHDs located on the hard drive in the drive dock.

The RDS server hosts an LoB (Line of Business) application being delivered by RD RemoteApp along with Microsoft Office.

This particular client has two satellite offices that will be connecting to the LoB and Office via RemoteApp with a standard DSL Internet connection (3Mbit down and 1Mbit up).

Remote printing via RD RemoteApp is via HP LaserJet Professional P1606dn printers using the most recent HP driver (5.0.1 as of this writing).

We brought in our shop vacuum to clean out the entire area that the server equipment is sitting in. The dust settles over time, so we made sure to start with a clean slate plus we will pop in with the vacuum once every six months or so to keep that area as clean as possible.

A point to consider when it comes to deploying any IT solution into an SMB/SME business is that much of what we do is “virtual”. Meaning that we set up some physical boxes with a bunch of software products and then manage it.

What that means is that “Presentation is Critical”!

Make sure that the solution is tidy with cables tucked neatly away, all surfaces clean (Windex works great), and no papers/paperwork is left lying around the workspace if any.

Another important point when it comes to setting up or visiting a client’s site for any work is to “Leave the scene cleaner than the way we found it”!

That means cleaning up the mess left by the phone line technician or alarm technician that was in that space before us. We may not realize it, but the client notices the state of their space and who makes the messes.

In this case, our client, the business owner is very happy with what they have seen and used on their new IT Solution.

Philip Elder
MPECS Inc.
Microsoft Small Business Specialists
Co-Author: SBS 2008 Blueprint Book

*Our original iMac was stolen (previous blog post). We now have a new MacBook Pro courtesy of Vlad Mazek, owner of OWN.

Windows Live Writer

Monday, 22 August 2011

Hyper-V Server 2008 R2 SP USB Flash Drive Must Have Drivers & Utilities

There are a number of different little utilities that we drop into the _Drivers folder on the USB flash drives we use to load the Hyper-V Server 2008 R2 SP1 OS with. We also put these utilities on our Windows Server 2008 R2 SP1 USB flash drives for standalone Hyper-V deployments.

  • ServerNameJoin.bat
    • NOTE: We drop all Server Core and Hyper-V servers into their own OU where we have all aspects of UAC disabled. Core management does _not_ work with UAC enabled.
      • Change OU structure to match your own.
      • Pause is there to allow us to see if the process succeeded or failed.
      • MYSERVERNAME: Must be the name of the Hyper-V server.
      • MYDOMAIN: Must be the name of the domain.
      • DomainAdmin: Must be the name of an admin account with permissions to join the domain.
    • netdom join MYSERVERNAME /Domain:MYDOMAIN.local /OU:OU=SBSServers-ServerCore,OU=Computers,OU=MyBusiness,DC=MYDOMAIN,DC=local /userd:DomainAdmin /passwordd:*
    • pause
  • John Howard’s HVRemote utility
    • This utility makes configuring the host for domain/domain, domain/workgroup, and the other iterations a breeze.
  • Chris Eck’s VHDTool utility
    • We use this utility to create fixed VHDs on _new_ LUNs/LDs or ones that have been properly initialized.
    • It is fast and easy.
    • NOTE: The size format is in bytes so add those zeroes!
  • Intel’s most recent PROSet driver and command line utility.
  • Appropriate drivers
    • Intel AXXSASIOMOD (LSI) Driver
    • LSI 3442 x64 Driver
    • Intel RAID driver

With the above on our flash drive we are able to jump right into configuring the Hyper-V node for clustering or standalone VM guest delivery.

Philip Elder
MPECS Inc.
Microsoft Small Business Specialists
Co-Author: SBS 2008 Blueprint Book

*Our original iMac was stolen (previous blog post). We now have a new MacBook Pro courtesy of Vlad Mazek, owner of OWN.

Windows Live Writer

Saturday, 16 July 2011

Some Microsoft iSCSI Software Target 3.3 Resources

As we are delving into Microsoft’s free iSCSI Target software there are a number of key resources available to us for the product.

The download is available here:

There are a number of different resources available to us:

The following link is the the Microsoft iSCSI Software Target 3.3 Product Help:

Under Product Help we find a list of operating systems that it can be installed on. Unfortunately it looks as though Windows Storage Server 2008 R2 Essentials is not one of them.

iSCSI Target and Adapter Teaming

One of the notes in the KB and Scalability pages talk about network adapter teaming _not_ being supported.

From that article we find:

Note

Use Microsoft MultiPath IO (MPIO) to manage multiple paths to iSCSI storage. Microsoft does not support teaming on network adapters that are used to connect to iSCSI-based storage devices. This is because the teaming software that is used in these types of configurations is not owned by Microsoft, and it is considered to be a non-Microsoft product. If you have an issue with network adapter teaming, contact your network adapter vendor for support. If you have contacted Microsoft Support, and they determine that teaming is the source of your problem, you might be required to remove the teaming from the configuration and/or contact the provider of the teaming software.

So, we see that the reason given here has to do with the teaming being provided by third parties.

So, off to Intel we go to see what they state:

The answer is “No”. Unequivocally “No”. From the Intel support page:

Adapter Teaming using Intel's ANS is not supported for those ports transferring iSCSI traffic. This is due to limitations of the third-party iSCSI target/initiator software.

For load balancing and failover support in Microsoft Windows* operating systems, you can use Microsoft's* MPIO (MultiPath I/O). Check the Microsoft Initiator User Guide on how to setup MPIO.

If you are planning to use Microsoft MPIO on an Intel® Storage System, please ensure that your firmware supports multi path I/O.

Now, so far our test iSCSI Target box (previous post) has been running fine with the three NICs teamed in Load Balancing Mode. However, since we are running in an unsupported configuration we will look to see about how to configure MPIO on that box.

iSCSI Initiator

Once we have our iSCSI Target set up we need to connect to it!

The iSCSI Initiator Guide for Windows 7 and Windows Server 2008 R2 can be downloaded here:

When working with Server Core R2 installations the iSCSI Initiator GUI can be started by the following command:

  • iscsicpl.exe [Enter]

Server Core iSCSI Initiator GUI

Here is a blog post on enabling this functionality in Server Core 2008 RTM:

iSCSI MPIO Configurations

One aspect that we will need to look into will be how to enable and configure multiple I/O paths to our iSCSI located storage if we were looking to use that storage for clustered VM VHD storage.

For now we will be sticking with our DAS configurations, but there may be a need to look at iSCSI MPIO as an failover cluster storage alternate especially if this type of configuration brings the cost of a 2 node cluster down.

Conclusion

As we can see, there is a _lot_ of reading that needs to be done in order to understand the ins and outs of using Microsoft’s iSCSI Software Target. Plus, we need to check into our backup box’s configuration to figure out how to work iSCSI with multiple NIC ports.

KB2535811 Hat Tip: Susan Bradley

Our previous post: MPECS Inc. Blog: Microsoft Releases iSCSI Software Target Version 3.3 For Windows Server 2008 R2 . . . For Free!

Philip Elder
MPECS Inc.
Microsoft Small Business Specialists
Co-Author: SBS 2008 Blueprint Book

*Our original iMac was stolen (previous blog post). We now have a new MacBook Pro courtesy of Vlad Mazek, owner of OWN.

Windows Live Writer

Friday, 15 July 2011

A Tentative iSCSI Target Host System Setup

We are looking at a number of different system configurations to run Microsoft’s new iSCSI Target Software 3.3 on that will provide us with VM to external storage access.

Now, one of the drawbacks to using one server box with today’s hardware is that we are limited to USB 2.0 data speeds.

Our goal is to find a configuration that will work under high I/O loads over longer periods of time with at least four (4) externally connected hard disks at USB 3.0 and/or eSATA data speeds.

We have tried to run with PCI-E USB 3.0 host bus adapters but so far all are aimed at the consumer desktop space and thus we would not risk them in a server setting. We are looking into some that state that they have USB 3.0 support for Windows Server 2008 R2 but have not yet tested them.

So, tentatively, we are looking at the following configuration to be used as an iSCSI Target box _only_. Other than the external drives connected to the box that will be hooked into both standalone and cluster based VMs for backup the box will not be used.

  • Intel Desktop Board DQ67EP
  • Intel Core i5-2400S
  • 4GB Kingston Non-ECC RAM
  • 2x 250GB Seagate 2.5” SATA drives in RAID 1
  • Antec ISK 300-150 case
  • Intel dual Gigabit Server NIC configured for low profile use

Once we have the Win2K8 Standard R2 SP1 OS installed along with the necessary drivers we installed Microsoft’s free iSCSI Target software. We then teamed the three NICs using the PROSet utility in Load Balancing mode.

Note that the USB 3.0 driver does install correctly while the OS picks up the eSATA ports with built-in drivers. And, both eSATA and USB 3.0 ports support hot swap for the drives.

NOTE: We ran into the same weird behaviour with the USB 3.0 ports and the Vantec NexStar USB 3.0 drive docks where one connected fine but the other would not until we dropped a USB 3.0 hub in between the second NexStar drive dock and its port.

Microsoft iSCSI Software Target

We begin by running the downloaded file:

image

Once the extraction was complete our IE browser opened with:

image

From there we ran the install routine:

image

At one point during the install we were asked about the server’s update settings:

image

We left the setting where it was since our network is managed by WSUS which would pick up on the iSCSI Software Target’s presence.

image

Once the install was complete we opened the new MMC:

image

And we were greeted with:

image

We will run through a separate blog post on how to set up the target and connect the initiator in a separate post. The only quirk we ran into when setting up an iSCSI Target was that we were required to know the IQN for the Initiator ahead of time.

So far, we have run through creating a number of targets, connecting them, configuring the backup, and running the backups.

On the iSCSI Target Host we see:
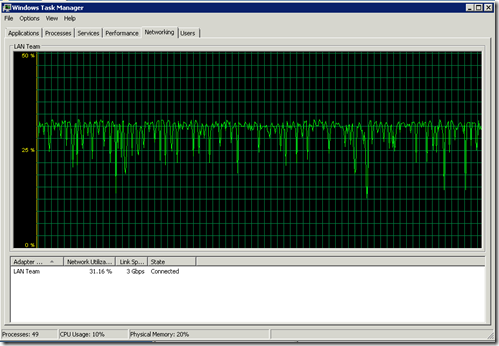
image

On the guest that is running a backup to the iSCSI Target host we see:

image

The throughput shown above is to a target VHD located on an eSATA connected hard disk. So, the real throughput would be about 80MB/Second to 85MB/Second.

We will keep testing the configuration, but it looks like we have a winner here. The box configured without OS is under $1,000.

Philip Elder
MPECS Inc.
Microsoft Small Business Specialists
Co-Author: SBS 2008 Blueprint Book

*Our original iMac was stolen (previous blog post). We now have a new MacBook Pro courtesy of Vlad Mazek, owner of OWN.

Windows Live Writer

Saturday, 9 July 2011

Hyper-V Server 2008 R2 SP1 – Error Applying New Virtual Network Changes – SP1 Specific Fix

A while back we posted instructions on how to reset Hyper-V’s virtual networking if something choked so as to not have to remove and reinstall the Hyper-V Role.

We are setting up a test box with the Hyper-V Role installed for a client that needs to demonstrate to the powers that be that virtualizing desktops running an LoB Terminal client is going to be the best option for them going forward.

When we went to set up the Hyper-V Role but it choked on setting up the vSwitch due to the Intel PROSet team being set to ALB instead of VMLB.

We could not get things to work after that so we went and ran the following commands in an elevated command prompt:

  1. netcfg –u vms_pp [Enter]
  2. netcfg -l c:\windows\winsxs\amd64_wvms_pp.inf_31bf3856ad364e35_6.1.7600.16385_none_beda85050b13680c\wvms_pp.inf -c p -i vms_pp [Enter]

The result for the reinstall command failed though:

C:\>netcfg -l c:\windows\winsxs\amd64_wvms_pp.inf_31bf3856ad364e35_6.1.7600.1638
5_none_beda85050b13680c\wvms_pp.inf -c p -i vms_pp
Trying to install vms_pp ...

..failed. Error code: 0x80070002.

The command failed with error code 0x80070002. A search for this code brings up a lot of different results. But, it looks as though Microsoft KB201318 indicates that it is a “File Not Found” error.

Now, the original post was written for Windows Server 2008 R2 RTM. We are working with Windows Server 2008 R2 SP1, so the first thing to check is whether the folder referenced in the install command above even exists.

image

It does not.

So, looking at what we do have we now need to figure out _which_ of the two indicated folders that share the common prefix is the right one.

Here is a screenshot of the same search from a Win2K8 R2 RTM:

image

There is definitely a significant difference between the freshly installed R2 SP1 and the R2 RTM:

  1. R2 RTM only shows _one_ folder with the correct prefix.
  2. R2 SP1 shows shows not one, but _three_ folders with the correct prefix!

So, what are we to do? One would think that we would find the .INF file in the folder with the highest version number. But, this did not turn out to be the case:

image

The higher version numbers, 6.1.6701.17617 and above, only had the vmsntfy.dll file in them.

The right folder turned out to be 6.1.7601.17514:

image

Sure enough:

image

Our Hyper-V networking was now reinstalled and now cooperating or so we thought:

image

Virtual Network Manager

Setup switch failed.

The operation failed because the file was not found.

Well, since we just ground zeroed Hyper-V networking the last thing to do was to reboot the box.

Once back up and in we then tried to create an externally connected vSwitch and saw the following result:

image

We had our production network access for the VMs that will be running on this test box.

How To Reset Hyper-V Networking In Win2K8 R2 SP1

The correct sequence for resetting the Win2K8 R2 SP1 Hyper-V networking structures are:

  1. Open an elevated command prompt.
  2. netcfg –u vms_pp [Enter]
  3. netcfg -l C:\Windows\winsxs\amd64_wvms_pp.inf_31bf3856ad364e35_6.1.7601.17514_none_c10b98cd0801eba6\wvms_pp.inf -c p -i vms_pp [Enter]
    • Copy and paste into NotePad to verify that there are no line breaks.
  4. shutdown –r –t 0 –f [Enter]
  5. Create the external vSwitch in Hyper-V Manager.

Philip Elder
MPECS Inc.
Microsoft Small Business Specialists
Co-Author: SBS 2008 Blueprint Book

*Our original iMac was stolen (previous blog post). We now have a new MacBook Pro courtesy of Vlad Mazek, owner of OWN.

Windows Live Writer