Showing posts with label Hyper-V Server 2008 R2. Show all posts

Monday, 4 February 2013

How-To: Hyper-V: Kill VM Process hung at Stopping/Starting/Snapshotting

Our search turned up the following:

Our process is as follows:

  1. Open Task Manager
  2. Processes tab
  3. Click View and Select Columns
  4. Select and click OK:
    1. Image Path Name
    2. Command Line
    3. image
  5. Click the Image Name column header to sort.
    1. image
  6. Open Windows Explorer and browse to the Hyper-V folder where the VMs are stored.
    • image
  7. For smaller deploys we open the XML file with NotePad to discover the correct GUID associated with the VM.
  8. In our case it was VMWP.exe with GUID 52806B15-
  9. Terminate the process.

Once the VM’s process has been terminated we can address what was causing the stoppage, which in this case was an errant pass-through USB drive.

Philip Elder
MPECS Inc.
Microsoft Small Business Specialists
Co-Author: SBS 2008 Blueprint Book

Windows Live Writer

Thursday, 10 May 2012

A Couple of Virtualization Scenarios for a 150 Seat Client

The following is our response on the Yahoo SBS2K list to a question about whether to virtualize Exchange or not.

For a client size of 150 users we would look at deploying a 2 node Hyper-V Failover Cluster to give some resilience to the Exchange environment.

  • Dual Xeon E5-2640+, 96GB/Node, 120GB Intel 320 SSD RAID 1 for host OS, Intel R1208GZ 2P 1U server system, dual RS25GB008 SAS HBA for DAS connection/Node, Quad Port i350 Gigabit NIC (comes with we add another), and a few other goodies.
  • Promise VTrak E610sD or HP P2000MSA RAID Subsystems with dual SAS controllers loaded up with 15K SAS or 10K SAS depending on I/O needs. JBODs attached for nearline running 7200RPM SAS.

One suggested VM deployment scenario:

  • VM 1: DC duties and file services
  • VM 2: Exchange 2010
  • VM 3: SQL/Management
  • VM 4: RDS
  • VM 5: VDI/VDA

The servers above would be fully licensed with two Windows Server 2008 R2 Enterprise Open Licenses that give 1+4 virtualization rights. This would be important for those times when the nodes themselves would need to be updated and thus the VMs moved from node to node.

Additional licenses would be required for Exchange, SQL, RDS, and other components. Enterprise CAL would cover much of it except SQL.

Another option would be to virtualize the four VMs on one box.

In that case two systems would need to be addressed:

  • RAM for VMs is paramount.
  • I/O for VMs along with data volume.
  • A high performance hardware RAID solution with flash cache or battery backup. PCI-E Gen 2 at 8x or better.
    • 15K SAS or enterprise grade SSDs would be the request here.
    • 24x 2.5" on board hot swap.
  • Secondary I/O and/or Nearline Storage:
    • Dual SAS HBAs
    • SAS based DAS like VTrak E610sD or HP P2000MSA dual SAS Controllers.
    • Load up with 7200RPM SAS 1TB or 2TB for nearline storage.

The above two options would be along the lines of what we would propose.

Philip Elder
MPECS Inc.
Microsoft Small Business Specialists
Co-Author: SBS 2008 Blueprint Book

*Our original iMac was stolen (previous blog post). We now have a new MacBook Pro courtesy of Vlad Mazek, owner of OWN.

Windows Live Writer

Tuesday, 8 May 2012

LSI SAS6160 Switch First Look

We are looking to scale out our two node Hyper-V failover cluster configuration beyond the two redundant SAS connections per controller on the Promise VTrak E610sD RAID Subsystem.

So, we brought in a couple LSI 6Gbit/Second SAS switches.

image

We see the possibility of going beyond the maximum six nodes in the Intel Modular Server using Intel R1208GZ Server Systems (previous blog post) with dual Intel RS25GB008 SAS Host Bus Adapters.

It will be interesting to see when we connect all four external SAS connectors on the two RS25GB008 HBAs for a total of four quad port SAS connections running at 6Gbit/Second at each port what kind of throughput, bandwidth, and IOPs we will see.

We have the switch out of the box, plugged in, and powered up. We changed a Windows 7 VM’s IP address to 192.168.1.101 so that we would be able to connect to the switch at its default static IP of 192.168.1.100.

Note that Java is required to connect to the management console.

image

The default username and password:

  • Username: admin
  • Password: admin
  • Default IP: 192.168.1.100

Once logged in we are greeted with the SAS Domain Manager GUI:

image

From there we went into the Operations tab so we could configure networking for management:

image

Now, the next step in the process is to get the firmware updated if need be.

Out of the box this particular switch has 200.10 which has the publishing date of August 1, 2011.

image

So, in this case it looks as though we need to run through the upgrade process as indicated in the above KB article twice to get to the most recent version. The KB is very specific about the process too!

Note that the dates must be goofy on the downloads because the April 11th download is Phase 12 with a later version number than the firmware the switch came with.

Once we have run through the firmware updates we will be plugging in the four Intel Server System SR1695GPRX2AC servers with dual 3Gbit/Second SAS connections each into the two switches we have for a fully redundant configuration.

We will start with one Promise VTrak E610sD RAID Subsystem for destination storage. We will add a second E610sD once we have worked our way through the first few rounds of configuration and testing.

More to come . . .

Philip Elder
MPECS Inc.
Microsoft Small Business Specialists
Co-Author: SBS 2008 Blueprint Book

*Our original iMac was stolen (previous blog post). We now have a new MacBook Pro courtesy of Vlad Mazek, owner of OWN.

Windows Live Writer

Monday, 30 April 2012

Confirmed: Intel Server System R1208GZ Integration For Our 2 Node Hyper-V Failover Cluster Is A Go Plus RemoteFX Compatibility!

We mentioned that we were looking at the new Intel Xeon E5-2600 series 1U and 2U server systems.

We now have it on good authority that an external LSI based SAS connector is available in the Intel RAID Controller RS25GB008:

image

Not only that we have the nVidia Tesla C2070 series and the PNY nVidia Quadro 6000 series graphics processors showing as being compatible with this particular server system.

We would be utilizing a 2U configuration if we were going to run with RemoteFX capabilities for our client’s VDI needs though. These boards are quite large so won’t fit in t 1U chassis depending on the add-on components are installed on the server board.

Since these particular adapters show up on the R1208GZ series 1U we checked to see if the R2208GZ series 2U configuration has them:

image

image

They do indeed.

Now to see if we can gain access to either of the graphics products to run some tests on our own setups! They are quite expensive. :)

We are one step closer to Private Cloud and RemoteFX based VDI!

Philip Elder
MPECS Inc.
Microsoft Small Business Specialists
Co-Author: SBS 2008 Blueprint Book

*Our original iMac was stolen (previous blog post). We now have a new MacBook Pro courtesy of Vlad Mazek, owner of OWN.

Windows Live Writer

Thursday, 26 April 2012

Production Hyper-V Failover Cluster on an Intel Modular Server Pictures

The following are some shots of one of the Intel Modular Server based Hyper-V Failover Clusters that we have deployed.

image


This particular three node Hyper-V Failover Cluster is set up with 14x 146GB 15K Seagate SAS drives configured in three Storage Groups in the built-in IMS SAN. One for the Hyper-V OSs, one for VM OS partitions, and another for a high I/O SQL database setup.

The IMS has both SAS Storage Controllers and both Ethernet Switch Modules installed. Each Compute Module has a mezzanine card installed to bring the total Gigabit NIC connections to four.

The Promise VTrak E310sD was added about a year later to open storage up for the SBS 2008 VM and also add Windows Desktop OS based VMs for a VDI deployment.

There are two Trip-Lite Rack Mount enclosures in this deploy. Unfortunately APC did not have a 24U unit available when this deployment was done so we had to run with them. APC is the vendor of choice for our rack enclosure and UPS needs.

The IMS, Intel Server System SR1630HGP 1U 1P that provides standalone DC services, the Promise VTrak, and the backup destination drives are housed in one.

The second APC Rack Mount enclosure has all of the APC UPS components:

image

A 6000KV head unit with four additional 192V battery packs give the cluster about 8-10 hours of run time. Near the top of the stack is the 208V to 120V transformer. A network management card is installed in the UPS head unit for total power control and monitoring.

A separate set of SUA1500RM2U APC UPS units are used for the networking, 1U DC, and the backup destination drives to give us some power control granularity.

Philip Elder
MPECS Inc.
Microsoft Small Business Specialists
Co-Author: SBS 2008 Blueprint Book

*Our original iMac was stolen (previous blog post). We now have a new MacBook Pro courtesy of Vlad Mazek, owner of OWN.

Windows Live Writer

Monday, 9 April 2012

Microsoft Updates for Hyper-V RSS Feeds

Here are some Microsoft updates Web lists with RSS feeds for the Hyper-V Role and Server:

There will be additional feeds once Windows Server 8 gets its name and is released to manufacturing.

Hat Tip: Susan Bradley

Philip Elder
MPECS Inc.
Microsoft Small Business Specialists
Co-Author: SBS 2008 Blueprint Book

*Our original iMac was stolen (previous blog post). We now have a new MacBook Pro courtesy of Vlad Mazek, owner of OWN.

Windows Live Writer

Tuesday, 27 March 2012

Deployed 2 Node 2U Intel Server System Hyper-V Failover Cluster With Pics

Here are some shots of one of the mid-level 2 node cluster configurations we are currently deploying.

image

image

The above configuration is as follows:

  • UPS Structure
    • 3x APC SMT1500RM2U
  • Servers
    • 2x Intel Server System SR2625URLX
      • Dual Intel Xeon E5645 Hex Core, 96GB ECC, Intel RAID, RAID 1 OS, Dual LSI External SAS, Intel RMM3
    • 1x Promise VTrak E610sD RAID Subsystem
      • Dual SAS Controller
      • 12x 300GB 15K Seagate SAS
    • 1x HP MicroServer
      • 8GB with RAC installed.
      • Windows Server 2008 R2 Standard acting as DC and Hyper-V for management VM.
  • Switching
    • Cisco SA520 Security Appliance
    • Cisco 48-Port Gigabit Web managed switch.

There are a few other items involved here including the APC 24U enclosure.

The closet this setup is installed into is climate controlled via Haier 12K BTU twin hose A/C unit. It keeps the space well cooled all year round.

VMs running on this cluster are:

  • SBS 2011 Standard
    • 4 vCPUs, 24GB RAM
  • Windows Server 2008 R2 Standard with RDS
    • 2 vCPUs, 8GB RAM
  • Windows Server 2008 R2 Standard with SQL
    • 4 vCPUs, 16GB RAM
  • Windows 7 and XP VMs
    • Windows 7: 2 vCPUs, 2-4GB RAM
    • XP Pro: 2 vCPUs, 2GB RAM

Philip Elder
MPECS Inc.
Microsoft Small Business Specialists
Co-Author: SBS 2008 Blueprint Book

*Our original iMac was stolen (previous blog post). We now have a new MacBook Pro courtesy of Vlad Mazek, owner of OWN.

Windows Live Writer

Friday, 20 January 2012

Some thoughts on a Hyper-V Mini-Cluster

While working on a FreeBSD grid system many years ago we came across the following that we used as a model for our own designs:

image

image

Mr. Gardner built a beautiful machine from the ground up.

The project we were working on at the time was scrapped due to a number of external factors.

However, the knowledge we gained in trying to create a grid based on FreeBSD helped to gain a grasp on how we were to go about building a Hyper-V cluster a number of years back when documentation was sadly lacking.

And that brings us to the point of this blog post:

image

Intel’s new Intel Server Board S1200KP in Mini-ITX form factor.

And, while searching for a quality image of the board we hit this gem:

image

That is a really neat looking box and fits right in with some of the directions we were looking at. One catch though is that the box is made in the Ukraine! :(

It looks as though they really ran the gamut as far as the setup for a Mini-ITX based solution. Management and redundancy is built right in. Kewl!

In the end we may look at a low power cluster configuration for folks wanting some redundancy at an ultra-low entry price point. How that materializes is yet to be seen.

Born to tinker. ;)

Philip Elder
MPECS Inc.
Microsoft Small Business Specialists
Co-Author: SBS 2008 Blueprint Book

*Our original iMac was stolen (previous blog post). We now have a new MacBook Pro courtesy of Vlad Mazek, owner of OWN.

Tuesday, 17 January 2012

Server Core–How to Properly Move the Swap File

We have posted on this subject before though the pieces of the puzzle were a bit incoherent due to the comments providing the proper methodology and eventually a link to Sander Berkouwer’s blog post with up to date information.

As is indicated in the second blog post’s comments we find the following methodology:

  1. Create the dedicated partition after the OS partition using DiskPart.
    • We install Server Core to a 50GB partition and FULL to a 75GB partition.
    • We use RAM * 2.5 as a rule.
    • For larger GB where only the Hyper-V Role is running then RAM * 1.
    • We assign the letter S:
  2. wmic computersystem where name=”MyCoreServer” set AutomaticManagedPagefile=False
  3. wmic.exe pagefileset create name="S:\pagefile.sys"
  4. wmic.exe pagefileset where name="S:\\pagefile.sys" set InitialSize=12288,MaximumSize=32768
    • Note the double slash in the file path.
  5. wmic.exe pagefileset where name="C:\\pagefile.sys" delete
  6. shutdown –r –t 0 –f

As per Sander we can check the registry for the settings as well:

  • HKEY_LOCAL_MACHINE\SYSTEM\CurrentControlSet\Control\Session Manager\Memory Management

Some additional reading:

Philip Elder
MPECS Inc.
Microsoft Small Business Specialists
Co-Author: SBS 2008 Blueprint Book

*Our original iMac was stolen (previous blog post). We now have a new MacBook Pro courtesy of Vlad Mazek, owner of OWN.

Saturday, 14 January 2012

TechNet Partner Forums: Hyper-V Failover Cluster Network Recommendations

This is a post on the TechNet Forums:

A direct copy and paste from the forum post with emphasis added by us:

Thanks for your post. I'm Lamb from Microsoft Partner support team.

From your description, you need an official recommendation of how we design the Hyper-v Cluster Networks. If I misunderstand it, please correct me.

First, I'd like to answer your question:

Q: "whether or not Microsoft still recommends a dedicated heartbeat / cluster network"

A: Yes, we recommend. But the requirement is removed.

Simply speaking, it is just an option.

Client access does not interfere with heartbeat, etc. Heartbeat can be running on either network ,where clients can access.

The suggestions below should help you more.

If you have more questions, please feel free to post back.

More suggestions:

1. I think that this article should solve your problem in the post, perfectly:

Hyper-V : How many network cards do I need?
http://blogs.technet.com/b/gavinmcshera/archive/2011/03/27/3416313.aspx

2. To understand how heartbeart co-works with client-access, I think that you need to read the following article.

This article tells you how to decide how we use a Network in a cluster.

Modify Network Settings for a Failover Cluster
http://technet.microsoft.com/en-us/library/cc725775.aspx

3. And, each network has a priority/metric.

Normally, this metric is decided by cluster itself.

And, for CSV&Live-migration, you can decide which network to use.

For CSV:
Designating a Preferred Network for Cluster Shared Volumes Communication
http://technet.microsoft.com/en-us/library/ff182335(WS.10).aspx

For live-migration:
search for "To configure a cluster network for live migration" in:
Hyper-V: Using Live Migration with Cluster Shared Volumes in Windows Server 2008 R2
http://technet.microsoft.com/en-us/library/dd446679(WS.10).aspx

4. And, we can manually change the metric, according to this article:

Configuring Network Prioritization on a Failover Cluster
http://blogs.msdn.com/b/clustering/archive/2011/06/17/10176338.aspx


Best regards,
Lamb Shu
Partner Online Technical Community
-----------------------------------------------------------------------------------------
We hope you get value from our new forums platform! Tell us what you think:
http://social.microsoft.com/Forums/en-US/partnerfdbk/threads
------------------------------------------------------------------------------------------
This posting is provided "AS IS" with no warranties, and confers no rights.

Hat Tip: Susan Bradley

Philip Elder
MPECS Inc.
Microsoft Small Business Specialists
Co-Author: SBS 2008 Blueprint Book

*Our original iMac was stolen (previous blog post). We now have a new MacBook Pro courtesy of Vlad Mazek, owner of OWN.

Friday, 13 January 2012

Hyper-V Failover Cluster: A Big Picture View Of How It Works

This post is from a post just made on the TechNet Forums: Shared LUN between VM’s.

Question

I am new to Hyper-V and have a question about a shared LUN between two VM's. I Have a LUN on a Dell SAN and I have granted access to it to a group of servers within the Dell Storage Manager. I can mount the volume on both VM's  but when I put data on the volume on one server the other server does not see the same data. Is this by design or am I doing something wrong? Can I not mount a shared LUN on two VM's at the same time so they both see the same data?

Our Answer

What you are trying to do is like trying to connect one physical hard drive to two different servers. This is not possible.

If you are looking to make that data redundant so that if one server fails the other keeps sharing it then you need a failover cluster.

In that case two physical machines are connected to the same storage and run Hyper-V in Failover Cluster mode. On top of Hyper-V will run what is called a Highly Available Virtual Machine with Windows Server 2008 R2 SP1 as an Operating System. That Virtual Machine would be set up to connect to the shared storage and deliver the shared folders to your network.

If Node 1 in the failover cluster fails then Node 2 takes over. If the VM was running on Node 1 at the time of the failure then the VM will behave just like a physical server would if the reset button was hit. The VM will transfer to Node 2 and boot the OS back up.

If the VM was already on Node 2 then things keep humming along while the problems with Node 1 are addressed.

If Node 1 fails and the shared storage is hosted on Node 1 all of the Reads/Writes to that storage get cached by the cluster until Node 2 takes the shared storage over. Once Node 2 takes over, this can take a few seconds, all of the Reads/Writes to that shared storage get done on the actual SAN.

Windows Server 8 looks like it may have a somewhat different approach to this dilemma but we have not approached it beyond building a standard Hyper-V Failover Cluster using 2 nodes and a DAS SAN on the Developer Preview currently available as of this writing.

Conclusion

We believe that a Hyper-V Failover Cluster is an excellent option for clients that are downtime conscious. We have done a number of SBS 2011 deploys on a 2 node failover cluster setup with our clients being quite satisfied with the performance and enhanced availability for their critical data and e-mail.

Philip Elder
MPECS Inc.
Microsoft Small Business Specialists
Co-Author: SBS 2008 Blueprint Book

*Our original iMac was stolen (previous blog post). We now have a new MacBook Pro courtesy of Vlad Mazek, owner of OWN.

Monday, 9 January 2012

A Quick Way to Find Server Up-Time in Server Core or Hyper-V Server

Open an elevated command prompt and:

  1. systeminfo | find “System Boot Time:”

Our report:

C:\>systeminfo | find "System Boot Time:"
System Boot Time:          1/3/2012, 11:22:30 AM

Hat tip: Petri: Seven Simple Ways to Find Your Uptime in Windows Server 2008

Note that this command can be run on almost any Windows OS.

UPDATE: Thanks to vNiklas we have the following PowerShell command run via an elevated PowerShell session:

  1. (get-date)-([System.Management.ManagementDateTimeconverter]::ToDateTime((Get-WmiObject win32_operatingsystem).lastbootuptime)) [Enter]

Our output:

PS C:\>  (get-date)-([System.Management.ManagementDateTimeconverter]::ToDateTime((Get-WmiObject win32_operatingsystem).lastbootuptime))


Days              : 6
Hours             : 4
Minutes           : 44
Seconds           : 31
Milliseconds      : 872
Ticks             : 5354718724344
TotalDays         : 6.19759111613889
TotalHours        : 148.742186787333
TotalMinutes      : 8924.53120724
TotalSeconds      : 535471.8724344
TotalMilliseconds : 535471872.4344

Philip Elder
MPECS Inc.
Microsoft Small Business Specialists
Co-Author: SBS 2008 Blueprint Book

*Our original iMac was stolen (previous blog post). We now have a new MacBook Pro courtesy of Vlad Mazek, owner of OWN.

Thursday, 5 January 2012

VM Dynamic VHD Performance On Shared LUNs/Partitions

Many years back we did a lot of performance testing on NT4 and Windows Server 2000 on standalone SCSI and RAID based SCSI arrays for server swap file performance.

It was not uncommon for the swap file to get quite fragmented over time in our experience with no no utilities beyond very expensive third party ones that would help us get things back together.

We got into some very animated discussions with the lead technician out our number 1 client at the time because setting aside a partition for a dedicated swap file was _expensive_.

As a result of that experience we _always_ build all of our servers and high end workstations with a dedicated partition for the OS swap file and Adobe Scratch Files (sometimes with their own SSD).

We carried that experience into our current methodology for configuring the storage setup for a VM’s VHD(s).

Shared Storage and VHDs

When VHDs are going to be hosted on shared storage that will have a number VHDs we set up static VHDs using VHDTool. The VHD files remain contiguous thus avoiding performance degradation over time due to fragmentation that would be experienced with dynamic VHDs.

It is our preference to set up dedicated partitions/LUNs on shared storage for dynamic VHDs when they are required. This leaves room for expansion without concern for fragmentation.

We create dynamic VHDs where portability gives us the option to move the file around. For example we can copy 120GB instead of 1.5TB.

  • Rule of thumb for Hyper-V Storage: Total Storage – 1GB = Available for VHD(s).

We have seen the behaviour where a Hyper-V VM or VMs go into Paused-Critical mode due to storage being full.

So, we make sure that the sum total GB/TB of our static and/or dynamic VHDs stored on that LUN/Partition never exceed the total amount of storage available minus 1 Gigabyte.

Philip Elder
MPECS Inc.
Microsoft Small Business Specialists
Co-Author: SBS 2008 Blueprint Book

*Our original iMac was stolen (previous blog post). We now have a new MacBook Pro courtesy of Vlad Mazek, owner of OWN.

Friday, 30 December 2011

Setting Server Core to MiniDump

When it comes to troubleshooting spontaneous reboots on Server Core we need to make sure that we have some sort of memory dump file.

In some cases we saw dump files such as when we were initially dealing with the CLOCK WATCHDOG TIMEOUT (blog post) issue. But that has not been consistent.

So, to set the Server Core installation to create a MiniDump file we do the following:

  • wmic RECOVEROS set DebugInfoType = 3

Some further reading:

We use the Crash Analyzer for MSDaRT Tool included in the Microsoft Desktop Optimization Pack to work with the dump files.

Philip Elder
MPECS Inc.
Microsoft Small Business Specialists
Co-Author: SBS 2008 Blueprint Book

*Our original iMac was stolen (previous blog post). We now have a new MacBook Pro courtesy of Vlad Mazek, owner of OWN.

Wednesday, 28 December 2011

Hyper-V: Apply Hotfix Before Running Export on Production Server

It seems that there is a bit of a bug in the Hyper-V export function if the destination for the export is receiving data slower than the source is sending it. The export function will continue to cache the export in all available memory until the server stops responding due to memory being exhausted.

Prior to running any export processes on a production server this hotfix should be applied.

Examples where the problem hits is when the export is being run to a USB hard disk that runs at 30MB/Second or across a slower LAN link to another server.

Hat Tip: Tim Barrett of No Geek Left Behind.

Philip Elder
MPECS Inc.
Microsoft Small Business Specialists
Co-Author: SBS 2008 Blueprint Book

*Our original iMac was stolen (previous blog post). We now have a new MacBook Pro courtesy of Vlad Mazek, owner of OWN.

Tuesday, 13 December 2011

Hyper-V Host in Workgroup and Management Client in Domain Error after Password Change: You do not have the required permission to complete this task . . .

The password for the domain account just rotated at one of our client sites where we have the beginnings of a two node cluster (1 node and 1 Promise VTrak).

After changing the password for the account on the node and then for the domain account we logged off the management machine. Once we logged back in we saw:

image

  • Hyper-V Manager: Virtual Machines
    • You do not have the required permission to complete this task. Contact the administrator of the authorization policy for the computer “HV_Node”

We used John Howard’s HVRemote utility to configure the node which is currently in a workgroup and the management Windows 7 desktop VM that is a member of the SBS 2011 DC running as a guest on the node.

To start with, we ran the following command on the Windows 7 desktop:

  • cmdkey /add:HV_Node /user:HV_Node\FirstLast /pass
    • Enter the password for 'HV_Node\FirstLast' to connect to 'HV_Node':
  • CMDKEY: Credential added successfully.

We then opened the MMC that we created using the domain user’s credentials that was synchronized with the node and we saw the following in the Hyper-V Management node:

image

We were then good to go and manage the node and its features along with the VMs on it.

Philip Elder
MPECS Inc.
Microsoft Small Business Specialists
Co-Author: SBS 2008 Blueprint Book

*Our original iMac was stolen (previous blog post). We now have a new MacBook Pro courtesy of Vlad Mazek, owner of OWN.

Monday, 28 November 2011

Failover Cluster Manager: Deleting a Cluster

Now that we have gone through our preliminary testing with the Huawei Symantec Oceanspace S2600 storage system, we are looking to reset the cluster nodes so that we can hook them up to another storage device for more testing or for client backup recovery purposes using a Promise VTrak E610sD.

To remove the cluster we start by deleting any highly available VMs from the cluster.

image

Once all VMs are removed we then evict Node-2 from the cluster.

The final step is to Destroy the cluster:

image

Are you sure?

image

After clicking the Destroy button we see:

image

Failover Cluster Manager then removes all reference to the previously existing cluster.

When we check Active Directory the object for the cluster was disabled:

image

We then deleted the AD object and moved on to clean-up on the nodes themselves which included removing the MPIO settings for the Oceanspace S2600.

We may leave them configured as they are for the next job or we may wipe them clean and start fresh. That all depends on what cluster related project is coming down the pipe!

Philip Elder
MPECS Inc.
Microsoft Small Business Specialists
Co-Author: SBS 2008 Blueprint Book

*Our original iMac was stolen (previous blog post). We now have a new MacBook Pro courtesy of Vlad Mazek, owner of OWN.

Huawei Symantec Oceanspace S2600 Configuration

We now have our RAID Group set up with the configuration set at RAID 10.
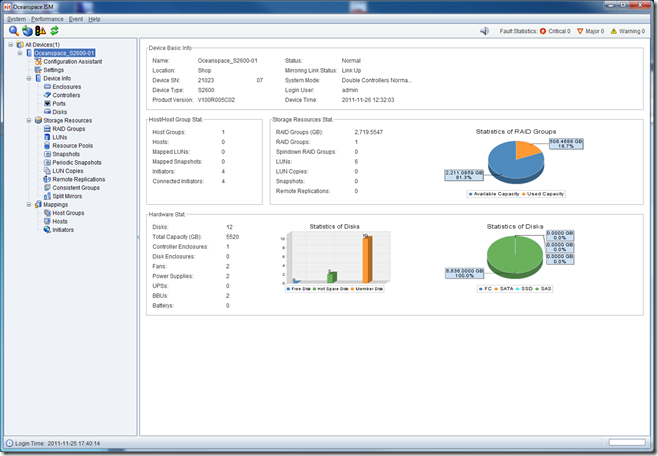
image

We then went ahead and configured our LUNs:
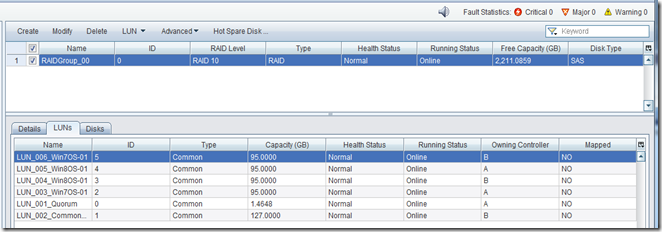
image

We have our two Intel Server System SR1695GPRX2AC units plugged in and turned on as can be seen under the Host section (4 Initiators).
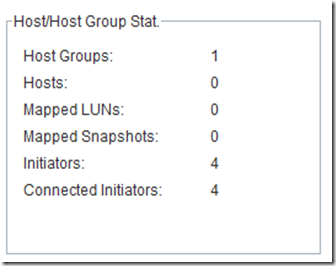
image

At the bottom of the left hand column under Mappings in the ISM we find our four SAS initiators for the two nodes:
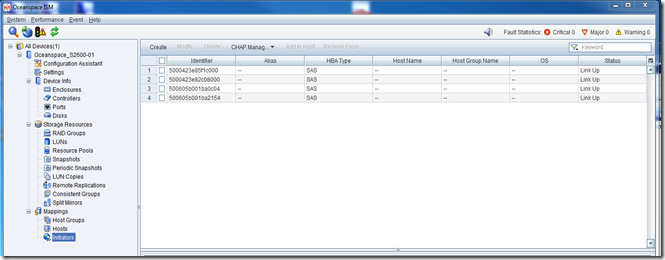
image

It took a bit to figure out just how to get the SAS IDs mapped to the LUNs. First we shut down the second node so that we would know which IDs belonged to which server:

image

We mapped them to the appropriate node:

image

Then we went to map the actual LUNs to the Hosts:
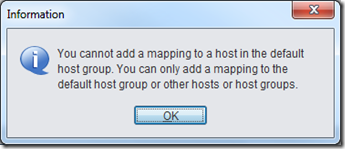
image

So, we moved to the Host Groups node in the left hand column of the ISM and went through the Add LUN Mapping wizard. Despite the way things looked, when we selected all of the LUNs they were given a sequential LUN ID.
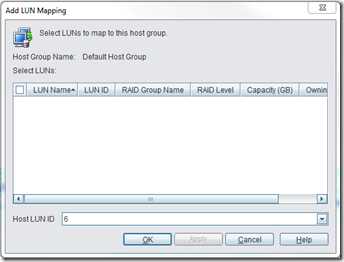
image

That Host LUN ID drop down list near the bottom is a bit misleading.

We then had our LUNs mapped to the Default Host Group:
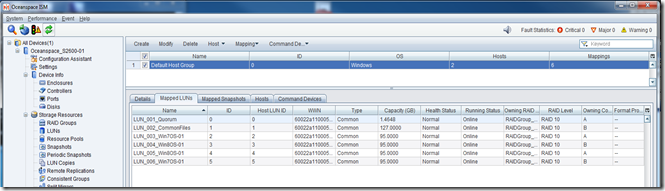
image

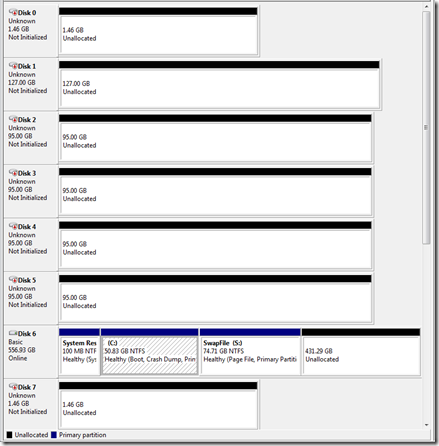
With that the shared storage showed up in both node’s Disk Management!

Now on to setting up MPIO in the Hyper-V node, running the Cluster Validation Wizard, and finally standing up a Hyper-V Failover Cluster for some further testing.

Some Initial Observations

Disk and LUN Configuration

Our primary DAS product has been the Promise VTrak E610sD and E310sD RAID subsystems. So, working with the Oceanspace S2600 has been a bit of a challenge since the management console and set up steps are quite different.

For one, the Oceanspace S2600 does not allow LUN level disk RAID configuration. The RAID Group that is configured with however many disks carries the RAID level.

This contrasts with the Promise VTrak’s ability to create a Disk Array and then set up whatever RAID level for each LUN we may set up in that Disk Array.

The cost is some storage space where RAID 1 would be specified for certain LUNs that would host low I/O needs such as RDS or SQL host OSs.

However, that would be balanced out with the fact that running RAID 10 underneath everything means that every LUN on the Oceanspace S2600 would receive the benefit of higher throughput.

Management Console

The Promise VTrak’s Web based management console is quite feature complex relative to the Oceanspace S2600’s console.

The plus side for the Oceanspace S2600 console is that it was quite simple to pick up on how to set up storage for our needs with very little reading needing to be done (primarily to get to know the nomenclature).

In the end, preference for one console over another is subjective. In both cases, the respective vendor’s Management Console gets the job done and that is what is most important to us.

MPIO Setup

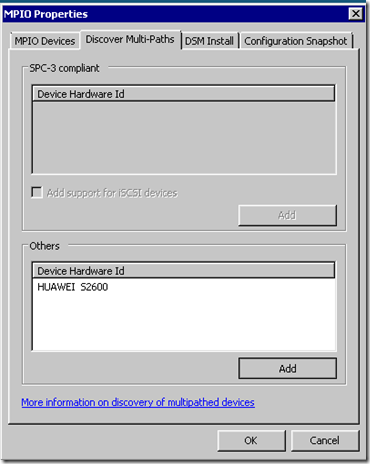
It took a couple of reboots after removing any MPIO device references, then running:

  • mpclaim –n –i –a (reboot)

Finally, in MPIOCPL.exe we saw the following on Node-01:
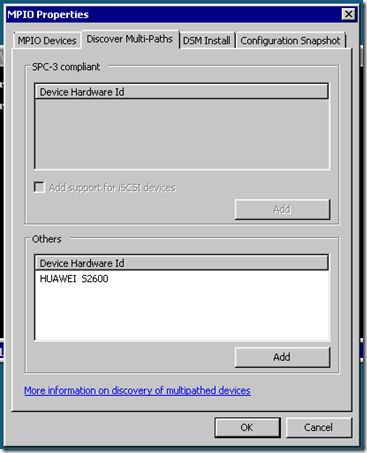
image

We then saw:

image

After a minute or two we finally had:
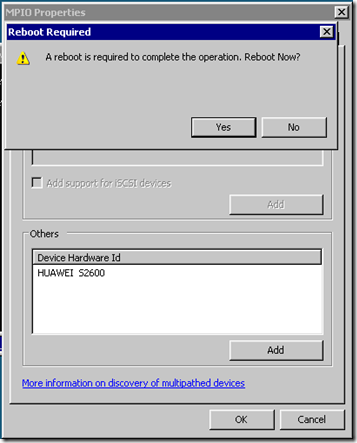
image

One reboot later:

image

But, our second node was still blank:
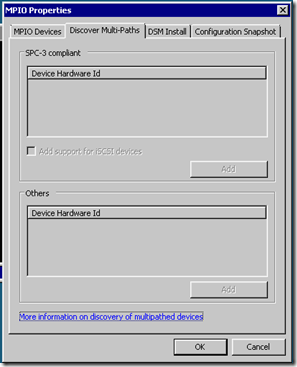
image

We manually added the Device Hardware ID as per the other node:
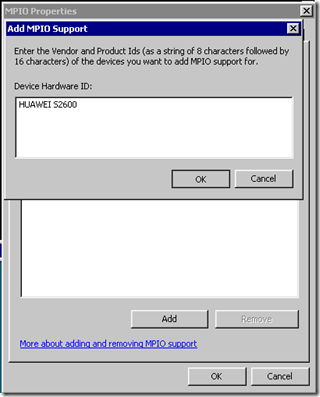
image

After a reboot and another mpclaim –n –i –a we finally had doubles of everything! One reboot later and we finally had our shared storage configured and ready for the Failover Cluster Manager’s Cluster Validation Wizard!

Long story short we had a lot of problems getting one of our nodes (they are identical all the way through) to recognize both SAS paths to the Oceanspace S2600.

Philip Elder
MPECS Inc.
Microsoft Small Business Specialists
Co-Author: SBS 2008 Blueprint Book

*Our original iMac was stolen (previous blog post). We now have a new MacBook Pro courtesy of Vlad Mazek, owner of OWN.

Friday, 25 November 2011

Huawei Symantec Oceanspace S2600 Entry Level Storage System

It is no secret that we are working on a commodity based 2 node Hyper-V Cluster to put our SMB clients into the running for high availability server systems.

As a result, Huawei Symantec (Huawei is pronounced: Wah-Way) graciously sent us one of their new entry level direct attached storage units the Oceanspace S2600.

Once we had the S2600 out of the box and on the bench we plugged the supplied RJ45 to Serial Cable into our Tecra S10’s serial port and fired up TeraTerm using the default settings. We made sure to have controller A’s network connection plugged in as well.

Once the unit finished its first boot sequence we needed to change the default IP address using the serial connection.

  • Oceanspace S2600 default username and password:
    • admin
    • 123456
  • Oceanspace S2600 default network settings:
    • IP: 192.168.128.101 or 102
    • Subnet: 255.255.0.0
  • Oceanspace S2600 Serial settings:
    • Bits per second: 115200, Data bits: 8, Parity: None, Stop bits: 1, Flow: None.

To change the default IP address we logged into the command line on our Tecra and ran the following command:

  • chgctrlip –c A –a 192.168.95.210 –s 255.255.255.0 –g 192.168.95.1

Once we had a successful IP change we were able to bring up the Oceanspace ISM:

image

Once we clicked on the Launch Oceanspace ISM link we needed to allow a file download which lead to:

image

We were then prompted for a Windows Firewall exception. Once made:

image

We left the default at English.

image

Despite being launched from the Oceanspace S2600’s web page found at the assigned IP address we had to go through a discovery process once into the ISM:

image

The device was promptly found:

image

We were then into the ISM console itself:

image

Now the next step will be to set up the storage subsystem and see how the S2600 hooks up to our 2 Intel Server Systems via SAS and set up a Hyper-V cluster for some performance testing.

Philip Elder
MPECS Inc.
Microsoft Small Business Specialists
Co-Author: SBS 2008 Blueprint Book

*Our original iMac was stolen (previous blog post). We now have a new MacBook Pro courtesy of Vlad Mazek, owner of OWN.