Saturday, 14 November 2009

What A BitLocker Encrypted Drive Looks Like On Another PC

It looks like this:

image

After refreshing the view it looks like this:

image

And, in Windows Explorer after clicking on the encrypted partition showing as G: with no file system indicator we get:

image

The above screenshots are from the Tecra S10’s 160GB spindle based hard disk that has since been replaced by an Intel X-25 M 160GB SSD.

The E: partition was the Active one that contained the BCD database and other files needed for the initial boot of the Windows 7 Enterprise.

The E: partition was actually a misguided attempt at setting up BitLocker with Windows 7 since the discovery that Windows 7 would create its own 100MB partition for the boot content was made after the fact.

This time around, we allowed Windows to install into the new SSD without touching any of the partitioning and we now have a BitLocker encrypted SSD in the Tecra S10 with nothing more than a small Active partition. The encryption process looks to be more CPU dependent that drive I/O dependent as the encryption time may have been reduced by 35%.

So, any guesses on whether the data in that encrypted partition is accessible? Perhaps by someone with a lot of horsepower like law enforcement or perhaps an organized crime syndicate of some sort . . . maybe.

For now, with BitLocker we have taken the best possible precautions at protecting the data on that drive and can be reasonably assured that the data will remain intact until we wipe the drive using a DoD 7 pass erase.

For that DoD 7 pass wipe we use a freeware product called Eraser. It is an excellent little utility that allows us to wipe as many drives as this particular system can handle (7+ drives).

Philip Elder
MPECS Inc.
Microsoft Small Business Specialists
Co-Author: SBS 2008 Blueprint Book

*Our original iMac was stolen (previous blog post). We now have a new MacBook Pro courtesy of Vlad Mazek, owner of OWN.

Windows Live Writer

Friday, 13 November 2009

Scorpion Software AuthAnvil Authentication Keyfob Tokens Have Arrived

While at the SMB Nation Fall Conference we took advantage of Scorpion Software’s bundled special.

We had a package arrive not long after we did that with five AuthAnvil tokens in it. Though they are not on the integration To Do list yet.

Once we have migrated our SBS to 2008, we will get in touch with Scorpion to schedule an installation training session that they are providing as part of the package.

Once we have done that, we will then have two factor authentication in place for our own network.

We will then begin to talk to our clients about augmenting their security setup with the AuthAnvil.

Scorpion Software has a good demonstration video here:

Check out some of the auditing features that are demonstrated near the end of the demo video. For folks that have one username for many tasks, AuthAnvil can actually track which user logged in using that account and from where.

This is a pretty neat product and should be a serious consideration for any organization dealing with sensitive client data.

Philip Elder
MPECS Inc.
Microsoft Small Business Specialists
Co-Author: SBS 2008 Blueprint Book

*Our original iMac was stolen (previous blog post). We now have a new MacBook Pro courtesy of Vlad Mazek, owner of OWN.

Windows Live Writer

Replacing a MacBook Pro Drive With An SSD and Upgrading the RAM

Okay, so we found this great video online that shows how to take things apart and put them back together.

Now, in the above case, the replacement hard drive seemingly had an OS already on it and according to the comments he used a cloning method in a previous video to do that.

Well, since the MacBook Pro had already been messed around with, tweaked, and essentially made non-standard, it was time to start fresh anyway.

Once we had the MacBook Pro opened up we started with the memory:

image

Note the Seagate 160GB 5400RPM SATA drive in the bottom left hand corner of the above shot.

We upgraded the memory using Kingston’s 4GB kit:

We then used a 160GB Intel X25-M second generation drive to replace the Maxtor:

image

Now, being that we do _a lot_ of hard drive upgrades and changes with a fresh install of the Windows OS, this process was supposed to be a no-brainer.

But, this is what we were greeted with when the MacBook Mac OS X Snow Leopard DVD booted up:

image

Since Windows would have the drive listed there despite the fact that it was untouched, the above screen was a bit disconcerting at first.

Just in case, we powered the unit down and pulled off the bottom cover to verify that all connections were properly seated which they were.

While we were at it, we tied the SSD up to our data mule via SATA to USB adapter and the drive showed up with no problems.

After installing it back into the MacBook Pro and booting back up into the setup routine, the Utilities menu item seemed to be the next logical place to look … at least for us Mac OS X n00bs anyway! ;)

Under that menu was an item called Disk Utility. We clicked on that and there was the SSD:

image

The only Disk Utility option that permitted us to do anything to the drive was Erase:

image

Note the Format was wrongly set to Case Sensitive. The second run through the OS X Snow Leopard install we left things at their default.

Once the format was finished we saw:

image

Forty minutes later we had a freshly installed Mac OS X and off we went to install the Mac Applications, Office 2008 for Mac, and all of the available updates.

Now, there may be a better way of getting a fresh drive available for OS X install in the Utilities menu, so please feel free to offer your way of doing things.

BTW, the RAM upgrade was actually done before the drive swap. It made a bit of a difference when multiple programs were open when swapping between them.

But, the SSD drive upgrade totally changed the performance characteristics of the MacBook Pro.

  • From off to logon screen is 16 seconds.
  • From logon to full dashboard functionality is less that 5 seconds.
    • The dashboard is pretty full.
  • Shutdown from the point of clicking the final shutdown button is 3 seconds.

The unit was pretty quick relative to the other portables that are used around here, but the SSD has made a huge difference in its performance.

Next up will be to pick up a copy of Parallels and install Windows to enable RWW/RDP and TS Gateway functionality to access client systems for management purposes.

Philip Elder
MPECS Inc.
Microsoft Small Business Specialists
Co-Author: SBS 2008 Blueprint Book

*Our original iMac was stolen (previous blog post). We now have a new MacBook Pro courtesy of Vlad Mazek, owner of OWN.

Windows Live Writer

Thursday, 12 November 2009

MacBook – You can’t turn on FileVault to protect the home folder of this user account.

Ack!

After finally figuring out how to get the MacBook to recognize the new Intel SSD (another post coming on this one), we ran into this lovely roadblock when enabling the home folder encryption setup called FileVault:

image

You can’t turn on FileVault to protect the home folder of this user account.

The home folder is located on a volume that isn’t in Mac OS Extended format.

Um, when we installed OS X 10.6 via the MacBook Pro DVD we chose the Mac OS Extended format for the hard drive. Though, we also included case sensitivity along with journaling.

So, what gives?

A few searches for the error turned up the following:

Essentially, we need to reinstall the OS via the DVD. Since this is a fresh install, it is not a really big deal. Apparently FileVault cannot be enabled when the disk was formatted to include case sensitivity in its structures.

This is a bit weird since the underlying OS for Snow Leopard is a UNIX derivative where case sensitivity has been a part of the OS setup since the beginning.

We have now learned that the type of disk format we use during an initial set up of any Mac will impact future uses of that Mac.

BTW, gotta love the non-descript error eh? It’s not like we haven’t seen those before in the Windows world! ;)

Philip Elder
MPECS Inc.
Microsoft Small Business Specialists
Co-Author: SBS 2008 Blueprint Book

*Our original iMac was stolen (previous blog post). We now have a new MacBook Pro courtesy of Vlad Mazek, owner of OWN.

Windows Live Writer

Using One USB Flash Drive To Install Different Windows OSs

We have run into a bit of a snag when we try and reuse the same USB flash drives to install the various Windows operating systems being installed on laptops, workstations, desktops, and servers.

What we were doing was keeping a copy of the OS in a folder and copying it onto the flash drive after deleting whatever was on the drive. We would rename the drive to indicate what OS was on it.

Well, we have been receiving BCD errors whenever we boot from the the reused flash drive.

So, here is what we do to make sure we get a nice clean start every time.

Software needed:

Now, once we have Virtual CloneDrive installed on the workstation, to keep things simple we create a series of folders with the OS’s name on our workbench system desktop.

We then copy the respective OS’s ISO file into that folder.

When we need to change the OS on the USB flash drive we delete the files on it, mount the ISO using Virtual CloneDrive, and copy that ISO’s content onto the flash drive.

This seems to work with no hassles.

To prep a flash drive for booting on a Vista or 7 machine:

  1. Start –> cmd –> right click and Run As Administrator.
  2. Click through the UAC.
  3. Diskpart [Enter]
  4. List Disk [Enter]
    • A list of disks in the system will appear. The USB flash drive should be pretty obvious due to its small size.
  5. Select Disk x [Enter]
    • Again, select the USB flash drive listed above by number.
  6. Clean [Enter]
  7. Create Partition Primary [Enter]
  8. Select Partition 1 [Enter]
  9. Active [Enter]
  10. Format fs=fat32 quick [Enter]
  11. Assign [Enter]
  12. Exit [Enter]

The autorun dialogue should pop up after completing the above procedure with the list of options available for a newly inserted USB flash drive.

At some point we might actually get into Windows Deployment Services . . . but that will not happen until we actually have some time! 8)

Philip Elder
MPECS Inc.
Microsoft Small Business Specialists
Co-Author: SBS 2008 Blueprint Book

*Our original iMac was stolen (previous blog post). We now have a new MacBook Pro courtesy of Vlad Mazek, owner of OWN.

Windows Live Writer

Force Eject a CD/DVD From the MacBook Pro

In the process of swapping the 160GB 5400RPM Hitachi hard drive for an Intel 160GB second generation SSD, there was a disk in the optical drive that would not come out when the eject button was pressed.

Now, on the MacBook Pro optical drive there is no pinhole for us to use a paperclip or the like to force eject a disk in the drive.

It turns out that all we needed to do was hold down the trackpad button prior to powering up the MacBook Pro.

Sure enough, after holding the button down and powering up the unit out came that disk.

Philip Elder
MPECS Inc.
Microsoft Small Business Specialists
Co-Author: SBS 2008 Blueprint Book

*Our original iMac was stolen (previous blog post). We now have a new MacBook Pro courtesy of Vlad Mazek, owner of OWN.

Windows Live Writer

Trend Micro – Reset the Security Dashboard Password

We are doing the last of our Trend Micro A/V product removals and replacement with Symantec EndPoint Protection.

Our Trend odyssey has unfortunately been long and very painful:

So painful in fact, we paid for a one year SEP subscription and did the R&R for free at all of our clients that had the Trend product installed at.

The password for this last client is not being recognized. So, our notes must be out of date as the password must have been changed without those notes being updated or perhaps the product hiccupped yet again.

To change that admin password:

  1. Go to the <installed drive>\Program Files\Trend Micro\Security server\PCCSRV\Private directory.
  2. Open the ofcserver.ini file using Notepad or any text editor
  3. Look for the Master_Pwd= parameter under the [INI_SERVER_SECTION] section.
  4. Replace the Master_Pwd= value with 70.
    • Remove the !encrypt! portion too.
  5. Save and close the ofcserver.ini file.
  6. Restart TM Security server  Master Service.
  7. Log into the Security dashboard  and type 1 as the password.

We now have the ability to manage if that was what we needed, or now to remove the product completely from all of our workstations and servers on this network.

Philip Elder
MPECS Inc.
Microsoft Small Business Specialists
Co-Author: SBS 2008 Blueprint Book

*Our original iMac was stolen (previous blog post). We now have a new MacBook Pro courtesy of Vlad Mazek, owner of OWN.

Windows Live Writer

Wednesday, 11 November 2009

HP TouchSmart iQ816 Wall Mount Completed and How-To

One of the tasks we needed to accomplish was the wall mounting of an HP TouchSmart iQ816 PC.

The HP recommended VESA compatible mount was set up in such a way that it could only mount to a wall stud as we were not confident in using any form of plugs for such a heavy item.

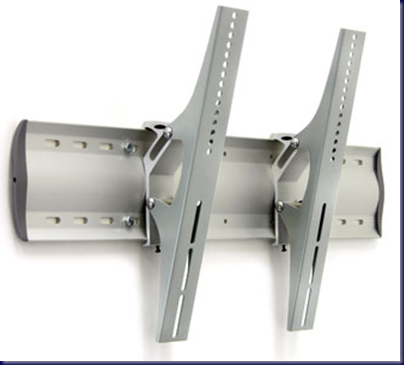
The product we ended up using to mount the iQ816 was made by Ergotron:
image

Now, the above image and the actual product are a bit deceiving as far as the tilting mechanism was concerned.

After pulling everything out of the box and seeing how loose the two arms seemed to be in the tilt, there was some doubt about how the actual tilt would work.

Once the iQ816 was mounted on the arms and installed onto the wall bracket there was no more doubt though:

image

Somehow there was enough resistance due to the weight of the iQ816 to allow the tilting motion to rest wherever we set it in the Ergotron product’s full range of motion.

Note the minimal clearance between the cupboards above the iQ816. This was quite intentional. To get that clearance though, we needed to remove the plastic cap on the wall bracket and slide the arms holding the iQ816 onto the wall bracket from the side shown. The arms were mounted to the iQ816 before sliding onto the wall bracket.

The cap’s screw hole can be seen in the middle of the cap above.

This next shot is not so clear, but gives a pretty good idea of how the final mounting looks from the front:

image

My best friend will be making up a cap that matches the pattern of the cupboards along with their colour to go over the mounting bracket seen to the right of the iQ816. Unfortunately the wall studs were not quite centered to the opening of the desk.

The TouchSmart units are really neat. Our client really likes them.

Tools needed for this project:

  • Cordless drill (18v Milwaukee in our case)
  • 3/16” drill bit for lag bolt pilot holes.
  • Bit, adapter, and socket to drive in lag bolts.
  • 3/8” socket wrench to finish tightening.
  • Laser sight stud finder with integrated 360Deg levels.
  • 36’ level to level the wall bracket.
  • Contractor quality tape measure.
  • 12” carpenter’s square.

The iQ816 required four spacers between its VESA bracket and the Ergotron arms as well as two washers per bolt when mounting the arms to the back of it.

The tape measure, square, and the laser site on the stud finder were used to pinpoint the desk’s centre relative to the wall behind the iQ816.

Once the studs were located, we measured out where the wall bracket needed to be relative to the placement of the iQ816. We then drilled our first pilot hole for the top left corner of the wall bracket.

Using the level and tape measure we were able to find and drill the other three pilot holes.

We then placed the wall bracket on the wall and started the first lag bolt on the top left. Once the lag bolt had grabbed enough (tacked in place) we then started the top right after which we finished off the two bottom bolts.

When all four bolts were tacked in, we then drove them into the stud using the drill until they were just touching the wall bracket. We left them snug enough to allow us to move the bracket and use the level to make sure that it was indeed level before tightening things up.

Once level, we carefully tightened up the top left lag bolt all the while making sure to maintain level. We then tightened up the bottom right bolt, then the bottom left, and finally the bottom right.

Keep in mind that the lag bolts can be over tightened. If this happens, the wall bracket will actually break through the outer skin of the wall board thus compromising its integrity.

This in turn could lead to a failure of the mount itself as it may loosen up the wall bracket over time as the user tilts the iQ816 up and down and the bracket works its way into the wall board.

Thus, it is important to pay attention and listen to the tightening process while using the socket wrench.

We cleaned up any wall board dust and wood before we installed the proprietary iQ816 VESA bracket onto the back of the unit as well as removed the two feet at the bottom. Supplied with the kit were a couple of caps to go in the holes where the feet used to be.

We then installed the Ergotron arms using the spacers as well as washers against the bolt head as already mentioned.

Once the unit was on the wall bracket, the cap at the end was back on, we wired up the HP power block in between the Ergotron mounting arms behind the iQ816.

Thus, we had a pretty neat and clean desk space for our client to work on.

Philip Elder
MPECS Inc.
Microsoft Small Business Specialists
Co-Author: SBS 2008 Blueprint Book

*Our original iMac was stolen (previous blog post). We now have a new MacBook Pro courtesy of Vlad Mazek, owner of OWN.

Windows Live Writer

Tuesday, 10 November 2009

HP MediaSmart Server Power Consumption

As we go through testing the various components in the home network we are installing, one of the neat things that was noticed:

HP MediaSmart Server
EX485 with Intel Celeron
2x 1TB Drives with folder redundancy
WHS Update 2.5 installed
Total power consumption:
Boot: 35Watts
Idle/Working: 25-30Watts

That is not a whole lot of power being consumed relative to the services provided by the HP for the home network.

Philip

Sent from my SBS Integrated Windows Mobile® phone.
--
ExchangeDefender Message Security provided by MPECS Inc: Click below to verify authenticity
http://www.exchangedefender.com/verify.asp?id=nAAM24F0011507&from=philipelder@mpecsinc.ca

Thursday, 5 November 2009

So, How Responsible Are We For Our Client's Networks?

The last new drive is in and the array is now in rebuild mode. So far, there are no errors coming up.

There is about 3 hours give or take for this rebuild process to complete.

These types of situations really bring home the depth and the weight of our responsibility for our client's livelihoods. If this box dies before the rebuild completes, we are ready to Swing and recover. The Swing could be done before they get in tomorrow morning and thus not cost them anything in lost productivity.

Do we really, and I mean _really_, know the value of our client's business in terms of dollars per hour?

If the hardware quit anytime during business hours or before we had the chance to prepare our disaster recovery plans the costs to our client would have been huge.

It would take us at least an hour or two to fail them over to the second server and sync the data on it from the ShadowProtect backup. There would also be lost time due to their client files that would not be up to speed.

Anyone hazard a guess as to the productivity costs per hour for this 15 seat accounting firm?

How about a thousand dollars per hour? How about two thousand per hour or even more since most of the folks in this firm are CGAs and up?

When this type of situation is at hand, getting to sleep at night can be very difficult. Yes, in this case we are now prepared. But, the possible impact to our client's business is not an easy thing to pass off as superfluous and thus weighs heavy on the back of the mind.

In this day and age where small businesses are totally reliant on their technology we truly do hold our client's livelihoods in our hands.

Philip

Sent from my SBS Integrated Windows Mobile® phone.
--
ExchangeDefender Message Security provided by MPECS Inc: Click below to verify authenticity
http://www.exchangedefender.com/verify.asp?id=nA61Gt4p016106&from=philipelder@mpecsinc.ca

RAID Controller Log: Unrecoverable Medium Error – Puncturing Bad Block?!?

Okay, so this is a new one and lead to a near stoppage of the heart last evening:

image

The errors in order:

Controller ID: 0 Unrecoverable medium error during rebuild: PD –|—:0 Location 0x26f1640

Controller ID: 0 Puncturing bad block: PD –|—:0 Location 0x26f1640

Controller ID: 0 Puncturing bad block: PD –|—:1 Location 0x26f1640

PD 0 is the last original disk in this server that is giving us headaches. Both PD 1 and PD 2 (there are three hot swap bays in the SR1560SFH Intel Server System) were replaced with new drives.

The original PD 1 had failed during a server firmware including BMC update (previous blog post). The original PD 2, the then global hot spare, was rebuilt into the array with no errors . . . until a consistency check that ran later that afternoon produced some unrecoverable fatal errors.

Last night we dropped original PD 1 out of the configuration, replaced it with a new drive, had the new drive picked up as a hot spare. We then failed out the original hot spare PD 2 now RAID 1 array member assuming that it was the source of the errors we saw in the consistency check yesterday afternoon.

So, the above screenshot was taken after the new PD 1 was being rebuilt into the array with PD 0 as the source. Needless to say the heart definitely skipped a few beats with visions of index $0 running through my head (previous blog post)!

The rebuild did eventually finish successfully though?!?

We will be going back this evening to fail out the bad PD 0 and replace it with a new drive which will then be designated the new hot spare.

Once the PD 2, currently a hot spare, rebuild into the RAID 1 array has finished, Intel indicated to us that we need to run a consistency check. From there, hopefully ShadowProtect will finally give us a backup!

And one more thing, just what does “Puncturing bad block” really mean?

The suggestion in the above NEC linked document is to take the preventative measure and swap out the indicated drive(s) promptly. :)

It looks as though the RAID controller has found some bad sectors on the PD 0 and puncturing means to set those sectors as off limits on both array members.

But part of this whole puzzle is the fact that the RAID controller (Intel SRCSASRB with firmware 470) shows a media error level of 0 for both array members and a predictive failure count of 0 for both members!

Hopefully tomorrow we can rest easy with a backup in hand!

Philip Elder
MPECS Inc.
Microsoft Small Business Specialists
Co-Author: SBS 2008 Blueprint Book

*Our original iMac was stolen (previous blog post). We now have a new MacBook Pro courtesy of Vlad Mazek, owner of OWN.

Windows Live Writer

How A Capacitor Is Not Supposed To Look

This is on an Intel X38BT Extreme series motherboard:

image

There is something definitely growing on top of the one capacitor down near the video card and just to the right of the memory stick on the right. It is brown and crusty and reminds me of a barnacle.

The system and board happen to be running quite stable as it does run 24x7 with the occasional reboot for an update.

The situation was discovered when showing a client the internal workings of this particular system which just happens to be sitting on my desk.

An RMA request has been placed with Intel for a replacement which we should see tomorrow.

Philip Elder
MPECS Inc.
Microsoft Small Business Specialists
Co-Author: SBS 2008 Blueprint Book

*Our original iMac was stolen (previous blog post). We now have a new MacBook Pro courtesy of Vlad Mazek, owner of OWN.

Windows Live Writer

Wednesday, 4 November 2009

Preparing for the Distinct Possibility of a Server Disaster

Besides being an awesome method for migrating SBS to SBS on the same or different hardware, Jeff Middleton’s Swing method brings about a whole new way of viewing disasters and disaster recovery situations.

Because of our previous experiences using the Swing method in past recoveries, we are in the process of preparing our OS backup-less server for the possibility of an all-out failure.

As mentioned in our earlier post this morning on the missing backup and the previous post to that we had a hardware hiccup on one of our client’s SBS servers. The hiccup is enough to cause ShadowProtect to not be able to take an image of the OS partition.

So far, despite the RAID controller throwing the fatal error, no NTFS 55 errors have shown up in SBS’s Event Logs. Hopefully this means that the bad section on the drive is in an empty area. We will be flipping out the array members this afternoon and rechecking the consistency to see if the error has disappeared.

Array member number one’s status:

image

Array member number two’s status:

image

Note the distinct lack of error counts for both drive’s media as well as a zero for the Predictive Fail Count on both drives. This is indeed a real puzzle.

So, here are a few of the things we are doing to prepare for the possibility of the main SBS crashing:

  • We have moved the live Exchange private and public stores to the data partition that is being backed up.
  • We have installed Win2k3 using the SBS media into Hyper-V on the second server and using the Swing method have introduced it as a DC on the network.
  • We have the previous backup drive with ShadowProtect Images that can be used to restore SBS into Hyper-V thus providing us with a frame of reference for the setup.
    • It is a little too far out of date to use as a recovery source though . . . maybe.

The second bullet will thus eliminate a step if we need to do a fresh build of the SBS box and re-introduce it back into the network using the Swing method.

We will be that much further ahead for recovery if this happens between the temporary DC and having the existing server recovered on our own lab Hyper-V box for reference.

In this particular case, our client’s second server also has a mirror of their own client data on it. We will be able to mount the ShadowProtect image from the good SBS backup and copy the changed files over using BeyondCompare.

While we are not in an ideal state with this particular server situation, we are in a position to expedite a recovery in short order thus leaving our client with very little down time.

ExchangeDefender will be very helpful in this situation too. If things do go sideways and the stores take a hit, we will have access to our client’s LiveArchive so that they can keep active with their e-mail.

More to come . . . hopefully a happy resolution with the new replacement drives cleaning things up!

Philip Elder
MPECS Inc.
Microsoft Small Business Specialists
Co-Author: SBS 2008 Blueprint Book

*Our original iMac was stolen (previous blog post). We now have a new MacBook Pro courtesy of Vlad Mazek, owner of OWN.

Windows Live Writer

We Know We Are In Trouble When? An Image Based Backup Flaw

Have a look at this and ask yourself, “What is missing here?”

image

The bottom two items in the above screenshot were just added the previous evening when this post was written.

The next screenshot of the ShadowProtect console tells us that we have a real problem:

image

Okay, so, now what is going on with our backups?

We replaced the troublesome Thermaltake USB hard drive enclosure with a new NexStar3 by Vantec since a hard drive size increase was needed anyway.

The BIOS in this particular server was quite out of date so we did the necessary updates to eliminate the warm boot hang when the NexStar3 was plugged into the server and turned on.

The BMC refused to take a proper update. We needed to force recover the BMC firmware though the BMC firmware still choked when we attempted an update to the backplane.

Once we powered up the server after the last BMC recovery attempt one of the drives in the RAID 1 array decided it was no longer a member. We verified in the RAID controller’s BIOS (SRCSASRB) that the hot spare had jumped into the array and began to be rebuilt which it had.

With that confirmed, we booted into the OS. Now, we had also updated the ShadowProtect version to 3.5 before running the BIOS/firmware updates too.

We logged into the RAID Web Console to have a look at what was up there because a pop-up came up indicating a fatal error:

image

So, where does that leave us?

In a pretty bad position. We shut down the Information Store and copied out the databases and took a System State. The second server on this network is not a DC since that is just too much of a hassle to work with in recovery situations.

The second server does have the Hyper-V role installed and is serving virtual desktops for RWW access.

We have the SBS 2003 R2 ISO as well as the Windows Server 2003 SP1 ISO being downloaded from Microsoft’s site at this moment. Tomorrow morning we will do a test install of one of them and recover the System State backup to make sure that things will recover enough to Swing back to the original server if things go completely sideways.

Our StorageCraft forum post on the ShadowProtect error:

So, we have inadvertently discovered another ShadowProtect/image based backup flaw. If the underlying hardware hiccups as is the case here, the backup will not run successfully until that hardware hiccup is fixed or things really go south on us.

Philip Elder
MPECS Inc.
Microsoft Small Business Specialists
Co-Author: SBS 2008 Blueprint Book

*Our original iMac was stolen (previous blog post). We now have a new MacBook Pro courtesy of Vlad Mazek, owner of OWN.

Windows Live Writer

Tuesday, 3 November 2009

Intel BIOS and Firmware Updates in EFI Shell

When it comes to updating some of the Intel server configurations that we have put together, we use the EFI Shell to update any server related BIOS and firmware.

The update being run on an Intel Server System SR1560SF this evening choked. It turned out to be some bad files on the USB Flash drive.

The benefit to using the EFI Shell was the ability to pull the USB flash drive, update the files on it, and plug it back in without losing connection to the drive.

Once we forced the BMC update to run we had things up to where we wanted them to be and were able to move on.

Philip Elder
MPECS Inc.
Microsoft Small Business Specialists
Co-Author: SBS 2008 Blueprint Book

*Our original iMac was stolen (previous blog post). We now have a new MacBook Pro courtesy of Vlad Mazek, owner of OWN.

Windows Live Writer