Showing posts with label Networking. Show all posts

Friday, 16 June 2017

S2D: Mellanox Prep for RoCE RDMA

We are in the process of setting up a pair of Mellanox SX1012B (40GbE) switches and CX354A ConnectX-3 Pro NICs (CX3) for a Storage Spaces Direct (S2D) four node cluster.

Setup:

  • (2) MSX1012B Switches
  • (2) NETGEAR 10GbE Switches
  • Intel Server System R2224WTTYS
    • (2) CX354A NICs per Node
    • (2) Intel X540-T2 10GbE NICs

The Mellanox gear will provide the East-West path between nodes while the NETGEAR/Intel 10GbE will provide for node access and the virtual switch setup.

Out of the box, the first thing to look at is … the Release Notes for the MLNX-OS version v3.6.3508 that is current as of this writing.

As we can see, the firmware level we need to have on our CX3 NICs:

image
The most current version of the CX3 firmware is 2.4.7000 which we had downloaded prior to reading the release notes. ;)
We will make sure to install 2.40.5030 once we are ready to do so:

image
Now, as far as the Mellanox switch OS goes (MLNX-OS), there may be a bit of a process needed depending on how old the current OS is on them!

imageimage2.5Upgrade From Previous Releases
Older versions of MLNX-OS may require upgrading to one or more intermediate versions prior to upgrading to the latest. Missing an intermediate step may lead to errors. Please refer to Table 2and Table 3 to identify the correct upgrade order.
Note that there are two types of switch operating systems depending on the underlying hardware. In our case, it is PPC as opposed to x86.

In our case, the current OS version is 3.4.0012, so our process will be:

  1. 3.4.0012 –> 3.4.2008
  2. 3.4.2008 --> 3.5.1016
  3. 3.5.1016 –> 3.6.2002
  4. 3.6.2002 –> 3.6.3004
  5. 3.6.3004 –> 3.6.3508

Fortunately, the Mellanox download site makes picking and choosing the various downloads a simple process.

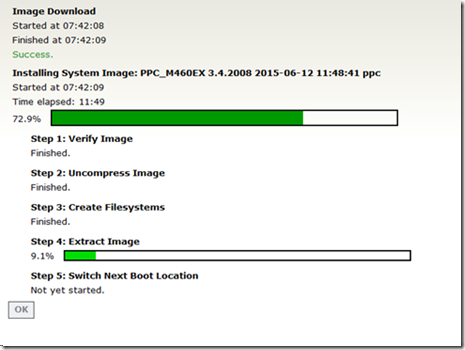
This is what the update process looks like:

image

image

One can expect to budget between 30-90 minutes per upgrade session.

NOTE: When both switch management consoles were opened in separate IE tabs one would fail out on the upload after a minute or so. Once we opened a separate Firefox browser session for one of the switches the upgrade moved seamlessly.

Once complete, we will move on to our preliminary settings scope for this project.

Philip Elder
Microsoft High Availability MVP
MPECS Inc.
Co-Author: SBS 2008 Blueprint Book
Our Cloud Service
Twitter: @MPECSInc

Wednesday, 21 October 2015

Folder Permissions: How To Properly Disinherit Permissions

We run into a lot of ACL corruption issues and access issues when a folder has not been disinherited properly.

The following is the best method for disinheriting permissions a folder receives from its parent:

  1. Right click on the folder and click Properties
  2. Click the Advanced button
  3. Click the Change Permissions button if required
  4. Click the Disable inheritance button
  5. Click the Convert inherited permissions into explicit permissions on this object.
    • image
    • DO NOT CLICK REMOVE
  6. Click on DOMAIN\Domain Users or MACHINE\Users and then the Remove button
    • This removes access to that folder to all domain users
  7. Add the necessary security groups and give them MOD
  8. OPTION: On existing folder sets one can click Replace all child object permission entries with inheritable permission entries from this object
    • Does one want to click this? If there are customized permissions _below_ the folder being disinherited those permissions would be lost.
  9. Click Apply and OK.

From there our folder would now have the necessary permissions for users in the specific security group(s) to make changes.

We enable Access-based Enumeration on _all_ shares we deploy by default. This means that users that are not in the above assigned security group(s) will not see the folder in their File Explorer.

One of the warning signs that the above process was not followed will be for domain admin or local admin accounts to get a UAC prompt when navigating the physical folder set.

As a rule we follow a trunk –> branch –> leaf structure for our folders. All users have a single point of entry with some subfolders having their inheritance blocked.

From there we prefer to _not_ disinherit any further down-level folders unless absolutely necessary because that inevitably leads to access issues and/or permissions corruption.

Philip Elder
Microsoft Cluster MVP
MPECS Inc.
Co-Author: SBS 2008 Blueprint Book

Thursday, 12 February 2015

Hyper-V: Set Up An Internal Network For Host/Guest File and Service Sharing

Here’s a quick and simple How-To for setting up network communication between a Hyper-V host, both Server and Windows 8/8.1, and any guests.

  1. Hyper-V Manager --> R.Click ServerName --> Virtual Switch Manager --> New --> INTERNAL.
    • Note the description for the internal vSwitch.
    • image
  2. Click APPLY and OK
  3. Assign the newly created vSwitch – Internal to the required VM(s)
    • image
  4. On the HOST: Start –> NCPA.CPL [Enter] –> Set an IPv4 IP Address
    • image
    • Use a different subnet for this network than anything else on the host’s NICs.
  5. On the Guest: Start –> NCPA.CPL [Enter] –> Set an IPv4 IP Address
    • image
    • Note the host and the guest are assigned an IP on the same subnet.
  6. On either the Host or the Guest open Windows Explorer
  7. \\IPv4Address\
  8. Authenticate
    1. To host: Either MachineName\Username or DomainName\Username
    2. To guest: MachineName\Username
  9. Copy and paste files and access services as expected
    • image 

If there is a need to work with UNC paths, HTTPS and certificates, and more then make sure to set up a small VM running DNS and ADDS if needed. One could also put DHCP on that VM to make addressing simple.

Philip Elder
Microsoft Cluster MVP
MPECS Inc.
Co-Author: SBS 2008 Blueprint Book

Chef de partie in the SMBKitchen ASP Project
Find out more at
Third Tier: Enterprise Solutions for Small Business

Friday, 13 September 2013

Why We Never Dedicate a NIC Port to a VM

We never dedicate a NIC port to a VM. We always _team_ NIC ports. Generally there are two teams in standalone and cluster setups.

Team0: Management (Port 0 on NIC 0 and 1)

Team 1: vSwitch (Ports 1+ on NIC 0 and 1) – Dedicated

I kinda understand the logic of doing that, that is dedicating a NIC port to a VM. However, the whole purpose of virtualization is to separate the guest operating system from the hardware. So, one needs to break from that mindset.

There is no reason why the dual Intel quad-port configurations (8 ports total with 6 for the vSwitch) we do would have a problem with the in some cases 20+ VMs running on the host.

Team configuration exception to the rule would be for CAD/CAM/High Bandwidth needs:

  • Team0: Management (Port 0 on NIC 0 and 1)
  • Team1: vSwitch High I/O (Port 1 on NIC 0 and 1)
  • Team2: vSwitch General VMs (Ports 2+ on NIC 0 and 1)

That leaves a dedicated pair to the higher network bandwidth VM or VMs. We would leave VM density on Team1 at two or three maximum.

BTW, in a disaster recovery scenario having things teamed makes recovery a lot simpler. Trying to keep track of all of those vSwitch names mapped to what VM would be a real PITA when things were tense. Plus, getting all that configured would be that much more time wasted getting things back. Keep It Simple Sir

Oh, and one more thing: Why would one use a dedicated physical port on each node in a cluster for a highly available guest hosted on that cluster?

That leaves a single point of failure and yet we see that it is quite common for NIC teaming to not be used.

With NIC teaming now built into Windows Server 2012 RTM and newer there is no real reason to avoid teaming NICs or NIC Port groups to avoid that single point of failure.

So, when architecting a cluster setup please use NIC Teaming.

Philip Elder
MPECS Inc.
Microsoft Small Business Specialists
Co-Author: SBS 2008 Blueprint Book

Chef de partie in the SMBKitchen
Find out more at
www.thirdtier.net/enterprise-solutions-for-small-business/

Windows Live Writer

Monday, 19 August 2013

Server 2012–Unidentified Network with Team Set As Public

This is a bit of a frustrating problem:

image

After setting up the team things were fine.

However, after a reboot the server has disappeared on the network.

After logging in we see that the team is active but the network is unidentified and the firewall is on Public:

image

Restart the Network Location Awareness service:

image

Then hit refresh in the Firewall MMC:

image

And refresh in NCPA.CPL (Network Connections):

image

It turns out that in situations where a Windows Server 2012 native NIC team is set up the Network Location Awareness service should be set to Automatic (Delayed Start) to give the team time to start!

image

Philip Elder
MPECS Inc.
Microsoft Small Business Specialists
Co-Author: SBS 2008 Blueprint Book

Chef de partie in the SMBKitchen
Find out more at
www.thirdtier.net/enterprise-solutions-for-small-business/

Windows Live Writer

Monday, 11 February 2013

Windows Server 2012 Hyper-V: NIC Teaming Setup and Caveat

When it comes to NIC teaming there are times that we need to pay attention to how the NICs get attached to the various services that will be run on the server.

If we are working with a server that will be solely a Hyper-V server using the native teaming in Server 2012 then we should be okay with the way the teaming process transpires and the resulting team(s).

However, when we are working with an OS that will have NICs teamed and it will also be delivering roles and/or services to the production network we have encountered some funky behaviours in that server _after_ the NIC team was created.

If we have a physical box with 4 NICs we have 4 MAC addresses.

When we set up the roles/services on that box before teaming and bind them to the IP address we will be setting to the team we run into a small problem.

The MAC address that is currently bound to the NIC with that IP address may _not_ be the MAC address that the team inherits going forward.

So, as a rule we recommend setting up the NIC teaming as one of the first steps before anything else is accomplished on the box.

image

We tend to set up two teams across at least two separate adapters. We prefer to run Intel NICs in our server configurations as a rule.

  1. Team 0: Management
    1. NIC 0 & 1 port 0 (2 ports)
  2. Team 1: vSwitch
    1. NIC 0 & 1 ports 1-7 (6 ports)
      • On Server 2012: Static Team with Hyper-V Port chosen

From there, make sure the binding order is set correctly _after_ a reboot. If changes are made to the binding order then a reboot will be required.

  1. Start –> ncpa.cpl [Enter]
    1. image
  2. Hit the ALT key on the keyboard
  3. Advanced
  4. Advanced Settings...
    1. image
  5. Verify binding
    1. image
  6. Production network is run by the guests so vSwitch gets priority.

Once we have our binding order verified we can look at setting up the respective VLANs.

As a side note, there does not seem to be any rhyme or reason to the way the NICs get named in the OS.

image

In the above snip, based on an Intel Server System R2208GZ4GC with dual Intel Quad Port i350 NICs, we have done a lot of testing with various storage setups. Thus, we have had a number of fresh operating system installs and to date _none_ of them have had the NICs named the same.

Since we always use the same two ports, port 0 on both NICs, we usually just pull the cables on those two ports for a quick “which one is which” check. Another way we could do that is via the Cisco SG500 series management console by turning off the ports.

Philip Elder
MPECS Inc.
Microsoft Small Business Specialists
Co-Author: SBS 2008 Blueprint Book

Chef de partie in the SMBKitchen
Find out more at
www.thirdtier.net/enterprise-solutions-for-small-business/

Windows Live Writer

Friday, 11 January 2013

Hyper-V 2012: Set up Native Teams, Virtual Switch, Binding, and SR-IOV

We have just finished installing Windows Server 2012 Standard on a new Intel Server System R2208GZ4GC. We have added the necessary Roles and Features including Hyper-V.

This particular server comes with a quad port i350 Gigabit adapter built in. We also added an Intel i350-T4 quad port Gigabit adapter into the mix.

With this particular setup we are configuring our NICs as follows:

image

  1. On board and PCIe Port 0 name: Management
    1. Static Teaming
    2. Address Hash
  2. On board and PCIe Ports 1-3 name: vSwitch
    1. Static Teaming
    2. Hyper-V Port

image

Note the white cables indicating which ports on the NICs and Cisco SG500X-48 to keep track of things. Once relocated to our client’s site our cabling is set up in a similar manner in that cables are colour coded for their roles with a Legend in our audit notes.

Once we have our teaming set up we can move on to creating our virtual switch.

  1. Hit the Start button on the keyboard to bring up the Start Menu
  2. Right click on Hyper-V Manager
    • image
  3. Click on Pin to Taskbar
  4. Hit the Windows key or ESC key to get back to the Desktop.
  5. Right click on Hyper-V Manager icon on the Taskbar
  6. Right click on the Hyper-V Manager shortcut
  7. Left click on Run as Administrator.
  8. Hit Start on the keyboard
  9. Type: NCPA.CPL [Enter]
    • image
    • The Network Connections window will pop up
  10. Note the Device Name for the Management and vSwitch teams.
    1. Microsoft Network Adapter Multiplexor Driver (Management)
    2. Microsoft Network Adapter Multiplexor Driver #2 (vSwitch)
  11. Minimize that window.
  12. In Hyper-V Manager right click on the Server Name and click Virtual Switch Manager...
    • image
  13. Click the Create Virtual Switch button.
  14. Name the virtual switch and choose the NIC to bind to.
    • image
  15. External Network choice is as noted above:
    • Microsoft Network Adapter Multiplexor Driver #2 (vSwitch)
  16. Uncheck Allow management operating system to share this network adapter
  17. Click Apply and OK.
    1. Answer Yes and check the “Don’t bug me” box.
  18. Click OK to close the Virtual Switch Manager.
  19. Bring up the Network Connections window.
    1. Right click on the vSwitch and click on Status
    2. Click on the Details button.
    3. The Network Connection Details window should be blank.
      • image
  20. Click Close and Close again.
  21. While looking at the Network Connections window hit the ALT key on the keyboard.
    • image
  22. Click on Advanced and then Advanced Settings...
  23. Make sure Management is on top of the Connections list in Adapters and Bindings.
    • WRONG:
      • image
    • RIGHT:
      • image
  24. If binding order was changed then a reboot is required.
    1. Hold the WIN key and R (WIN+R):
    2. Shutdown –r –t 0 –f [Enter]
      • image

Once the reboot has completed we are ready to go with our Hyper-V configuration steps. We will leave that for another blog post. :)

Some explanations and caveats with SR-IOV:

UPDATE: Missed this very good post on Hyper-V and SR-IOV:

Philip Elder
MPECS Inc.
Microsoft Small Business Specialists
Co-Author: SBS 2008 Blueprint Book

Windows Live Writer

Wednesday, 9 January 2013

Hyper-V Cluster Error: FailoverClustering 5120: Cluster Shared Volume is no longer available ... STATUS_CONNECTION_DISCONNECTED(c000020c)

This was a bit of a strange thing to see on one of our clusters:

Log Name:      System
Source:        Microsoft-Windows-FailoverClustering
Date:          1/8/2013 9:48:10 PM
Event ID:      5120
Task Category: Cluster Shared Volume
Level:         Error
Keywords:     
User:          SYSTEM
Computer:      NODE01.DOMAIN.LAN
Description:
Cluster Shared Volume 'Volume4' ('CSV 04 XPVM-01') is no longer available on this node because of 'STATUS_CONNECTION_DISCONNECTED(c000020c)'. All I/O will temporarily be queued until a path to the volume is reestablished.

A search turned up the following:

This KB talks about network connectivity with specific bindings for the adapters that the cluster uses for communication.

Well, we knew that we had the configuration on the NICs correct.

However, we were unable to ping via the Heartbeat network (Hyper-V Server 2008 R2 SP1) that was set on a separate tagged VLAN.

The problem ended up being found in the fact that their Gigabit switch had been recently replaced with a warranty replacement. We had missed the VLAN configuration when we set up the replacement switch.

Sure enough, a dig through the Failover Cluster Management console brought up the big red X on the Heartbeat Network.

And, ultimately we found out the reason why that setting was missed. Our network audit notes were not up to date on the VLAN setting for the Heartbeat Network.

In this case this mistake only caused a minor problem with cluster communication that redundant networking structures took care of in the cluster setup.

We cannot emphasize enough just how important it is to keep good a good audit trail of any and all client IT Solutions and their components.

Besides facilitating consistency across our solutions our clients have a working paper that will provide anyone with a very in-depth view of their network setup should the need arise.

Philip Elder
MPECS Inc.
Microsoft Small Business Specialists
Co-Author: SBS 2008 Blueprint Book

Windows Live Writer

Thursday, 20 December 2012

Why We Terminate All CAT Cable Runs Outside The Enclosure

Our longest standing client is about to move after being in the same location for somewhere around 20 years.

Their current location required some wiring changes around 10 years ago and the electrical contractor wanted to terminate inside the enclosure. At that time, we had seen quite a few enterprise level racks that had that setup so we accepted that configuration.

The APC 24U enclosure has two bundles running into it with the patch panel mounted at the back and top of the APC.

Years ago we were looking to move the enclosure into a different location within the server closet but could not because the loops left in the ceiling were not long enough to allow much movement at all.

And today, we are in a position where we will need to cut the cables in order to move the enclosure out of the closet when it comes time to move.

Ever since that day we wanted to move that enclosure and could not we have always recommended that all CAT cabling be terminated in a patch panel that sits in a wall mount.

We would then use patch cables properly strung to remove any weight bearing on the cable ends plugged into the patch panel into the enclosure mounted switch or switches.

As of this writing our recommended network cabling setup is:

  • Minimum CAT5e with CAT6 being preferred.
    • A box of CAT6 is no longer that much more than CAT5e.
    • Home Depot shows CAT6 at $250 for 305m (1000’).
  • Prefer a minimum of _two_ cables per drop.
    • One for PC and one for Phone.
  • Patch Cables are CAT6 or CAT6a
  • Patch Panel is a minimum spec of CAT5e with CAT6 being the preference.
  • Wall mount for Patch Panel and cable management
    • 5U or 8U works fine.
    • Phone/VOIP on separate patch panel with different colour jacks.
    • Mounted above 6’6” so most folks won’t bump their head!
  • Contractor gives us a minimum of 5m (~15’) of loop in the ceiling.
  • Contractor gives a print-out of _all_ drop’s capabilities after job is completed.
    • We expect this. We have had problems with bad runs if an electrician versus an actual cabling contractor do the runs.

With the above specifications we are able to move any rack mount enclosure about a server closet or room by changing the length of the patch cables versus bringing in a contractor to re-wire the solution on the wall.

Philip Elder
MPECS Inc.
Microsoft Small Business Specialists
Co-Author: SBS 2008 Blueprint Book

Windows Live Writer