Showing posts with label Windows Server. Show all posts

Saturday, 22 December 2018

VS Code for PowerShell: IntelliSense Code Highlighting Not Working?

This is what VS Code looks like on _all_ machines used in the shop and elsewhere but one:

image

Note the great colour coding going on. That's IntelliSense working its magic to render the code in colour!

The errant machine looks like this:

image

Note the distinct lack of colour coding going on. :(

We removed and re-installed VS Code, the Extensions, and anything else we could with no change.

After an ask on a PowerShell list a suggestion was made to check the VS Code theme.

Sure enough, on the problematic one:

image

VS CODE: Dark (Visual Studio) Colour Theme

While on a functioning setup:

image

VS CODE: Dark+ (default dark)

For whatever reason, the latter colour theme seems to break things.

Now that we have that figured out, we can move on to coding! :D

Merry Christmas and a Happy New Year's to everyone!

Hat Tip: Shawn Melton MVP

Philip Elder
Microsoft High Availability MVP
MPECS Inc.
Co-Author: SBS 2008 Blueprint Book
www.s2d.rocks !
Our Web Site
Our Cloud Service

Tuesday, 11 December 2018

OS Guide: Slipstream Updates Using DISM and OSCDImg *Updated

We have found out that we need to have the May Servicing Stack Update (SSU) KB4132216 _and_ the latest SSU which is currently KB4465659 in the Updates_WinServ folder we drop the Cumulative Update into for the Windows Server 2016 slipstream run.

image

Note that the current version of the script points to Server 2019. Please use that as a base to tweak and create a set of folders for Windows Server 2016 and Windows 10 updates.

Philip Elder
Microsoft High Availability MVP
MPECS Inc.
Co-Author: SBS 2008 Blueprint Book
www.s2d.rocks !
Our Web Site
Our Cloud Service

Thursday, 6 December 2018

Error Fix: Trust Relationship is Broken

Here's a quick post on fixing a broken trust situation when the local administrator username and password is a known commodity.

On Windows 7:

  1. Windows Explorer
  2. Right click My Computer/This PC --> Properties
  3. Change settings for Computer Name
  4. Change button
  5. Domain: Setting Now: DOMAIN.LOCAL
    1. Change to DOMAIN (delete .Local)
    2. Credential
  6. Reboot

That process will fix things for Windows 7 unless PowerShell is up to date then for all others including it:

  1. Log on with local admin user
  2. Reset-ComputerMachinePassword -Credential DOMAIN\DomainAdmin
  3. Log off
  4. Log on with domain user account

That's it.

If you know any other methods, especially for situations where the local admin username and password is an unknown or all local admin accounts are disabled feel free to comment or ping!

Thanks for reading. :)

Philip Elder
Microsoft High Availability MVP
MPECS Inc.
Co-Author: SBS 2008 Blueprint Book
www.commodityclusters.com
Our Web Site
Our Cloud Service
Monday, 15 October 2018

Server 2019 and ADDS: FRS Not Supported - Migrate to DFSR

We went to DCPromo a newly stood up Windows Server 2019 VM into an existing domain and it would not let us do so.

Suffice it to say, we needed to migrate File Replication Service (FRS) to Distributed File System Replication (DFSR).

The process is actually quite simple so long as Active Directory and replication are healthy.

Ned Pyle has an article that has three methods in it:

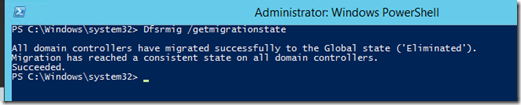
We followed method one as a just-in-case during business hours. No hiccups were experienced and once done:

image

A simple way to keep an eye on things is to open File Explorer and plug the following in the Address Bar: \\Domain.Com

So long as DNS is healthy and SYSVOL and NETLOGON are there the process is humming along as expected.

NOTE: Make sure a backup is taken of the PDCe and a System State as well!

Philip Elder
Microsoft High Availability MVP
MPECS Inc.
Co-Author: SBS 2008 Blueprint Book
www.s2d.rocks !
Our Web Site
Our Cloud Service

Wednesday, 15 August 2018

PowerShell Paradise: Installing and Configuring Visual Studio Code (VS Code) and Git

It was Ben Thomas that gave me the prodding to look into Visual Studio Code (VS Code) for PowerShell coding and troubleshooting. I had an error in a PowerShell step that puzzled me. It turned out to be the auto-replaced hyphens that got introduced into that PowerShell step somewhere along the lines since I keep (kept) everything in OneNote.

There are several reasons why coding in any form are difficult for me, suffice it to say it took a few days to get over the, "Oh no, yet something else to learn" initial reaction to that prodding.

With a little downtime late last week, the opportunity presented itself to at least do a cursory search and skim of info on VS Code and PowerShell.

What I saw amazed me so much so that the time to learn became a non-starter.

First, download VS Code but don't install it right away.

Next, download GIT for Windows (there's other versions).

Now, there's a bit of a Catch-22 in this process as Git looks for VS Code and VS Code looks for Git.

Install VS Code and Git

Install order to make things simple:

  1. Install VS Code
    • image
  2. Run VS Code and ignore the Git prompt
    • image
  3. Install Git and choose VS Code
    • image
    • This is where things can get weird. If VS Code does not get started first, the Next button will not light up!
    • If not, leave this window, start VS Code, ignore the prompt, and close it.
    • Hit the Back button and then the Next button again and the Next button on this window should now be lit up.
  4. We chose Use Git from the Windows Command Prompt
    • image
  5. On the next window Use the OpenSSL Library
  6. Checkout Windows-style, commit Unix-style line endings
    • image
  7. Use MinTTY (the default terminal of MSYS2)
    • image
  8. We left the defaults for Configuring extra options
    • Enable file system caching
    • Enable Git Credential Manager

Once Git has been installed the next thing to do is to start VS Code and it should find Git:

image

Initialize the Git Repository

A few more steps and we'll be ready to code a new PowerShell script, or transfer in from whatever method we've been using prior.

  1. Create a new folder to store everything in
    • We're using OneDrive Consumer as a location for ours to make it easily accessible
  2. CTRL+SHFT+E --> Open Folder --> Folder created above
    • VS Code will reload when the folder has been chosen
  3. CTRL+SHFT+G --> Click the Initialize Repository button
    • image
  4. Click the Initialize Repository button with the folder we opened being the default location
  5. Git should be happy
    • image

Now, we're almost there!

VS Code Extension Installation

The last steps are to get the PowerShell Extension installed and tweak the setup to use it.

  1. CTRL+SHFT+X
  2. Type PowerShell in the Marketplace search
  3. Click the little green Install button then after the install the little blue Reload button
    • image
  4. Additional VS Code Extensions we install by default
    1. Better Comments
      • Allows for colour coded # ! PowerShell Comments
    2. Git History
      • Allows us to look at what's happening in Git
    3. VSCode-Icons
      • Custom icons in VS Code

VS Code Quick Navigation

Once done, the following key strokes are the first few needed to get around and then there's one more step:

  • Source Control: Git: CTRL+SHFT+G
  • Extensions: CTRL+SHFT+X
  • Folder/File Explorer: CTRL+SHFT+E
  • User/Workspace Settings: CTRL+,

Create the Workspace

And finally, the last step is to:

  1. File
  2. Save Workspace As
  3. Navigate to the above created folder
  4. Name the Workspace accordingly
  5. Click the Save button

Then, it's Ready, Set, Code! :)

Note that the PowerShell .PS1 files should be saved in the Workspace folder and/or subfolders to work with them.

To start all new files in the PowerShell language by default add the following to User Settings

  1. CTRL+,
  2.     "files.defaultLanguage": "powershell"

One of the beauties of this setup is the ability to look at various versions of the files, much like we can with SharePoint and Office files, to compare the changes made over the history of the PowerShell Code.

Another is the ability to see in glorious colour!

image

Thanks to Ben Thomas' challenge PowerShell is already so much easier to work with!

2018-08-15 EDIT: Oops, missed one important step.

  1. Open Git GUI
  2. Click Open Existing Repository
  3. Navigate to the Workspace folder with the .git hidden folder
  4. Open
  5. Set the User's name and E-mail address for both settings
    • image
  6. Click Save

Git should be happy to Commit after that! :)

Philip Elder
Microsoft High Availability MVP
MPECS Inc.
Co-Author: SBS 2008 Blueprint Book
www.s2d.rocks !
Our Web Site
Our Cloud Service
Thursday, 9 August 2018

PowerShell: Add-Computer Error when Specifying OUPath: The parameter is incorrect FIX

We're in the process of setting up a second 2-node Kepler-64 cluster when we hit this when running the Add-Computer PowerShell to domain join a node:

Add-Computer : Computer 'S2D-Node03' failed to join domain 'Corp.Domain.Com from its current
workgroup 'WORKGROUP' with following error message: The parameter is incorrect.
At line:1 char:1
+ Add-Computer -Domain Corp.Domain.Com -Credential Corp\DomainAdmin -OUPath  …
+ ~~~~~~~~~~~~~~~~~~~~~~~~~~~~~~~~~~~~~~~~~~~~~~~~~~~~~~~~~~~~~~~~~~~~~
     + CategoryInfo          : OperationStopped: (S2D-Node03:String) [Add-Computer], InvalidOperation
    Exception
     + FullyQualifiedErrorId : FailToJoinDomainFromWorkgroup,Microsoft.PowerShell.Commands.AddComp
    uterCommand

The PowerShell line it's complaining about is this one:

Add-Computer -Domain Corp.Domain.Com -Credential Corp\DomainAdmin -OUPath "OU=S2D-OpenNodes,OU=S2D-Clusters,DC=Corp,DC=Domain,DC-Com" -Restart

Do you see it ? ;)

The correct PoSh for this step is actually:

Add-Computer -Domain Corp.Domain.Com -Credential Corp\DomainAdmin -OUPath "OU=S2D-OpenNodes,OU=S2D-Clusters,DC=Corp,DC=Domain,DC=Com" -Restart

When specifying the OUPath option if there is any typo in that setting the nondescript error is "The parameter is incorrect."

We always prefer to drop a server or desktop right into their respective OU containers as that allows our Group Policy settings to take giving us full access upon reboot and more.

Philip Elder
Microsoft High Availability MVP
MPECS Inc.
Co-Author: SBS 2008 Blueprint Book
www.s2d.rocks !
Our Web Site
Our Cloud Service

Monday, 30 July 2018

Intel Server System R1208JP4OC Base System Device Driver ERROR Fix

We were asked to rebuild a cluster that had both Intel Server System R1208JP4OC nodes go blotto.

After installing Windows Server 2012 R2 the first step is to install the drivers. But, after installing the most recent Intel Chipset Drivers file we still saw the following:

image

Base System Device: Error

After a bit of finagling around we figured out that version 10.1.2.86_Public shown in the above snip cleared things up nicely.

image

PowerShell found in our Kepler-47 Setup Guide # DRIVERS section

Thanks for reading! :)

Philip Elder
Microsoft High Availability MVP
MPECS Inc.
Co-Author: SBS 2008 Blueprint Book
www.s2d.rocks !
Our Web Site
Our Cloud Service

Thursday, 26 July 2018

Hypervisor, Cluster, and Server Hardware Nomenclature (A quick what's what)

100 Level Post

When helping folks out there seems to be a bit of confusion on what means what when it comes to discussing the software or hardware.

So, here are some definitions to help clear the air.

  • NIC
    • Network Interface Card
    • The card can have one, two, four, or more ports
    • Get-NetAdapter
    • Get-NetLbfoTeam
  • Port
    • The ports on the NIC
  • pNIC
    • pNIC = NIC
    • A physical NIC in a hypervisor host or cluster node
  • vNIC
    • The virtual NIC in a Virtual Machine (VM)
    • In-Guest: Get-NetAdapter
    • In-Guest: Get-NetIPAddress
  • vSwitch
    • The Virtual Switch attached to a vNIC
    • Get-VMSwitch
  • Gb
    • Gigabit =/= Gigabyte (GB)
    • 1 billion bits
  • GB
    • Gigabyte =/= Gigabit (Gb)
    • 1 billion bytes
  • 10GbE
    • 10 Gigabit Ethernet
    • Throughput @ line speed ~ 1GB/Second (1 Gigabyte per Second)
  • 100GbE
    • 100 Gigabit Ethernet
    • Throughput @ line speed ~ 10GB/Second (10 Gigabytes per Second)
  • pCore
    • A physical Core on a CPU (Central Processing Unit)
  • vCPU
    • A virtual CPU assigned to a VM
    • Is _not_ a pCore or assigned to a specific pCore by the hypervisor!
    • Please read my Experts-Exchange article on Hyper-V especially the Virtual CPUs and CPU Cores section mid-way down it's free to access
    • Set-VMProcessor VMNAME -Count 2
  • NUMA
    • Non-Uniform Memory Access
    • A Memory Controller and the physical RAM (pRAM) attached to it is a NUMA node

A simple New-VM PowerShell script is here. This is our PowerShell Guide Series that has a number of PowerShell and CMD related scripts . Please check them out and back every once in a while as more scripts are on the works.

Think something should be in the above list? Please comment or feel free to ping us via email.

Philip Elder
Microsoft High Availability MVP
MPECS Inc.
Co-Author: SBS 2008 Blueprint Book
www.commodityclusters.com
Our Web Site
Our Cloud Service

Tuesday, 3 July 2018

Hyper-V Storage Live Migration Error: …not allowed because replication state is not initialized.

We had a Hyper-V server choke on some attached USB storage that was being used as a backup destination.

After getting things up and running we went to move one of the VM's VHDX file set and hit this:


image

Move Wizard

Storage migration for virtual machine 'VMName' failed.

Operation not allowed because the replication state is not initialized.

Storage Migration for virtual machine 'VMName' (GUID) failed with error 'The device is not ready.' (0x80070015).

Operation not allowed for virtual machine 'VMName' because Hyper-V state is yet to be initialized from the virtual machine configuration. Try again in a few minutes. (Virtual machine ID GUID)

The "fix" is to restart the VMM Service in an elevated PowerShell:

Restart-Service -Name VMMS

Once the service was restarted:

image

The move started without issue.

HT: Charbel Nemnom.

Philip Elder
Microsoft High Availability MVP
MPECS Inc.
Co-Author: SBS 2008 Blueprint Book
Our Web Site
Our Cloud Service

Wednesday, 20 June 2018

Windows Server: Black Screen with "Windows logon process failed to spawn user application."

After demoting a DC we were not able to get to the desktop with a black screen showing up and that was it.

Try and get Task Manager up and running produced the following in the server's Event Logs:

Log Name:      Application
Source:        Microsoft-Windows-Winlogon
Date:          6/20/2018 11:19:06 AM
Event ID:      4006
Task Category: None
Level:         Warning
Keywords:      Classic
User:          N/A
Computer:      SERVER.DOMAIN.COM
Description:
The Windows logon process has failed to spawn a user application. Application name: launchtm.exe. Command line parameters: launchtm.exe /3 .

In the end the solution ended up being to add the local administrator account to the local Users group after hitting CTRL+ALT+DEL/END to click Log Off/Sign Out.

Once we signed back in we got to the server's desktop and were able to continue with it's removal from the domain.

EDIT: Note that the change was done from a DC via Active Directory Users and Computers.

Philip Elder
Microsoft High Availability MVP
MPECS Inc.
Co-Author: SBS 2008 Blueprint Book
Our Web Site
Our Cloud Service

Thursday, 31 May 2018

OS Guide: Slipstream Updates and Drivers Using DISM and OSCDImg

We've posted another guide to our Web site.

Using the script on this page in an elevated CMD allows us to take the base Install.WIM for Windows Server 2016 and slipstream the latest Cumulative Update into it.

Then, the script copies the updated Install.WIM into two separate folders where we keep two sets of installer files/folders. One is a Bare version that has only the Windows installer files. The other contains a whole host of drivers, BIOS and firmware updates, and a copy of the newly minted .ISO file. We use the FULL version for our USB flash drives (blog post) that get permanently plugged into all server systems we deploy.

This script is constantly updated.

Another will be posted at a later date that also includes the ability to update the Install.WIM file with drivers.

UPDATE 2018-06-04: Fixed the link!

Philip Elder
Microsoft High Availability MVP
MPECS Inc.
Co-Author: SBS 2008 Blueprint Book
Our Web Site
Our Cloud Service

Tuesday, 23 January 2018

Storage Spaces Direct (S2D): Sizing the East-West Fabric & Thoughts on All-Flash

Lately we've been seeing some discussion around the amount of time required to resync a S2D node's storage after it has come back from a reboot for whatever reason.

Unlike a RAID controller where we can tweak rebuild priorities, S2D does not offer the ability to do so.

It is with very much a good thing that the knobs and dials are not exposed for this process.

Why?

Because, there is a lot more going on under the hood than just the resync process.

While it does not happen as often anymore, there were times where someone would reach out about a performance problem after a disk had failed. After a quick look through the setup the Rebuild Priority setting turned out to be the culprit as someone had tweaked it from its usual 30% of cycles to 50% or 60% or even higher thinking that the rebuild should be the priority.

S2D Resync Bottlenecks

There are two key bottleneck areas in a S2D setup when it comes to resync performance:
  1. East-West Fabric
    • 10GbE with or without RDMA?
    • Anything faster than 10GbE?
  2. Storage Layout
    • Those 7200 RPM capacity drives can only handle ~110MB/Second to ~120MB/Second sustained
The two are not the mutually exclusive culprit depending on the setup as they both can play together to limit performance.

The physical CPU setup may also come into play but that's for another blog post. ;)

S2D East-West Fabric to Node Count

Let's start with the fabric setup that the nodes use to communicate with each other and pass storage traffic along.

This is a rule of thumb that was originally born out of a conversation at a MVP Summit a number of years back with a Microsoft fellow that was in on the S2D project at the beginning. We were discussing our own Proof-of-Concept that we had put together based on a Mellanox 10GbE and 40GbE RoCE (RDMA over Converged Ethernet) fabric. Essentially, at 4-nodes a 40GbE RDMA fabric was _way_ too much bandwidth.

Here's the rule of thumb we use for our baseline East-West Fabric setups. Note that we always use dual-port NICs/HBAs.
  • Kepler-47 2-Node
    • Hybrid SSD+HDD Storage Layout with 2-Way Mirror
    • 10GbE RDMA direct connect via Mellanox ConnectX-4 LX
    • This leaves us the option to add one or two SX1012X Mellanox 10GbE switches when adding more Kepler-47 nodes
  • 2-4 Node 2U 24 2.5" or 12/16 3.5" Drives with Intel Xeon Scalable Processors
    • 2-Way Mirror: 2-Node Hybrid SSD+HDD Storage Layout
    • 3-Way Mirror: 3-Node Hybrid SSD+HDD Storage Layout
    • Mirror-Accelerated Parity (MAP): 4 Nodes Hybrid SSD+HDD Storage Layout
    • 2x Mellanox SX1012X 10GbE Switches
      • 10GbE RDMA direct connect via Mellanox ConnectX-4 LX
  • 4-7 Node 2U 24 2.5" or 12/16 3.5" Drives with Intel Xeon Scalable Processors
    • 4-7 Nodes: 3-Way Mirror: 4+ Node Hybrid SSD+HDD Storage Layout
    • 4+ Nodes: Mirror-Accelerated Parity (MAP): 4 Nodes Hybrid SSD+HDD Storage Layout
    • 4+ Nodes: Mirror-Accelerated Parity (MAP): All-Flash NVMe cache + SSD
    • 2x Mellanox Spectrum Switches with break-out cables
      • 25GbE RDMA direct connect via Mellanox ConnectX-4/5
      • 50GbE RDMA direct connect via Mellanox ConnectX-4/5
  • 8+ Node 2U 24 2.5" or 12/16 3.5" Drives with Intel Xeon Scalable Processors
      • 4-7 Nodes: 3-Way Mirror: 4+ Node Hybrid SSD+HDD Storage Layout
      • 4+ Nodes: Mirror-Accelerated Parity (MAP): 4 Nodes Hybrid SSD+HDD Storage Layout
      • 4+ Nodes: Mirror-Accelerated Parity (MAP): All-Flash NVMe cache + SSD
      • 2x Mellanox Spectrum Switches with break-out cables
        • 50GbE RDMA direct connect via Mellanox ConnectX-4/5
        • 100GbE RDMA direct connect via Mellanox ConnectX-4/5
    Other than the Kepler-47 setup we always have at least a pair of Mellanox ConnectX-4 NICs in each node for East-West traffic. It's our preference to separate out the storage traffic and the rest.

    All-Flash Setups

    There's a lot of talk in the industry about all-flash.

    It's supposed to solve the biggest bottleneck of them all: Storage!

    The catch is, bottlenecks are moving targets.


    Drop in an all-flash array of some sort and all of a sudden the storage to compute fabric becomes the target. Then, it's the NICs/HBAs on the storage _and_ compute nodes, and so-on.

    If you've ever changed a single coolant hose in an older high miler car you'd see what I mean very quickly. ;)

    IMNSHO, at this point in time, unless there is a very specific business case for all-flash and the fabric in place allows for all that bandwidth with virtually zero latency, all-flash is a waste of money.

    One business case would be for a cloud services vendor that wants to provide a high IOPS and vCPU solution to their clients. So long as the fabric between storage and compute can fully utilize that storage and the market is there the revenues generated should more than make up for the huge costs involved.

    Using all-flash as a solution to a poorly written application or set of applications is questionable at best. But, sometimes, it is necessary as the software vendor has no plans to re-work their applications to run more efficiently on existing platforms.

    Caveat: The current PCIe bus just can't handle it. Period.

    A pair of 100Gb ports on one NIC/HBA can't be fully utilized due to the PCIe bus bandwidth limitation. Plus, we deploy with two NICs/HBAs for redundancy.

    Even with the addition of more PCIe Gen 3 lanes in the new Intel Xeon Scalable Processor Family we are still quite limited in the amount of data that can be moved about on the bus.

    S2D Thoughts and PoCs

    The Storage Spaces Direct (S2D) hyper-converged or SOFS only solution set can be configured and tuned for a very specific set of client needs. That's one of its beauties.

    Microsoft remains committed to S2D and its success. Microsoft Azure Stack is built on S2D so their commitment is pretty clear.

    So is ours!

    Proof-of-Concept (PoC) Lab
    S2D 4-Node for Hyper-Converged and SOFS Only
    Hyper-V 2-Node for Compute to S2D SOFS
    This is the newest edition to our S2D product PoC family:
    Kepler-47 S2D 2-Node Cluster

    The Kepler-47 picture is our first one. It's based on Dan Lovinger's concept we saw at Ignite Atlanta a few years ago. Components in this box were similar to Dan's setup.

    Our second generation Kepler-47 is on the way to being built now.
    Kepler-47 v2 PoC Ongoing Build & Testing

    This new generation will have an Intel Server Board DBS1200SPLR with an E3-1270v6, 64GB ECC, Intel JBOD HBA I/O Module, TPM v2, and Intel RMM. OS would be installed on a 32GB Transcend 2242 SATA SSD. Connectivity between the nodes will be Mellanox ConnectX-4 LX running at 10GbE with RDMA enabled.

    Storage in Kepler-47 v2 would be a combination of one Intel DC P4600 Series PCIe NVMe drive for cache, two Intel DC S4600 Series SATA SSDs for performance tier, and six HGST 6TB 7K6000 SAS or SATA HDDs for capacity. The PCIe NVMe drive will optional due it is cost.

    We already have one or two client/customer destinations for this small cluster setup.

    Conclusion

    Storage Spaces Direct (S2D) rocks!

    We've invested _a lot_ of time and money in our Proof-of-Concepts (PoCs). We've done so because we believe the platform is the future for both on-premises and data centre based workloads.

    Thanks for reading! :)

    Philip Elder
    Microsoft High Availability MVP
    MPECS Inc.
    Co-Author: SBS 2008 Blueprint Book
    Our Web Site
    Our Cloud Service

    Monday, 18 December 2017

    Cluster: Troubleshooting an Issue Using Failover Cluster Manager Cluster Events

    When we run into issues the first thing we can do is poll the nodes via the Cluster Events log in Failover Cluster Manager (FCM).

    1. Open Failover Cluster Manager
    2. Click on Cluster Events in the left hand column
    3. Click on Query
      • image
    4. Make sure the nodes are ticked in the Nodes: section
    5. In the Event Logs section:
      • Microsoft-Windows-Cluster*
      • Microsoft-Windows-FailoverClustering*
      • Microsoft-Windows-Hyper-V*
      • Microsoft-Windows-Network*
      • Microsoft-Windows-SMB*
      • Microsoft-Windows-Storage*
      • Microsoft-Windows-TCPIP*
      • Leave all defaults checked
      • OPTION: Hardware Events
    6. Critical, Error, Warning
    7. Events On
      • From: Events On: 2017-12-17 @ 0800
      • To: Events On: 2017-12-18 @ 2000
    8. Click OK
    9. Click Save Query As...
    10. Save it
      • Copy the resultant .XML file for use on other clusters
      • Edit the node value section to change the node designations or add more
    11. Click on Save Events As... in FCM to save the current list of events for further digging

    Use the Open Query option to get to the query .XML and tweak the dates for the current date and time, add specific Event IDs that we are looking for, and then click OK.

    We have FCM and Hyper-V RSAT installed on our cluster's physical DC by default.

    Philip Elder
    Microsoft High Availability MVP
    MPECS Inc.
    Co-Author: SBS 2008 Blueprint Book
    Our Web Site
    Our Cloud Service

    Saturday, 9 December 2017

    PowerShell TotD: Hyper-V Live Move a specific VHDX file

    There are times when we need to move one of two VHDX files associated with a VM.

    The following is the PowerShell to do so:

    Poll Hyper-V Host/Node for VM HDD Paths

    get-vm "*" | Select *path,@{N="HDD";E={$_.Harddrives.path}} | FL

    Move a Select VHDX

    Move-VMStorage -VMName VMName -VHDs @(@{"SourceFilePath" = "X:\Hyper-V\Virtual Hard Disks\VM-LALoB_D0-75GB.VHDX"; "DestinationFilePath" = "Y:\Hyper-V\Virtual Hard Disks\VM-LALoB_D0-75GB.VHDX"})

    Move-VMStorage Docs

    The Move-VMStorage Docs site. This site has the full syntax for the PowerShell command.

    Conclusion

    While the above process can be initiated in the GUI, PowerShell allows us to initiate a set of moves for multiple VMs. This saves on time bigtime versus mouse.

    By the way, TotD means: Tip of the Day.

    Thanks for reading! :)

    Philip Elder
    Microsoft High Availability MVP
    MPECS Inc.
    Co-Author: SBS 2008 Blueprint Book
    Our Web Site
    Our Cloud Service

    Wednesday, 1 November 2017

    Error Fix: Event 7034 Service Control Manager - Server, BITS, Task Scheduler, Windows Management Instrumentation, Shell Hardware Detection Crashes

    This has just recently started to pop up on networks we manage.

    All of the following are Event ID 7034 Service Control Manager service terminated messages:

    • The Windows Update service terminated unexpectedly. It has done this 3 time(s).
    • The Windows Management Instrumentation service terminated unexpectedly. It has done this 3 time(s).
    • The Shell Hardware Detection service terminated unexpectedly. It has done this 3 time(s).
    • The Remote Desktop Configuration service terminated unexpectedly. It has done this 3 time(s).
    • The Task Scheduler service terminated unexpectedly. It has done this 3 time(s).
    • The User Profile Service service terminated unexpectedly. It has done this 3 time(s).
    • The Server service terminated unexpectedly. It has done this 3 time(s).
    • The IP Helper service terminated unexpectedly. It has done this 2 time(s).
    • The Device Setup Manager service terminated unexpectedly. It has done this 3 time(s).
    • The Certificate Propagation service terminated unexpectedly. It has done this 2 time(s).
    • The Background Intelligent Transfer Service service terminated unexpectedly. It has done this 3 time(s).
    • The System Event Notification Service service terminated unexpectedly. It has done this 2 time(s).

    It turns out that all of the above are tied into SVCHost.exe and guess what:

    Log Name: Application
    Source: Application Error
    Date: 10/23/2017 5:09:57 PM
    Event ID: 1000
    Task Category: (100)
    Level: Error
    Keywords: Classic
    Computer: ABC-Server.domain.com
    Description:
    Faulting application name: svchost.exe_DsmSvc, version: 6.3.9600.16384, time stamp: 0x5215dfe3
    Faulting module name: DeviceDriverRetrievalClient.dll, version: 6.3.9600.16384, time stamp: 0x5215ece7
    Exception code: 0xc0000005
    Fault offset: 0x00000000000044d2
    Faulting process id: 0x138
    Faulting application start time: 0x01d34c5c3f589fe7
    Faulting application path: C:\Windows\system32\svchost.exe
    Faulting module path: C:\Windows\System32\DeviceDriverRetrievalClient.dll

    A contractor of ours that we deployed a greenfield AD and cluster for was the one who figured it out. WSUS and the Group Policy settings were deployed this last weekend with everything in our Cloud Stack running smoothly until then.

    The weird thing is, we have had these settings in place for years now without any issues.

    The following are the settings changed at both sites:

    System/Device Installation
    Specify search order for device driver source locations: Not Configured
    2014-02-11: Enabled by Philip Elder.
    2017-11-01: Not Configured by Philip Elder.
    Specify the search server for device driver updates: Not Configured
    2014-02-11: Enabled by Philip Elder.
    2017-11-01: Not Configured by Philip Elder.

    System/Driver Installation
    Turn off Windows Update device driver search prompt: Not Configured
    2017-10-28: Disabled by Philip Elder.
    2017-11-1: Returned to Not Configured by Philip Elder

    System/Internet Communication Management/Internet Communication settings
    Turn off Windows Update device driver searching: Not Configured
    2014-02-11: Disabled by Philip Elder.
    2017-11-01: Not Configured by Philip Elder.

    It is important to note that when working with Group Policy settings a comment should be made in each setting if at all possible. Then, when it comes to troubleshooting an errant behaviour that turns out to be Group Policy related we are better able to figure out where the setting is and when it was set. In some cases, a short description of the "Why" the setting was made helps.

    Philip Elder
    Microsoft High Availability MVP
    MPECS Inc.
    Co-Author: SBS 2008 Blueprint Book
    Our Cloud Service
    Twitter: @MPECSInc

    Tuesday, 31 October 2017

    Xeon Scalable Processor Motherboard CPU-Soft Lockup Fix

    The new Intel Purley based Intel Server Boards S2600WF, S2600BP, and S2600ST Product Family use a new BMC (Baseboard Management Controller) video subsystem.

    As a result, some operating systems, mostly *NIX based, will choke on install as they may not have the driver built-in.

    Intel Technical Advisory: Intel® Server Board S2600WF, S2600BP and S2600ST Product Family fail to initialize the operating system video driver for the ASPEED* Base Management Controller (BMC).

    That document point's to ASPEED's site for downloading an up to date driver that fixes the problem.

    Root Cause
    Full root cause of this issue has been determined. Intel has confirmed that the failure has no bearing on system performance, it only impacts local video graphics. In detail, when the operating system loads, the OS-embedded ASPEED* video driver is not able to access a portion of the BMC memory space, therefore the process stalls.

    On Windows Server based configurations we need to update the driver once the OS is installed. The default VGA driver that comes built-in to the OS works just fine.

    Philip Elder
    Microsoft High Availability MVP
    MPECS Inc.
    Co-Author: SBS 2008 Blueprint Book
    Our Cloud Service
    Twitter: @MPECSInc

    Tuesday, 24 October 2017

    Some thoughts on Windows Server 1709 and Where to Find It

    We were looking for the new Software Assurance benefit based download of Windows Server 1709 in Microsoft's Volume Licensing Service Center.

    It took a bit to realize that the download was not tied into "Windows Server 2016" and it's available downloads.

    The following two items show up in search for "Windows Server":

    image

    image

    When we click through and try to download either one they both point to the same download:image

    Keep in mind that 1709 is a Server Core only option and receives updates every six months. Plus, the service life of each release is 18 months.

    That means that adopting the Semi-Annual Channel (SAC) release of Windows Server would require a significant investment in both testing prior to deployment and in deploying the OS on a regular basis.

    Keep in mind that Software Assurance is required for access to SAC.

    Is it of value? For those businesses that are looking to adopt newer/better features via quicker cadence then yes, there is value in it.

    For those that are looking for long-term stability in their deployments then the Long Term Service Branch/Channel (LTSB/C) is the way to go.

    For us, we are in a "Wait and see" mode as our focus is currently Storage Spaces and Hyper-V along with Storage Spaces Direct clusters.

    As far as SAC being a Server Core option only we don't have a problem with that now do we? ;)

    Realistically though, there may be a lot of really neat features and abilities that may only appear in the SAC branch of Windows Server as we go along. That has yet to be seen, but given Microsoft's push to add value to Software Assurance over the last number of years one can comfortably wager that there will be extra value in that branch of the OS.

    Philip Elder
    Microsoft High Availability MVP
    MPECS Inc.
    Co-Author: SBS 2008 Blueprint Book
    Our Cloud Service
    Twitter: @MPECSInc

    Saturday, 19 August 2017

    Server 2012 R2 BitLocker Post Install Error: Unspecified Error

    The following error happened on a DC we recently set up and were going to encrypt via BitLocker:

    image

    C:\Users\USERNAME\AppData\Local\Packages\windows.immersivecont...
    C:\Users\USERNAME\Classic_{GUID}.settingcontent-ms
    Unspecified error

    A quick search turned up a simple fix: Reboot the server a second time.

    Sure enough, good to go:

    image

    As a rule, we deploy a TPM in all of our physical DCs that are deployed with our clusters. They are then encrypted using BitLocker. This greatly reduces the exposure to compromise if someone has physical access to that DC. For virtual DCs, we now have the ability to pass a vTPM through to the guests in Server 2016. We're still in the testing phase, but our plan is to have _all_ domain controllers on networks we manage encrypted!

    Philip Elder
    Microsoft High Availability MVP
    MPECS Inc.
    Co-Author: SBS 2008 Blueprint Book
    Our Cloud Service

    Thursday, 22 June 2017

    Disaster Preparedness: KVM/IP + USB Flash = Recovery. Here’s a Guide

    One of the lessons the school of hard knocks taught us was to be ready for anything. _Anything_

    One client space had such a messed up HVAC system that the return air system, which is in the suspended ceiling, didn’t work because most of the vent runs up there were not capped properly. We had quite a few catastrophic failures at that site, as the server closet’s temperatures were always high but especially so in the winter. Fortunately, they moved out of that space a few years ago.

    Since we began delivering our standalone Hyper-V solutions, Storage Spaces Direct (S2D) Hyper-Converged or SOFS clusters, and Scale-Out File Server and Hyper-V clusters into Data Centers around the world, we have discovered that there is a distinct difference in Data Centre services quality. As always, “buyer beware” and “We get what we pay for”.
    So, what does that mean?

    It means that, whether on-premises (“premises” not “premise”), hybrid, or all-in the Cloud we need to be prepared.
    For this post, let us focus in on being ready for a standalone system or a cluster node failure.

    There are four very important keys to being ready:

    1. Systems warranties
      1. 4-Hour Response in a cluster setting
      2. Next Business Day (NBD) for others is okay
    2. KVM over IP (KVM/IP) is a MUST
      1. Intel RMM
      2. Dell iDRAC Enterprise
      3. iLO Advanced
      4. Others …
    3. Bootable USB Flash Drive (blog post)
      1. 16GB flash drive
      2. NTFS formatted ACTIVE
      3. Most current OS files set up and maintained
      4. Keep those .WIM files up to date (blog post)
    4. Either Managed UPS or PDU
      1. Gives us the ability to power cycle the server’s power supply or supplies.

    In our cluster settings, we have our physical DC (blog post)  set up for management. We can use that as our platform to get to the KVM/IP to begin our repair and/or recover processes.

    This is what the back of our (S2D) cluster looks like now:

    image

    The top flash drive is what we have been using for the last few years. A Kingston DTR3 series flash drive.

    The bottom one is a Corsair VEGA. We have also been trying out the SanDisk Cruzer Fit that is even smaller than that!

    The main reason for the change is to remove that fob sticking off the back or front of the server. In addition, the VEGA or Fit have such a small profile we can ship them plugged in to the server(s) and not worry about someone hitting them once the server is in production.

    Here is a quick overview of what we do in the event of a problem:

    1. Log on to our platform management system
    2. Open the RMM web page
    3. log on
    4. Check the baseboard management controller logs (BMC/IPMI logs page)
      1. If we see the logs indicate a hard-stop them we’re on to initiate warranty replacement
      2. If it is in the OS somewhere then we can either fix or rebuild
    5. Rebuild
      1. Cluster: Clean up domain AD, DNS, DHCP, and Evict OLD Node from Cluster
      2. Reset or Reboot
      3. Function Key to Boot Menu
      4. Boot flash
      5. Install OS to OS partition/SSD
      6. Install and configure drivers
      7. Cluster: Join Domain
        1. Server name would be the same as downed node
        2. Update Kerberos Constrained Delegation
      8. Install and configure the Hyper-V and/or File Services Roles
      9. Set up networking
      10. Standalone: Import VMs
      11. Cluster: Join and Live Migrate on then off to test

    Done.

    The key reason for the RMM and flash drive? We just accomplished the above without having to leave the shop.

    And, across the entire life of the solution if there is a hiccup to deal with we’re dealing with it immediately instead of having to travel to the client site, data centre, or third party site to begin the process.

    One more point: This setup allows us to deploy solutions all across the world so long as we have an Internet connection at the server’s site.

    There is absolutely no reason to deploy servers without a RMM or desktops/laptops/workstations without vPro. None. Nada. Zippo.

    When it comes to getting in to the network, we can use the edge to VPN in or have an IP/MAC filtered firewall rule with RDP inbound to our management platform. One should _never_ open the firewall to a listening RDP port no matter what port it would be listening on.

    Philip Elder
    Microsoft High Availability MVP
    MPECS Inc.
    Co-Author: SBS 2008 Blueprint Book
    Our Cloud Service
    Twitter: @MPECSInc

    Monday, 13 February 2017

    Installing Windows: Updating Drivers for Boot.WIM and Install.WIM

    We have a number of clients that are going to be on Windows 7 Enterprise 64-bit for the foreseeable future.
    Most, if not all, of the laptops we are deploying today require a few BIOS tweaks to turn off uEFI and SecureBoot prior to beginning the setup process.
    Once that is done, the laptops we are deploying today have wired and wireless network, chipsets, and USB 3 ports that have no drivers in the Windows 7 Boot.WIM or Install.WIM files. So, we would be left stranded when trying to deploy an operating system (OS) via flash!
    Given the amount of application updates most of our clients have we decided to avoid using MDT or other imaging software to deploy a new laptop. The time savings would be negligible since we’d be stuck running all of the application updates or new installs post OS deployment anyway.
    Also, when installing an operating system via USB 3 flash drive with decent read speeds it only takes a few minutes to get through the base OS install. Windows 10 can have an entire OS install done in a few minutes.
    The following instructions assume the files have already been extracted to a bootable flash drive to use for installing an OS on a new machine.
    Here’s a simple step-by-step for updating the drivers for a Windows 7 Professional Install.WIM:
    1. Dism /Get-WimInfo /WimFile:D:\sources\install.wim
      • Where D: = the flash drive letter
    2. Dism /Mount-Wim /WimFile:D:\sources\install.wim /Name:"Windows 7 PROFESSIONAL" /MountDir:C:\Mount
      • Change C: to another drive/partition if required
      • NOTE: Do not browse the contents of this folder!
    3. Dism /Image:L:\mount /Add-Driver /Driver:C:\Mount_Driver /Recurse
      • Again, change C: to the required drive letter
      • We extract all drivers to be installed or updated to this folder
    4. Dism /unmount-Wim /mountdir:L:\mount /commit
      • This step will commit all of the changes to the .WIM file
      • NOTE: Make sure there are _no_ Windows/File Explorer, CMD, or PowerShell sessions sitting in the C:\Mount folder or the dismount will fail!
    5. Dism /unmount-Wim /mountdir:L:\mount /Discard
      1. Run this command to dismount the .WIM
    The following is the process for updating the WinPE Boot.WIM:
    1. Dism /Get-WimInfo /WimFile:D:\sources\boot.wim
    2. Dism /Mount-Wim /WimFile:D:\sources\boot.wim /Name:"Microsoft Windows Setup (x64)" /MountDir:C:\Mount
    3. Dism /Image:C:\mount /Add-Driver /Driver:C:\Mount_Driver /Recurse
    4. Dism /unmount-Wim /mountdir:C:\mount /commit
    The above process can be used to install the newest RAID driver into a Windows Server Boot.WIM and Install.WIM to facilitate a smoother install via flash drive.
    Currently, we are using Kingston DTR3.0 G2 16GB flash drives as they have good read and decent write speeds. Please feel free to comment with your suggestions on reasonably priced 16GB and 32GB USB 3 flash drives that have good read and write speeds.
    Good to us is ~75MB/Second read and ~35MB/Second write.
    Thanks for reading! :)
    Philip Elder
    Microsoft High Availability MVP
    MPECS Inc.
    Co-Author: SBS 2008 Blueprint Book
    Our Cloud Service