Showing posts with label System Builder Tips. Show all posts

Tuesday, 15 January 2019

Custom Intel X299 Workstation: Intel VROC RAID 1 NVMe WinSat Disk Score

We just finished a custom build for a client of ours in the US.

The machine is extremely fast but quiet.

image

After kicking the tires a bit with Windows 10 Pro 64-bit and some software installs post burn-in we get the following performance out of the Intel NVMe RAID 1 pair:

C:\Temp>winsat disk
Windows System Assessment Tool
> Running: Feature Enumeration ''
> Run Time 00:00:00.00
> Running: Storage Assessment '-ran -read -n 0'
> Run Time 00:00:00.77
> Running: Storage Assessment '-seq -read -n 0'
> Run Time 00:00:02.38
> Running: Storage Assessment '-seq -write -drive C:'
> Run Time 00:00:01.64
> Running: Storage Assessment '-flush -drive C: -seq'
> Run Time 00:00:00.45
> Running: Storage Assessment '-flush -drive C: -ran'
> Run Time 00:00:00.38
> Dshow Video Encode Time                      0.00000 s
> Dshow Video Decode Time                      0.00000 s
> Media Foundation Decode Time                 0.00000 s
> Disk  Random 16.0 Read                       1020.73 MB/s          8.8
> Disk  Sequential 64.0 Read                   3203.52 MB/s          9.3
> Disk  Sequential 64.0 Write                  1456.24 MB/s          8.8
> Average Read Time with Sequential Writes     0.090 ms          8.8
> Latency: 95th Percentile                     0.146 ms          8.9
> Latency: Maximum                             0.316 ms          8.9
> Average Read Time with Random Writes         0.058 ms          8.9
> Total Run Time 00:00:05.91

The machine is destined for a surveying company that's getting into high end image and video work with drones.

All in all, we are very happy with the build and we're sure they will be too!

Philip Elder
Microsoft High Availability MVP
MPECS Inc.
Co-Author: SBS 2008 Blueprint Book
www.s2d.rocks !
Our Web Site
Our Cloud Service

Thursday, 9 November 2017

Intel Server System R2224WFTZS Integration & Server Building Thoughts

We have a brand new Intel Server System R2224WFTZS that is the foundation for a mid to high performance virtualization platform.

image

Intel Server System R2224WFTZS 2U

Below it sits one of our older lab Intel Server System SR2625URLX 2U. Note the difference in the drive caddy.

That change is welcome as the caddy no longer requires a screwdriver to set the drive in place:

image

Intel 2.5" Tooless Drive Caddy

What that means is the time required to get 24 drives installed in the caddies went from half an hour or more to five or ten minutes. That, in our opinion, is a great leap ahead!

The processors for this setup are Intel Xeon Gold 6134s with 8 cores running at 3.2GHz with a peak of 3.7GHz. We chose the Gold 6134 as a starting place as most of the other CPUs have more than eight cores thus pushing up the cost of licensing Microsoft Windows Server Standard or Datacenter.

image

Intel Xeon Gold 6134, Socket, Heatsink, and Canadian Loonie $1 Coin

The new processors are huge!

The scale difference between the E3-1200 series, E5-2600 series is orders of magnitude larger. The jump in size reminds me of the Pentium Pro's girth next to the lesser desktop/server processors of the day.

image

Intel Xeon Processor E3-1270 sits on the Intel Xeon Gold 6134

The server is nearly complete.

image

Intel Server System R2224WFTZS Build Complete

Bill of Materials

In this setup the server's Bill of Materials (BoM) is as follows:

  • (2) Intel Xeon Gold 6134
  • 384GB via 12x 32GB Crucial DDR4 LRDIMM
  • Intel Integrated RAID Module RMSP3CD080F with 7 Series Flash Cache Backup
  • Intel 12Gbps RAID Expander Module RES3TV360
  • (2) 150GB Intel DC S3520 M.2 SSDs for OS
  • (5) 1.9TB Intel DC S4600 SATA SSDs for high IOPS tier
  • (19) 1.8TB Seagate 10K SAS for low to mid IOPS tier
  • Second Power Supply, TPM v2, and RMM4 Module

It's important to note that when setting up a RAID controller instead of a Host Bus Adapter (HBA) that does JBOD only we require the flash cache backup module. In this particular unit one needs to order the mounting bracket: AWTAUXBBUBKT

I'm not sure why we missed that, but we've updated our build guides to reflect the need for it going forward.

One other point of order is the rear 2.5" hot swap drive bay kit (A2UREARHSDK2) does not come installed from the factory in the R2224WFTZS as it did in the R2224WTTYS. I'm still not sold on M.2 for the host operating system as they are not hot swap capable. That means, if one dies we have to down a node in order to change it. With the rear hot swap bay we can do just that, swap out the 2.5" SATA SSD that's being used for the host OS.

For the second set of two 10GbE ports we used an Intel X540-T2 PCIe add-in card as the I/O modules are not in the distribution channel as of this writing.

NOTE: One requires a T30 hex screwdriver for the heatsinks! After installing the processor please make sure to start all four nuts prior to tightening. As a suggestion, from there snug each one up gradually starting with the two middle nuts then the outer nuts similar to the process for installing a head on an engine block. This process provides an even amount of pressure from the middle of the heatsink outwards.

Firmware Notes

Finally, make sure to update the firmware on all components before installing an operating system. There are some key fixes in the motherboard firmware updates as of this writing (BIOS 00.01.0009 ReadMe). Please make sure to read through to verify any caveats associated with the update process or the updates themselves.

Next up on our build process will be to update all firmware in the system, install the host operating system and drivers, and finally run a burn-in process. From there, we'll run some tests to get a feel for the IOPS and throughput we can expect from the two RAID arrays.

Why Build Servers?

That's got to be the burning question on some minds. Why?

The long and the short of it is because we've been doing so for so many years it's a hard habit to kick. ;)

Actually, the reality is much more mundane. We continue to be actively involved in building out our own server solutions for a number of reasons:

  • We can fine tune our solutions to specific customer needs
    • Need more IOPS we can do that
    • Need more throughput we can do that
    • Need a blend of the two as is the case here, then we can do that too.
  • Direct contact with firmware issues, interoperability, and stability
    • Making the various firmware bits play nice together can be a challenge
  • Driver issues, interoperability, and stability
    • Drivers can be quite finicky about what's in the box with them
  • Hardware interoperability
    • Our parts bin is chalk full of parts that refused to work with one another
    • On the other hand our solution sets are known good configurations
  • Cost
    • Our server systems are a fraction of the cost of Tier 1
  • Overall system configuration
    • As Designed Stability out of the box
  • He said She said
    • Since we test our systems extensively prior to deploying we know them well
    • Software Vendors that point the finger have no leg to stand on as we have plenty of charts and graphs
    • Performance issues are easier to pinpoint in software vendor's products
    • We remove the guesswork around an already configured Tier 1 box

Business Case

The business case is fairly simple: There are _a lot_ of folks out there that do not want to cloud their business. We help customers with a highly available solution set and our business cloud to give them all of the cloud goodness but keep their data on-premises.

We also help I.T. Professional Shops who may not have the skill-set on board that have customers with a need for High Availability and a cloud like experience but want the solution deployed on-premises.

For those customers that do want to cloud their business we have a solution set for the Small to Medium I.T. Shops that want to provide multi-tenant solutions in their own data centres. We provide the solution and backend support at a very reasonable cost while they spend their time selling their cloud.

All in all, we've found ourselves a number of different great little niches for our highly available solutions (clusters) over the last few years.

Thanks for reading! :)

Philip Elder
Microsoft High Availability MVP
MPECS Inc.
Co-Author: SBS 2008 Blueprint Book
Our Web Site
Our Cloud Service
Twitter: @MPECSInc

Tuesday, 31 October 2017

Xeon Scalable Processor Motherboard CPU-Soft Lockup Fix

The new Intel Purley based Intel Server Boards S2600WF, S2600BP, and S2600ST Product Family use a new BMC (Baseboard Management Controller) video subsystem.

As a result, some operating systems, mostly *NIX based, will choke on install as they may not have the driver built-in.

Intel Technical Advisory: Intel® Server Board S2600WF, S2600BP and S2600ST Product Family fail to initialize the operating system video driver for the ASPEED* Base Management Controller (BMC).

That document point's to ASPEED's site for downloading an up to date driver that fixes the problem.

Root Cause
Full root cause of this issue has been determined. Intel has confirmed that the failure has no bearing on system performance, it only impacts local video graphics. In detail, when the operating system loads, the OS-embedded ASPEED* video driver is not able to access a portion of the BMC memory space, therefore the process stalls.

On Windows Server based configurations we need to update the driver once the OS is installed. The default VGA driver that comes built-in to the OS works just fine.

Philip Elder
Microsoft High Availability MVP
MPECS Inc.
Co-Author: SBS 2008 Blueprint Book
Our Cloud Service
Twitter: @MPECSInc

Monday, 10 July 2017

VELCRO Ties: It’s not easy being green!

This spring and now summer I’ve been spending a lot of time in the garden. From getting things ready for planting, planting, and now keeping the weeds at bay and the plants from being thirsty!

Well, on one of the trips into one of our Canadian Tire big box hardware stores I stumbled across these:

image

Yeah, okay, so what you might say?

Well, that 45' role was $6 before taxes. $6!

Needless to say, I purchased a good number of roles while I was there to use as wire ties in our Proof-of-Concept (PoC) systems plus others.

I personally don't have a problem with the colour green. ;)

Philip Elder
Microsoft High Availability MVP
MPECS Inc.
Co-Author: SBS 2008 Blueprint Book
Our Cloud Service
Twitter: @MPECSInc

Thursday, 22 June 2017

Disaster Preparedness: KVM/IP + USB Flash = Recovery. Here’s a Guide

One of the lessons the school of hard knocks taught us was to be ready for anything. _Anything_

One client space had such a messed up HVAC system that the return air system, which is in the suspended ceiling, didn’t work because most of the vent runs up there were not capped properly. We had quite a few catastrophic failures at that site, as the server closet’s temperatures were always high but especially so in the winter. Fortunately, they moved out of that space a few years ago.

Since we began delivering our standalone Hyper-V solutions, Storage Spaces Direct (S2D) Hyper-Converged or SOFS clusters, and Scale-Out File Server and Hyper-V clusters into Data Centers around the world, we have discovered that there is a distinct difference in Data Centre services quality. As always, “buyer beware” and “We get what we pay for”.
So, what does that mean?

It means that, whether on-premises (“premises” not “premise”), hybrid, or all-in the Cloud we need to be prepared.
For this post, let us focus in on being ready for a standalone system or a cluster node failure.

There are four very important keys to being ready:

  1. Systems warranties
    1. 4-Hour Response in a cluster setting
    2. Next Business Day (NBD) for others is okay
  2. KVM over IP (KVM/IP) is a MUST
    1. Intel RMM
    2. Dell iDRAC Enterprise
    3. iLO Advanced
    4. Others …
  3. Bootable USB Flash Drive (blog post)
    1. 16GB flash drive
    2. NTFS formatted ACTIVE
    3. Most current OS files set up and maintained
    4. Keep those .WIM files up to date (blog post)
  4. Either Managed UPS or PDU
    1. Gives us the ability to power cycle the server’s power supply or supplies.

In our cluster settings, we have our physical DC (blog post)  set up for management. We can use that as our platform to get to the KVM/IP to begin our repair and/or recover processes.

This is what the back of our (S2D) cluster looks like now:

image

The top flash drive is what we have been using for the last few years. A Kingston DTR3 series flash drive.

The bottom one is a Corsair VEGA. We have also been trying out the SanDisk Cruzer Fit that is even smaller than that!

The main reason for the change is to remove that fob sticking off the back or front of the server. In addition, the VEGA or Fit have such a small profile we can ship them plugged in to the server(s) and not worry about someone hitting them once the server is in production.

Here is a quick overview of what we do in the event of a problem:

  1. Log on to our platform management system
  2. Open the RMM web page
  3. log on
  4. Check the baseboard management controller logs (BMC/IPMI logs page)
    1. If we see the logs indicate a hard-stop them we’re on to initiate warranty replacement
    2. If it is in the OS somewhere then we can either fix or rebuild
  5. Rebuild
    1. Cluster: Clean up domain AD, DNS, DHCP, and Evict OLD Node from Cluster
    2. Reset or Reboot
    3. Function Key to Boot Menu
    4. Boot flash
    5. Install OS to OS partition/SSD
    6. Install and configure drivers
    7. Cluster: Join Domain
      1. Server name would be the same as downed node
      2. Update Kerberos Constrained Delegation
    8. Install and configure the Hyper-V and/or File Services Roles
    9. Set up networking
    10. Standalone: Import VMs
    11. Cluster: Join and Live Migrate on then off to test

Done.

The key reason for the RMM and flash drive? We just accomplished the above without having to leave the shop.

And, across the entire life of the solution if there is a hiccup to deal with we’re dealing with it immediately instead of having to travel to the client site, data centre, or third party site to begin the process.

One more point: This setup allows us to deploy solutions all across the world so long as we have an Internet connection at the server’s site.

There is absolutely no reason to deploy servers without a RMM or desktops/laptops/workstations without vPro. None. Nada. Zippo.

When it comes to getting in to the network, we can use the edge to VPN in or have an IP/MAC filtered firewall rule with RDP inbound to our management platform. One should _never_ open the firewall to a listening RDP port no matter what port it would be listening on.

Philip Elder
Microsoft High Availability MVP
MPECS Inc.
Co-Author: SBS 2008 Blueprint Book
Our Cloud Service
Twitter: @MPECSInc

Saturday, 12 November 2016

Server Hardware: The Data Bus is Playing Catch-Up

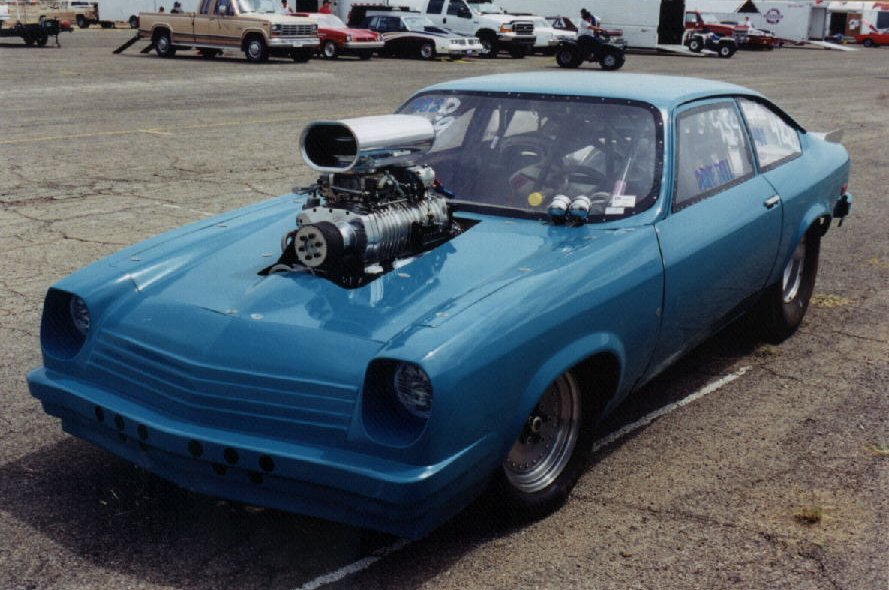
After seeing the Mellanox ConnectX-6 200Gb announcement the following image came to mind:

image

Image credit

The Vega/Monza was a small car that some folks found the time to stuff a 454CID Chevy engine into then drop a 671 or 871 series roots blower on (they came off trucks back in the day). The driveline and the "frame" were then tweaked to accommodate it.

The moral of the story? It was great to have all of that power but putting down to the road was always a problem. Check out some of the "tubbed" Vega images out there to see a few of the ways to do so.

Our server hardware today does not, unfortunately, have the ability to be "tubbed" to allow us to get things moving.

PCI Express

The PCI Express (PCIe) v3 spec (Wikipedia) at a little over 15GB/Second (that's Gigabytes not Gigabits) across a 16 lane connector falls far short of the needed bandwidth for a dual port 100Gb ConnectX-5 part.

As a point of reference, the theoretical throughput of one 100Gb port is about 12.5GB/Second. That essentially renders the dual port ConnectX-5 adapter a moot point as that second port has very little left for it to use. So, it becomes essentially a "passive" port to a second switch for redundancy.

A quick search for "Intel Server Systems PCIe Gen 4" yields very little in the way of results. We know we are about due for a hardware step as the "R" code (meaning refresh such as R2224WTTYSR) is coming into its second to third year in 2017.

Note that the current Intel Xeon Processor E5-2600 v4 series only has a grand total of 40 PCI Express Generation 3 lanes available. Toss in two PCIe x16 wired lanes with two ConnectX-4 100Gb adapters and that's going to be about it for real throughput.

Connectivity fabric bandwidth outside the data bus is increasing in leaps and bounds. Storage technologies such as NVMe and now NVDIMM-N, 3D XPoint, and other such memory bus direct storage technologies are either centre stage or coming on to the stage.

The current PCIe v3 pipe is way too small. The fourth generation PCI Express pipe that is not even in production is _already_ too small! It's either time for an entirely new bus fabric or a transitioning of the memory bus into either a full or intermediate storage bus which is what NVDIMM-N and 3D XPoint are hinting at.

Oh, and one more tiny point: Drawing storage into the memory bus virtually eliminates latency ... almost.

Today's Solutions

Finally, one needs to keep in mind that the server platforms we are deploying on today have very specific limitations. We've already hit some limits in our performance testing (blog post: Storage Configuration: Know Your Workloads for IOPS or Throughput).

With our S2D solutions looking to three, five, or more years of service life these limitations _must_ be at the forefront of our thought process when in discovery and then solution planning.

If not, we stand to have an unhappy customer calling us to take the solution back after we deploy or a call a year or two down the road when they hit the limits.

***

Author's Note: I was just shy of my Journeyman's ticket as a mechanic, in a direction towards high-performance, when the computer bug bit me. ;)

Philip Elder
Microsoft High Availability MVP
MPECS Inc.
Co-Author: SBS 2008 Blueprint Book
Our Cloud Service

Friday, 7 June 2013

Windows Server 2012 to RST RAID 0 Error: Windows can’t be installed on drive 0 partition 1 - and Others

We had the following errors when trying to install Windows Server 2012 onto a desktop setup:

image

Windows Setup

Windows cannot be installed to this disk. This computer’s hardware may not support booting to this disk. Ensure that the disk’s controller is enabled in the computer’s BIOS menu.

And then, after fiddling about with DiskPart we managed:

image

Windows Setup

We couldn’t install Windows in the location you chose. Please check your media drive. Here’s more info about what happened; 0x80300001.

Windows cannot be installed to this disk. This computer’s hardware may not support booting to this disk. Ensure that the disk’s controller is enabled in the computer’s BIOS menu.

The PC setup

  • Intel DX79SR with Core i7 and 64GB RAM
  • Intel RST RAID enabled and 6x 160GB Intel SSDs in RAID 0
  • Primary SATA set to RAID
  • Secondary SATA DISABLED in BIOS
  • Boot order set correctly

Now, it is important to note that these SSDs have been in and out of various systems.

So, a last ditch effort:

  1. Log into the RAID BIOS
  2. Reset the disks to NON-RAID
  3. Boot to WinPE
  4. SHFT+F10
  5. DiskPart
  6. Select each SSD and CLEAN
  7. Reboot
  8. Log into RAID BIOS
  9. Set up RAID 0
  10. Boot to Windows Server 2012 Setup

We created our 120GB partition and did not see a single message.

So, rule of thumb: Clean each disk while in JBOD/Standalone mode with DiskPart before configuring the disks in a new host-based RAID setup (chipset RAID).

A hardware RAID setup would initialize the disks (use the deep/long initialization to run a full set of zeros across all platters/SSDs if problems happen) so we would not normally see this problem.

Philip Elder
MPECS Inc.
Microsoft Small Business Specialists
Co-Author: SBS 2008 Blueprint Book

Chef de partie in the SMBKitchen
Find out more at
www.thirdtier.net/enterprise-solutions-for-small-business/

Windows Live Writer

Thursday, 23 May 2013

System Builder: Replacing that OEM COA

For those of us that are OEM System Builders we can request a replacement COA label if the original one was damaged beyond recognition or the case it was affixed to needed to be replaced.

We just replaced a case for a client that has an integrated power supply. So, we needed to apply for a replacement COA.

When we did so the result was:

image

So, we sent an e-mail off to the address with all of the relevant information. Hopefully we get word back.

In this case the Windows 7 Ultimate x64 OEM software package was purchased through legitimate distribution channels here in Canada. And we are the system builders. :)

Philip Elder
MPECS Inc.
Microsoft Small Business Specialists
Co-Author: SBS 2008 Blueprint Book

Chef de partie in the SMBKitchen
Find out more at
www.thirdtier.net/enterprise-solutions-for-small-business/

Windows Live Writer

Tuesday, 19 February 2013

HP Smart Array P420i Controller – Caveat: Need Flash Based Cache to Make Any Online Array Changes

We are in the process of setting up a Windows Server 2012 Hyper-V host with two server operating system guests, one DC and one RDS, and a couple of desktop operating system guests.

We were brought in to set up the environment at the hardware vendor’s request. So, this box was set up prior to our jumping in.

Since we do not work with HP servers on a regular basis we are not up on their terminology nor product features throughout their server lines.

We are in the process of looking into filling up the 2.5” hot swap drive bays as the server came configured with a RAID 10 (RAID 1+0) array and one global hot spare.

Having worked with Intel RAID Controllers most of the time as well as LSI RAID controllers we have come to expect advanced features to work out of the box. This is primarily due to the fact that we run with mainstream series or high performance series RAID controllers out of the box.

We avoid entry level if at all possible.

As we have discovered today, this is one reason why:

image

Note the following:

  • Modular, easy-to-upgrade design lets you optimize performance by upgrading from 40-bit 512MB cache to 72-bit 1GB Flash Backed Write Cache or 72-bit 2GB Flash Backed Write Cache (FBWC).
  • Addition of the flash backed cache upgrade enables array expansion, logical drive extension, RAID migration, and stripe size migration.

Obviously the emphasis is ours.

So, we are now in a position where we need to find out the cost on the 1GB and 2GB FBWC options for this particular server.

We are not sure what that cost will be but it will probably beat out our having to back up the entire server and its guests, that are already set up for production, and restoring the box using our ShadowProtect IT Edition license.

The clue that something was up came via the HP management utility that showed the following for the current RAID array configuration:

image

Note the distinct absence of RAID 6.

Apparently there is a license key that enables RAID 6 in this particular controller.

So, we hit two caveats with this setup:

  • Flash based Cache is required for advanced RAID features.
  • A license pack is required to enable RAID 6.

Ever try to purchase a base model car and add _just_ the features needed like cruise/tilt/air and a decent stereo and end up more expensive that the “LX” version of that vehicle?

It has been a disappointing trend in our industry to no longer be able to configure a Tier 1 server system, desktop system, or workstation system without having to knew the bits and pieces that these systems are made up of. We used to be able to configure systems that would just work as we expect them to and have the features we would expect for the price we paid.

Also, it has been our experience that the Tier 1 sales folks that _know_ these bits and pieces are very hard come-by with the onus being on us to make sure we have our ducks lined up _before_ we initiate contact.

Philip Elder
MPECS Inc.
Microsoft Small Business Specialists
Co-Author: SBS 2008 Blueprint Book

Chef de partie in the SMBKitchen
Find out more at
www.thirdtier.net/enterprise-solutions-for-small-business/

Windows Live Writer

Thursday, 24 January 2013

Desktop Board BIOS Flash Initiated Within Windows – Caveat

When flashing a desktop board with TXT (Trusted Execution Technology) enabled in the BIOS an update to the BIOS initiated within Windows will fail.

Prior to initiating the BIOS update reboot and disable TXT then run the update.

Once the update has completed and the system has finished its post update boot shut the system down. Pull the power and let it sit for a minute.

Power the system up and F2 or DEL into the BIOS. Verify that the update did not change any of the settings and enable TXT.

We enable TXT before installing the operating system by default. We also make sure the drive mode is set to AHCI.

Philip Elder
MPECS Inc.
Microsoft Small Business Specialists
Co-Author: SBS 2008 Blueprint Book

Windows Live Writer

Wednesday, 23 January 2013

Intel Desktop Board 7 Series BIOS Update Caveats – Important

We’ve been building a lot of our corporate desktop systems based on the Intel DQ77KB and the Core i5-3470S with either an 80GB or 120GB Intel 320 Series SSD installed.

We normally finish of a system install with the most recent BIOS update and then a run through the settings post update boot.

This last board stopped dead during the reboot to BIOS update process.

A call into Intel and we discovered why (from their support technician’s e-mail we requested):

In this particular case, for the 7 Series Chipset based motherboards like the Intel® Desktop Board DQ77KB it is extremely necessary to have the BIOS 0044 before applying the latest version. This is because BIOS 0044 contains the update version 8.1.2.1318 for the Intel® Management Engine which corrects possible problems with USB3.0 front panel headers.

All of the Intel® 7 Series Chipset Based motherboards require this Intel® Management Engine firmware update so here is a list of the required BIOS version to accomplish this fix based on the motherboard number:

Motherboard model BIOS with the Management Engine firmware update

DP75EN 0039

DH77DF / DH77KC 0102

DH77EB 0096

DQ77KB 0044

DQ77CP / DQ77MK 0052

DZ75ML-45K 0010

DZ77BH-55K 0093

DZ77GA-70K / DZ77RE-75K 0057

DZ77SL-50K 0089

You can continue updating the BIOS version once you have reached the one having the Management Engine firmware update

As we can see, we need to step our BIOS updates.

UPDATE: Put “77” in the original title. Corrected to “7 Series”.

Philip Elder
MPECS Inc.
Microsoft Small Business Specialists
Co-Author: SBS 2008 Blueprint Book

Windows Live Writer

Wednesday, 24 October 2012

Intel Desktop Board DQ77KB Integration Notes with Lian-Li PC-Q05

Our previous posts:

We have our power brick as per the first linked blog post above.

Here are a few notes as far as how we need to configure this system.

Cooling Solution

The cooling solution comes with a backing plate:

WP_000662

The plate needs to be installed on the bottom of the motherboard _before_ installing the board into the PC-Q05 case.

We need to move the cross-member as well as the plate in the cooling channel before we can install the cooling solution onto the CPU.

Note that there are two small screws that are on the cooling fin block that need to be set in place along with the four screws around the CPU itself.

WP_000670

Make sure to have the SATA power cable set plugged into the motherboard prior to re-installing the case cross-member.

Now, the fan itself presents a bit of a conundrum:

WP_000673

Intel provides two screws with the HTS1155LP that are too _small_ for the standoffs that are in the PC-Q05. Note that the standoffs use a fine thread so any screw used to mount an optical drive will do (Shown above).

The catch is that the plate between the cooling fins and blower that mounts to the PC-Q05 has two screws that are a bit too long. So, when it comes to installing the fan do _not_ try and tighten up the screws 100% as that will push the fan’s metal base plate into the fan itself. One does not need to deliver a PC that will start humming and/or rattling a few days or weeks down the road.

On the plus side the fan standoffs in the PC-Q05 are just a tad off so one can snug up the screws once the fan base hits the buffer plate screws and not worry about them backing out.

SATA Cable

In the picture shown below the SATA connector on the motherboard side is straight. This type of connector is a bit too tall as the cover of the case will not close properly.

Make sure to have some short SATA cables that have one straight and one 90 degree connector on it. That will allow the cover to close without issue.

Windows 7 Installation

We have a bit of a catch when it comes to installing Windows 7. The Intel Desktop Board DQ77KB only has USB 3 SuperSpeed ports on the back. There are USB 2 headers on the board itself but no connectors are provided with the motherboard or case.

WP_000677

So, if the Windows 7 ISO does not have the USB 3 drivers slipstreamed into it we need to use a USB 2 connection as shown above. Fortunately we have a number of those old USB header kits in a bin that will now come in handy. :)

Once the base OS is in place we needed to install the most current driver set for Windows 7.

Please make sure to install the following:

  • Intel PROSet NIC Drivers
  • Graphics Driver
  • Intel Chipset Driver
  • Intel MEI/AMT Driver

Once our system was completely set up we finished off with the BIOS update for the board.

We now have a really slick looking system that is _fast_ in its base configuration!

  • Intel Desktop Board DQ77KB
  • Intel Core i5-3470S
  • 8GB or 16GB Kingston SO-DIMM RAM
  • 80GB Intel 320 Series SSD (or larger depending on application)
  • Lian-Li PC-Q05 Slim Mini-ITX case
  • 19 Volt at 8.4A (160 Watt) AC/DC Power Brick

One small caveat with the setup: The PC-Q05 comes with two Power LED headers. One for the button and one for the front mounted LED. Since the DQ77KB only has one header we chose to modify the front LED header (3 hole block) to have the dark wire (positive) in the middle. That header was then plugged into the Power LED header on the board.

image

That is one smart looking system. :)

Philip Elder
MPECS Inc.
Microsoft Small Business Specialists
Co-Author: SBS 2008 Blueprint Book

Windows Live Writer

Monday, 30 April 2012

Confirmed: Intel Server System R1208GZ Integration For Our 2 Node Hyper-V Failover Cluster Is A Go Plus RemoteFX Compatibility!

We mentioned that we were looking at the new Intel Xeon E5-2600 series 1U and 2U server systems.

We now have it on good authority that an external LSI based SAS connector is available in the Intel RAID Controller RS25GB008:

image

Not only that we have the nVidia Tesla C2070 series and the PNY nVidia Quadro 6000 series graphics processors showing as being compatible with this particular server system.

We would be utilizing a 2U configuration if we were going to run with RemoteFX capabilities for our client’s VDI needs though. These boards are quite large so won’t fit in t 1U chassis depending on the add-on components are installed on the server board.

Since these particular adapters show up on the R1208GZ series 1U we checked to see if the R2208GZ series 2U configuration has them:

image

image

They do indeed.

Now to see if we can gain access to either of the graphics products to run some tests on our own setups! They are quite expensive. :)

We are one step closer to Private Cloud and RemoteFX based VDI!

Philip Elder
MPECS Inc.
Microsoft Small Business Specialists
Co-Author: SBS 2008 Blueprint Book

*Our original iMac was stolen (previous blog post). We now have a new MacBook Pro courtesy of Vlad Mazek, owner of OWN.

Windows Live Writer

Wednesday, 25 April 2012

New Intel Server System R1208GZ Integration Notes for 2 Node Cluster Deployment

We are in the process of working on some new additions to our 2 node Hyper-V Cluster setups based on the new Intel E5-2600 Xeon Processor series.

The one we are focused in on at the moment is the Intel Server System R1208GZ. It is a dual CPU server in a 1U form factor.

image

This particular 1U Server System gives us two PCI-E full height slots thus allowing us to install two LSI SAS Host Bus Adapters for our redundant storage connections. We are in the process to find out which LSI SAS HBAs have been given the green light for use in this Intel Server System.

Since it is so new the Tested Hardware and Operating System List is a bit shy on third party components at this time.

image

It is important to note that the bus connection for the second PCI Riser slot is directly connected to CPU 2. Thus it will only function if a second CPU is present!

The same is true for the DIMM slots associated with CPU 2. DIMMs can only be accessed in the slots designated for CPU 2 if there is a CPU present in that socket!

image

We have four Intel i350 Gigabit Ethernet NICs out of the box with the ability to add in a Quad port 1Gbit I/O Module based on Intel Ethernet Controller i350 if there was a need. 10Gbit Ethernet and other connectivity options are also available.

We would be adding the Intel Remote Management Module 4 LITE plus the dedicated NIC option for the RMM to give us total out-of-band access to the server’s baseboard management controller (BMC) as well as KVM over IP.

A pair of 120GB Intel 320 Series SSDs set up in a RAID 1 array would round out the configuration.

By default we will always be installing two Intel Xeon Processors along with a minimum of 48GB (3x 8GB Kingston Intel Certified ECC) of RAM at 1333MHz for the mid-level Xeons and 1600MHz for the top tier CPUs.

Some further reading on the new server systems (pages with PDF download links):

This new line looks to be a promising 1U form factor addition for our Hyper-V Cluster configuration offerings.

We just need to wait and see what happens with LSI compatibility.

Philip Elder
MPECS Inc.
Microsoft Small Business Specialists
Co-Author: SBS 2008 Blueprint Book

*Our original iMac was stolen (previous blog post). We now have a new MacBook Pro courtesy of Vlad Mazek, owner of OWN.

Windows Live Writer

Tuesday, 24 April 2012

Intel Server System SR1695GPRX Server Board R&R Process

The process of doing a Remove & Replace for warranty purposes on an Intel SR1695GPRX is well documented in the Service Guide . . . well almost.

image

We put together a new SR1695GPRX for a specific purpose and found that one of the memory banks was bad on the board.

We have the replacement board in hand from Intel today and when we went to R&R the board we found a bit of a puzzle not found in the Intel Service Guide:

image

On the back of the server board that came with the Intel Server System was the silver plate that the 1U heat sink would mount to. After a few trial presses the plate looked to be in there quite solidly.

So, we experimented to see just what was keeping that plate stuck to the board.

It turned out that there was a thin gasket like material between the board and the plate. With a blunt object we used a bit of leverage at one edge of the board to push down on the heat sink mount peg from the top of the board.

It took a bit of effort but we were rewarded with a snapping sound and sure enough there was a thin layer of some sort of glue holding the two together.

Same pressure to the other plate peg and we were half way there. We were good to go with a bit of gentle prying using our fingers to get the other two pegs to break free.

Please note that the amount of leverage/pressure to be used may depend on the amount of time the whole setup was in production. This particular one was pretty much right out of the box so we were rewarded after just a bit of effort.

Philip Elder
MPECS Inc.
Microsoft Small Business Specialists
Co-Author: SBS 2008 Blueprint Book

*Our original iMac was stolen (previous blog post). We now have a new MacBook Pro courtesy of Vlad Mazek, owner of OWN.

Windows Live Writer

Monday, 9 April 2012

Zalman ZM-VE300: How to Mount That ISO

The manual does not actually do a step-by-step on getting a mounted ISO to actually stay mounted.

So, we would mount an ISO in the Zalman, plug it into a machine to boot the ISO, and end up with no mounted ISO once the machine proceeded to boot.

One of the catches was that we were mounting the ISO with the Zalman connected to the machine to be built.

The other was that we missed a crucial step when pulling the Zalman from any of our shop systems.

The proper order of things:

  1. Plug the Zalman into a shop system.
  2. Use the Jog Wheel to mount the correct ISO.
  3. Click and Safely Remove the Zalman.
    • image
  4. Wait until the Zzz shows in the Zalman’s display.

Once the unit has placed itself into Sleep Mode the ISO will be locked in place and the USB plug can be pulled.

The Zalman ZM-VE300 USB 3 external enclosure is one of the best external enclosures for system builders that we have found.

Philip Elder
MPECS Inc.
Microsoft Small Business Specialists
Co-Author: SBS 2008 Blueprint Book

*Our original iMac was stolen (previous blog post). We now have a new MacBook Pro courtesy of Vlad Mazek, owner of OWN.

Windows Live Writer

Tuesday, 3 April 2012

Product Review: Microsoft Arc Keyboard

We picked up a Microsoft Arc keyboard to check it out.

image

Firstly, we do have a bit of a beef with Microsoft keyboards that gives Logitech the advantage: Where is the Mouse Right Click button?

On Logitech keyboards we can hit a key or combination of keys to bring up the right click menu wherever the mouse cursor happens to be. For keyboard users this is a big time saver.

Microsoft does not have that button on this keyboard. So, right away the mouse hand is moving back and forth between the mouse/touchpad and keyboard for that right click menu.

The keyboard itself looks to be purposed for mobile carrying as it is rather compact:

image

The SSD sitting on the keyboard is a standard 2.5” Intel 320 Series.

While it does take a bit to get use to the keyboard’s key layout due to the compact size and the arc of the key set once that hurdle is overcome it is actually quite easy to use.

The keys have a solid feel to them with excellent feedback. One knows that a key press has happened.

The catch with that for those of us that are used to keyboards with a much lower spring load in the keys is that we will miss a number of key strokes around the edges both due to that and the arc until we get use to using it.

In the end this keyboard is great for mobile folks that require the ability to type a lot of information into their systems.

As far as being a daily driver the Logitech MX 5500 is probably one of the best all around keyboards to work with along with the MX Revolution mouse that comes with the MX 5500 kit.

For the wrist conscious the Microsoft Wave keyboard takes a load off of the curvature that a straight keyboard causes in the wrists and thus reduces pain there after a long day’s typing.

Philip Elder
MPECS Inc.
Microsoft Small Business Specialists
Co-Author: SBS 2008 Blueprint Book

*Our original iMac was stolen (previous blog post). We now have a new MacBook Pro courtesy of Vlad Mazek, owner of OWN.

Windows Live Writer

Friday, 30 March 2012

In-Win BP655 System Integration Tips

We happen to have an In-Win BP655 series Mini-ITX case here in the shop to see if it would work with some of our system designs. The main benefit of this particular case is the 200 Watt power supply that would give us a little more juice for higher end setups.

image

It is important to note that the hard drive needs to be mounted in the cage shown above. This is done with the cage out of the case.

The cage then needs to be mounted back in the case _without_ the optical drive installed.

The desktop board is then mounted in the case and cabled up.

The final step is to slide the optical drive into its resting place from the front of the case.

Change the order of any of the above steps and things just don’t work!

image

Once the system is complete it is actually a good looking little case with the built-in fan along with the CPU fan being relatively muffled.

Philip Elder
MPECS Inc.
Microsoft Small Business Specialists
Co-Author: SBS 2008 Blueprint Book

*Our original iMac was stolen (previous blog post). We now have a new MacBook Pro courtesy of Vlad Mazek, owner of OWN.

Windows Live Writer

Tuesday, 14 February 2012

How to Swap the mSATA SSD or RAM on a Toshiba Portege

There are a couple of gotchas when it comes to removing the bottom panel on the Toshiba Portege Ultrabook.

image

  1. Under the centre bumper is found a T8 Tamper-Proof Torx screw.
  2. The microphone and earphone jacks pin the cover in place on that side.

Once all of the screws have been removed including the tamper-proof centre screw one needs to make sure that the SD slot is empty.

Then, based on the image above gently grasp the two _opposite_ corners to the mic/ear jacks (right top and bottom) and pull up much like the cover of a book pivoting on the mic/ear side.

Once the cover is a couple of centimetres up (~1.5”) we can then slip the cover out and off over the mic/ear jacks.

When it comes to re-installing the back cover run through the opposite steps however one needs to be mindful of the VGA port as it has a slot on either side that the cover needs to nestle into.

Set the cover in place over the mic/ear jacks first and then guide it into place around the VGA port. It should essentially settle into its rightful spot with a little assistance from there.

NOTE: At no time is there any need to use force when working the back cover off or on. When removed or installed correctly the panel will essentially sit in place with no more effort than to guide it off or on.

Also, be mindful that making any changes to the default unit can and may void the Toshiba warranty.

Philip Elder
MPECS Inc.
Microsoft Small Business Specialists
Co-Author: SBS 2008 Blueprint Book

*Our original iMac was stolen (previous blog post). We now have a new MacBook Pro courtesy of Vlad Mazek, owner of OWN.

Friday, 3 February 2012

Product Review: Update on the Zalman ZM-VE300 USB 3 Drive Enclosure–This one is a sure win!

We did our initial review of the Zalman ZM-VE300 USB 3 enclosure here:

Now that we have had a chance to work with the unit we are really impressed with its ability to facilitate booting from “optical disk” via internally mounted ISO or to boot from the drive itself.

When the enclosure is in Dual Mode meaning both the mounted ISO and the hard drive storage are presented to the BIOS we are able to boot from either via Boot Menu.

What this means is that we can boot the Windows Server 2008 R2 SP1 DVD so to speak and have the necessary RAID drivers on the USB hard drive.

Given that we have installed an 80GB Intel X25-M SSD in this enclosure we have enough room for all of the OS ISOs we require plus all of the current server, workstation, and desktop hardware drivers needed.

In the near future we will be slipstreaming the Renesas Electronics USB 3.0 controller driver into our desktop OS WIM files so that we can use the USB 3 interfaces on the desktops we build to speed things up even further.

This product is a clear win for us.

Even if we were building a lot of desktops or workstations, servers are our mainstay, having a number of these units around will make getting that OEM, Retail, or Volume License version of a Windows 7 OS, or even Windows XP Professional, installed in _very_ short order.

We will be ordering a few more of these enclosures along with some Intel 320 Series 80GB and 160GB SSDs to install in them to make the best possible combination.

Happy Friday everyone and thanks for reading! :)

Philip Elder
MPECS Inc.
Microsoft Small Business Specialists
Co-Author: SBS 2008 Blueprint Book

*Our original iMac was stolen (previous blog post). We now have a new MacBook Pro courtesy of Vlad Mazek, owner of OWN.