Showing posts with label Printer. Show all posts

Friday, 3 October 2014

HP Colour LaserJet M476dw Firmware Bug – DHCP Assigns Self IP for Gateway

After beating our collective heads against the wall wondering why our newly deployed HP Colour LaserJet M476dw refused to make SMTP connections for Scan to E-mail we found our source in the _very_ last place we expected.

image

IP Address Configured by: DHCP
IP Address: 192.168.75.6
SubNet Mask: 255.255.255.0
Gateway: 192.168.75.6

Note that the gateway address currently points to _itself_ instead of the router that is assigning the IPs.

This is the IPConfig /ALL output for one of the systems on the network:

image

Note the Gateway address is correctly pointing to the router.

What this means is that for now we are setting the IPv4 configuration to Manual and putting in the correct IP address for the Gateway:image

What a pain that has been.

Sure enough:image

The above status came out really quick and so did the test e-mail:

image

So, after all of the time we spent getting frustrated with the ISP, thinking they had blocked SMTP outbound, and everything else in between the least expected source for the problem has turned out to be the one.

NOTE: Printer firmware was updated to the most current version as of this writing.

NOTE TO SELF: Check the hanger bearing before replacing that rear-end! ;)

Philip Elder
Microsoft Cluster MVP
MPECS Inc.
Co-Author: SBS 2008 Blueprint Book

Chef de partie in the SMBKitchen ASP Project
Find out more at
Third Tier: Enterprise Solutions for Small Business

Thursday, 7 March 2013

HP LaserJet JetDirect Password Forgotten

We have an HP LaserJet 4350DTN printer that was configured prior to our involvement with a firm.

The JetDirect print server installed in the printer is protected by a password.

Well, the above HP Support document tells us that the JetDirect unit will need to be cold reset. But, there is no link or direction indicating just how this would be done.

Any search online came up with third party sites.

So, we tried “cold-reset 4350” in HP’s Business Support Center and came up with:

From the above support page we get the following instructions.

To perform a cold reset:

  1. Turn the printer power off.

  2. Power on the printer and watch for the memory count to begin.

  3. Hold down the SELECT (Checkmark) button, when you see the memory count begin.

  4. Continue holding down the SELECT (Checkmark) button until all three printer control-panel lights flash once and then remain on. This might take up to 10 seconds.

  5. After the message SELECT LANGUAGE appears on the display, press the UP ARROW button or the DOWN ARROW button until COLD RESET appears on the display

  6. Press the SELECT (Checkmark) button. The printer performs a cold reset and then continues its power-on sequence.

  7. Check all I/O settings and reset any user-set printer configuration values.

Once the printer had finished its boot cycle we were able to open the JetDirect web management page and see all of the configuration tabs without the need for the long-forgotten password:

image

Philip Elder
MPECS Inc.
Microsoft Small Business Specialists
Co-Author: SBS 2008 Blueprint Book

Chef de partie in the SMBKitchen
Find out more at
www.thirdtier.net/enterprise-solutions-for-small-business/

Windows Live Writer

Monday, 23 July 2012

Canon Copier Network Print Using PCL6 Driver Error: NG End Code #853

Apparently Canon has a licensing fee for enabling PCL printing via a network.

We just finished setting up a network with three Canon copiers on it. One did not print:

image

In the above snip we see the failures and subsequent success when printing.

The catch was the need to change the PCL6 driver for the Canon UFR II and then re-deploy the copier via Group Policy.

image

As the snip shows the copier was happy once we corrected the driver.

Philip Elder
MPECS Inc.
Microsoft Small Business Specialists
Co-Author: SBS 2008 Blueprint Book

*Our original iMac was stolen (previous blog post). We now have a new MacBook Pro courtesy of Vlad Mazek, owner of OWN.

Windows Live Writer

Monday, 12 March 2012

Lexmark X736de: Colour option greyed out after firmware update–How to Set Up Monochrome Print Only Driver

We ran a firmware update on a Lexmark X736de that has been in production for a few months.

Today folks are complaining that they cannot print in colour.

image

Both the SBSe 2011 server and the client workstations show the above Black & White option ticked with no way to uncheck it.

After walking through the various settings with the Lexmark chat support folks we found the following:

image

Lexmark X736de Properties:

Print Black Only

So, we have inadvertently discovered how to set up a Black and White (Monochrome) print driver for this MFP at this particular client.

Having a black only setup was not requested in this office but we do have clients that are running monochrome only with the exception of a few key folks in the firm.

But, when we do need a monochrome only print setup we can add that option on the server and the clients will pick it up.

Lexmark MFP for SMB is a Win

For mid-sized offices we are now running almost 100% with the Lexmark X700 series MFPs. They have the best feature set for the price over HP by and far.

For virtualized SBS 2011 deployments the incoming fax to e-mail feature kills as we can deliver all faxes to a SharePoint library with minimal configuration (Set up an MFP with SBS 2011 in our Setup Guide).

We can then eliminate dealing with the built-in SBS Fax setup that can be a bit of a bear to manage between the fax services themselves and finding hardware that will work with the OS.

The X73x series MFP also supports print to fax across the network so anyone needing to send something outbound can do so without the need to print and then fax from a dedicated machine. This saves time and paper.

Philip Elder
MPECS Inc.
Microsoft Small Business Specialists
Co-Author: SBS 2008 Blueprint Book

*Our original iMac was stolen (previous blog post). We now have a new MacBook Pro courtesy of Vlad Mazek, owner of OWN.

Windows Live Writer

Thursday, 2 February 2012

HP LaserJet P1606dn Continually Printing

We had a problem where an HP LaserJet P1606dn kept spitting page after page of the same Test Print page without stop.

We managed to find the solution to the problem:

We disabled Bidirectional print support and power cycled the printer. It finally stopped spitting out the same print test page.

If that did not work we would have downloaded the latest driver package from HP’s Web site as well as a firmware update (this printer is relatively new so firmware is up to date) if required.

For now we have a printer that is doing what it is supposed to be doing for this small equipment rentals office.

Philip Elder
MPECS Inc.
Microsoft Small Business Specialists
Co-Author: SBS 2008 Blueprint Book

*Our original iMac was stolen (previous blog post). We now have a new MacBook Pro courtesy of Vlad Mazek, owner of OWN.

Monday, 24 October 2011

Quick Link: HP Universal Print Drivers for Windows

We are in the process of troubleshooting why the HP LaserJet Pro P1606dn once worked through Remote Desktop Services connections for remote connections to a Windows 7 machine but now does not. It works for remote to RDS sessions, but not for desktop RDP connections to this one machine.

The above link is good as of this writing. It has links to all versions that we may need to work with:

image

We already ran through the process of disabling the setting in Group Policy for the Remote Desktop Easy Print driver to be chosen first. Doing this has not changed anything so far. :(

From what we can tell, the print driver fails to install on this particular machine where on machines the driver seems to work as expected. So, we now know that the situation is isolated to this one machine.

Hopefully after we ground zero (wipe) the spool service setup including all drivers that we can get things to work as expected.

Philip Elder
MPECS Inc.
Microsoft Small Business Specialists
Co-Author: SBS 2008 Blueprint Book

*Our original iMac was stolen (previous blog post). We now have a new MacBook Pro courtesy of Vlad Mazek, owner of OWN.

Windows Live Writer

Friday, 27 May 2011

Windows XP Mode–Printing From A DOS Application

Some of our clients have Line of Business Applications that go way back. This is especially true for accounting firms where folks will come to them to fill out tax reports for years gone by.

Some of those LoBs were DOS with no other option to run them.

So, we get the app set up in XP Mode on the Windows 7 system, from there we need to run the following command in the command line shell:

  • net use lpt1 \\pserver\laser1 /persistent:yes

Since 99.9% of our clients don’t even have a parallel port on their computer anymore, it is probably quite safe to use LPT1. For those rare cases use LPT2.

One can either point that command to a server share or share the locally attached USB printer making sure that the firewall allows the connection.

Note that in our experience both HP and Lexmark printers seem to work okay for this process. The actual printout may not be what is expected, but it works. If using any other printer vendor’s products this may or may not work due to driver or PCL language issues.

Philip Elder
MPECS Inc.
Microsoft Small Business Specialists
Co-Author: SBS 2008 Blueprint Book

*Our original iMac was stolen (previous blog post). We now have a new MacBook Pro courtesy of Vlad Mazek, owner of OWN.

Windows Live Writer

Thursday, 9 December 2010

Upgrading HP LaserJet’s Firmware via Windows Explorer

Download the newest firmware from HP’s site for the printer in question.

Open the firmware’s folder and extract the firmware.

Open a second Explorer Window and type ftp://192.168.40.5 (printer’s IP) and hit Enter. Double click on the PORT folder to open it.

Copy and past the .RFU file from the network folder to the FTP based folder.

image

The display on the front of the printer will display “Receiving Upgrade”. Once done the printer will reboot itself and show Ready.

On the printer’s management site we should then see the new firmware version displayed:

image

HP has come a long way from connecting either a parallel or USB cable and uploading the firmware file by a series of commands.

Philip Elder
MPECS Inc.
Microsoft Small Business Specialists
Co-Author: SBS 2008 Blueprint Book

*Our original iMac was stolen (previous blog post). We now have a new MacBook Pro courtesy of Vlad Mazek, owner of OWN.

Windows Live Writer

Thursday, 10 June 2010

Ever see what a 3D printer can do for prototyping?

We are doing a bit of research on 3D scanning and reproduction.

This is some pretty neat stuff:

The above video gives us a pretty good idea of where the technology has gone since the last time we were researching solid printing on behalf of a client.

Essentially, anyone looking to develop a product prototype with the need to conceptualize the finished form of that product, this technology is a perfect fit.

Philip Elder
MPECS Inc.
Microsoft Small Business Specialists
Co-Author: SBS 2008 Blueprint Book

*Our original iMac was stolen (previous blog post). We now have a new MacBook Pro courtesy of Vlad Mazek, owner of OWN.

Windows Live Writer

Wednesday, 10 February 2010

HP LaserJet 1022n on Windows 7 – Spooler Event ID 1000 – Application Error

We just recently delivered a number of Acer laptops that we installed Intel 160GB SSDs and a fresh install of Windows 7 Enterprise x64.

Today, one of the users called and said that she could not print anything. No printers were showing as available in Printers and Devices either.

This is what we found in the laptop’s event logs:

Log Name:      Application
Source:        Application Error
Date:          2/10/2010 2:38:53 PM
Event ID:      1000
Task Category: (100)
Level:         Error
Keywords:      Classic
User:          N/A
Computer:      PC.SBSDomain.LAN
Description:
Faulting application name: spoolsv.exe, version: 6.1.7600.16385, time stamp: 0x4a5bd3d1
Faulting module name: ZSR.dll, version: 6.20.1625.0, time stamp: 0x462fe8cf
Exception code: 0xc0000005
Fault offset: 0x000000000002b54c
Faulting process id: 0x9ac
Faulting application start time: 0x01caaa996ad83bde
Faulting application path: C:\Windows\System32\spoolsv.exe
Faulting module path: C:\Windows\system32\spool\DRIVERS\x64\3\ZSR.dll
Report Id: ae6d4995-168c-11df-b80b-00262d5be3db
Event Xml:
<Event xmlns="http://schemas.microsoft.com/win/2004/08/events/event">

Anytime the Spooler Service was restarted and a print job or even a right click on a printer happened the service would die.

To fix this, we needed to figure out which printer was causing the problem between the two HPs configured.

One was an HP LaserJet 4345MFP which we have had no real issues with since day 1 and it has been running for 3 years.

The other was an HP LaserJet 1022n printer. Unplug the printer and plug it back in again and nothing changed.

So, we needed to somehow clean it out of the system and reinstall it.

So, we started by cleaning out the driver in Print Management:

image

Once we removed the driver, unplugging and plugging the printer’s USB cable did nothing to bring it back.

For this particular printer, HP only has the USB based Windows 7 x64 drivers which also installs a bunch of superfluous printer utilities. So, we ran the USB installer, found the temporary folder here.

  • C:\Users\UserName\AppData\Temp\HPInstaller???\

We copied the contents out and used the Add Driver wizard in Print Management to install the driver.

Even then, the printer would show up in the Printers and Devices as _Unspecified_. When we went into the Device Manager, we did not see it listed there though which was really strange.

We needed to click on View and Show Hidden Devices before the printer showed up.

image

Once we saw it, we right clicked on it and clicked on Uninstall to remove the printer without enabling the driver delete option.

Unplug the USB cable and plug it back in again and we were good to go:

image

One thing to note, once we removed the LJ 1022n driver, and recycled the Spooler service, a print job could be run through to the LJ 4345MFP. So, if the user was in a real pinch for something, they would at least been able to print their content before we went further in our troubleshooting and eventual reinstall of the LJ 1022n.

Philip Elder
MPECS Inc.
Microsoft Small Business Specialists
Co-Author: SBS 2008 Blueprint Book

*Our original iMac was stolen (previous blog post). We now have a new MacBook Pro courtesy of Vlad Mazek, owner of OWN.

Windows Live Writer

Tuesday, 1 December 2009

Windows 7 – Connecting To A Legacy HP LaserJet 5Si

We have this old workhorse of a printer that we received way back when from a new at that time client. It had not been “working” for a while. They wanted a new printer which we ended up selling to them.

After tinkering with the printer it turned out to be the no-name refill toners they were using that was causing the problems.

When we installed an HP genuine toner and ran a number of cleaning pages through the print quality became quite reasonable.

A new fuser, 128MB in 16bit 32MB DIMMS, and a duplex unit courtesy of eBay brought the printer up to where we could use it for a lot of our bulk printing needs.

Now that our office systems are on Windows 7, there was no time since the upgrade to get the LaserJet 5Si connected to them since the OS does not have a built-in driver for it.

To boot, the product page for the LaserJet 5Si has no information on Windows 7 driver compatibility.

Jump up a few generations in the product line to the LaserJet 8150 product page and we see a different story:

image

The links to the Universal Print Driver are provided.

Here is what we need to do:

  1. Download and save the HP LaserJet Universal Print Driver (HP Support Search)
  2. Double click on the downloaded file.
  3. Uncheck the When done unzipping open: .\Install.exe.
    • image
  4. Choose a directory to unzip to.
  5. Click the Unzip button.
  6. Click Start –> Printers [Enter].
  7. Right click and Add Printer.
  8. Our LJ 5Si is network connected, so we are using the Add a local printer option.
  9. Create a new Standard TCP/IP Port and Next.
  10. Type the IP address of the printer 192.168.40.5 (your printer’s IP) and click Next.
  11. At the Install the printer driver window click the Have Disk button and navigate to the unzipped HP Universal Print Driver folder.
    • image
  12. Choose the PCL version and click Next.
  13. Name the printer and click Next.
  14. Choose to share or not.
  15. Set as Default, or not, and click Finish.
    • A test page will confirm that everything is working as expected.

Now, once the printer has been installed, we need to make sure that the printer’s installed options are showing up as expected. Otherwise, we will not be able to duplex or pick up paper from an add-on paper tray.

  1. Right click on the printer’s icon and click on Printer Properties.
  2. Choose the Device Settings tab.
  3. Verify that the correct options and paper types are set.

We have all of our printers in our workstations set to duplex by default to save on paper. To do that, after checking the printer options we click on the General tab and click on the Preferences button. There we will find the Print on both sides option to check.

image

We now have our old workhorse printer connected to our Windows 7 workstations.

BTW, this printer is still quite young at 267,691 pages printed since day 1 and actually somewhat comparable to the newer printers at 24 pages per minute!

Philip Elder
MPECS Inc.
Microsoft Small Business Specialists
Co-Author: SBS 2008 Blueprint Book

*Our original iMac was stolen (previous blog post). We now have a new MacBook Pro courtesy of Vlad Mazek, owner of OWN.

Windows Live Writer

Tuesday, 1 September 2009

SBS 2008 – Konica Minolta BizHub C353 Driver GP Stall

One of our clients called to say that they had a new copier being installed at their site and if we would mind popping by to help out with the install.

It seemed like a pretty straight forward task and we had a bit of time in-between calls so the call came in at an opportune time.

We downloaded what we thought were the newest drivers for the unit:

image

Now, the 64bit driver installed into the Print Management drivers node with no real issue.

But, when we went to install the 32bit drivers after configuring the printer, adding it to the SBS 2008 Console, and deploying it via Group Policy we received this surprise:

image

Add Printer Driver Wizard

The selected driver must be installed remotely from an x86 computer using Type 3 (User mode) drivers.

Okay . . . now how exactly does that work again?

Since this was the first time we had seen this message, a bit of searching ensued to figure out how.

That was a tough find:

image

We needed to navigate to \\MY-SBS\Printers and open the Server Properties, bring up the driver dialogue and “upload” the drivers onto the server from an x86 system as the error message indicated.

But, something still did not jibe.

So, we went back to Konica Minolta’s Web site for the copier to see just what was going on with the drivers.

Now, what is happening right now, this evening, as this post is being written is pretty funky. The driver results page looks different than it did this afternoon while at the client site.

Here is what the driver site looks like now.

Windows Vista 32-Bit Postscript Drivers:

image

Windows Vista 32-Bit PCL Drivers:

image

Windows Vista 64-Bit Postscript Drivers:

image Windows Vista 64-Bit PCL Drivers:

image

Now, after looking at all of the drivers, we knew that the Universal Driver was going to be a problem.

We did need a WHQL signed driver though.

The original driver we had downloaded was both the Postscript and PCL 6.1.2.0 driver sets. After extracting them, we found that they contained both x86 and x64 driver directories. It was the 6.1.2.0 x86 driver that was giving us the headache on SBS 2008.

So, on the second venture through the site, we looked at every driver option for the copier and one eventually stood out as the candidate for our solution.

Can you guess which one?!? :)

Yes, it was the 6.3.1.0 driver set dated June 24, 2008 that was our only other specific driver with a WHQL signature. Only, it was not an option for Vista 32bit where we looked for the 32bit drivers in the first place!

We downloaded, extracted, and ran the Add Driver routine in the Print Management console.

Sure enough, the 64bit driver updated to 6.3.1.0 and the 32bit 6.3.1.0 driver installed via the console with no issues either.

Once we had the driver in place, we ran our workstation reboot script and we had all of our Windows Vista x86 machines connected to the new copier.

Philip Elder
MPECS Inc.
Microsoft Small Business Specialists
Co-Author: SBS 2008 Blueprint Book

*All Mac on SBS posts will not be written on a Mac until we replace our now missing iMac! (previous blog post)

Windows Live Writer

Friday, 12 June 2009

SBS 2008 – Printers Deployed to XP Pro x86 – Unable to Connect Error

We used our trusty PushPrinterConnections.exe setup in Group Policy (previous blog post) to deploy printers to a bunch of XP Pro computers on the SBS network we just migrated.

Two of the printers were the same model in two locations within the organization and kept complaining “Unable to Connect”.

Right click on the printers and we see the following:

image

Printer Properties

Printer properties cannot be displayed. Windows cannot locate a suitable printer driver. Contact your administrator for help locating and installing a suitable driver.

Okay, so initially, nothing we came up with in our searches gave us a real clue as to how to get things working.

The ultimate clue came from Steve Rowe’s Blog:

Sure enough, open the x86 and x64 INF files for the affected printer and we see:

image

The top INF is the x86 (32bit) version and the bottom is the x64 (64bit) version. Note the difference in the printer name.

The top INF file is actually a copy of the original made along with an additional extension .PHL to keep it safe.

We tried to remove the “ XL” portion along with the “_XL” at the end of the various GPD strings but we would receive a “Not Digitally Signed” error when we did that.

Since the SBS OS is x64, we left the proper digitally signed “ XL” based driver and used the Print Management Console to load the x86 driver with a modified INF file:

image

Note the addition of the “ XL” in the name versus the previous screenshot along with the addition of the “_XL” at the end of the GPD string.

SBS 2008 still complained about the driver not being Digitally Signed, but since they were being delivered to x86 XP Pro clients we were not too concerned.

The main thing was we had the printers available to users once we deleted the old “Cannot Connect” printers and rebooted.

Philip Elder
MPECS Inc.
Microsoft Small Business Specialists
Co-Author: SBS 2008 Blueprint Book

*All Mac on SBS posts will not be written on a Mac until we replace our now missing iMac! (previous blog post)

Windows Live Writer

Monday, 1 June 2009

SBS 2008 – Printer Management Extended View

This is a pretty neat little feature in the Print Management snap-in:

09-06-01 SBS 2008 - Print Management Extended View

Right click anywhere in the whitespace under the printers list and click on Show Extended View.

When enabled, we can view any queued print jobs and manage them as well as gain access to the printer’s management Web page as shown above.

We add the Print Management snap-in as part of our SBS 2008 Setup Checklist process.

Keep an eye on the Reusable Posts section in the right hand column of the blog as the SBS 2008 Setup Checklist link there will always point to the most current version of the list.

We will update that link to also reflect the checklist version to help with keeping things as simple as possible. :)

Philip Elder
MPECS Inc.
Microsoft Small Business Specialists
Co-Author: SBS 2008 Blueprint Book

*All Mac on SBS posts will not be written on a Mac until we replace our now missing iMac! (previous blog post)

Windows Live Writer

Tuesday, 13 January 2009

SBS 2008 Terminal Services and HP Printer Drivers

When configuring a Terminal Services Remote Desktop environment for users to connect to, keep in mind that SBS 2008 has the 64bit driver installed by default.

When deploying Terminal Services, one needs to make sure to install the Print Services Role, and then load up both the x64 and x86 HP Universal Print Driver on the SBS 2008 box.

If the user needs to take advantage of a particular printer feature on an MFP series, then make sure to verify on the HP Support site that there are no specific Windows Server 2008 x86 and x64 drivers available for that printer.

As a precaution, it is a good idea to verify if there are any specific printer drivers, both x86 and x64, with HP's site and load them into the Print Management Console anyway.

Philip Elder
MPECS Inc.
Microsoft Small Business Specialists

*All Mac on SBS posts are posted on our in-house iMac via the Safari Web browser.

Monday, 5 January 2009

SBS 2008 - Group Policy and 32bit PushPrinterConnections.exe

To deploy printers to 32bit XP clients via Group Policy in a 64bit SBS 2008 network can be frustrating if we are not aware that the utility included with SBS can only work with 64bit versions of XP Pro.

Our previous blog post on the matter: x86 PushPrinterConnections.exe a must for the Technician's Thumb Drive!


Please let the SBS team know that this is an important issue. Please go here if you have a Microsoft Connect account and you were on the SBS Cougar beta, you may not have to be now that SBS is official, and vote for this item's importance:

Connect ID: 382304.

Hopefully we can have the 32bit utility included in R2.

Philip,

Sent from an SBS integrated Windows Mobile Phone.

Thursday, 13 November 2008

SBS 2008 - Deploying Printers

Deploying printers in SBS 2003 was pretty sweet: Add the printer in the SBS Console, and the SBS setup script would take care of installing it on the client when the user logged in.

SBS 2008 does not use this feature anymore.

With SBS 2008, we need to deploy the printers via Group Policy. But, not too worry, it is actually not that painful at all with the new Windows Server 2008 print management capabilities.

Essentially, you setup your printer on SBS, then use the Print Management Console to deploy the printer via GP.

We create a Default Printer Deployment Policy object at the Computers OU level so that both workstations and servers would inherit the printer deployment. We deploy per-computer unless there is a need to deploy per-user.

For Windows Vista, the GP deployed printer shows up and is available as soon as the Vista workstation refreshes its Group Policy settings, or via a GPUpdate /force command in the Run box or Search box.

For Windows XP Professional, you will need to tweak that GPO:
  • Client computers running Windows 2000, Windows XP, or Windows Server 2003 must use the PushPrinterConnections.exe tool in a startup script (for per-computer connections) or in a logon script (for per-user connections).
The above is from the SBS 2008 Help file.

A sample finished GPO:

Default Printer Deployment Policy

With printers being deployed in this manner, it becomes a lot simpler for larger clients to have printers assigned to specific departments via an OU and printer deployment GPO structure aligned along department lines. Sweet. Move a computer from one OU to another, and the printer setup available to the workstation should change with it.

Philip Elder
MPECS Inc.
Microsoft Small Business Specialists

*All Mac on SBS posts are posted on our in-house iMac via the Safari Web browser.

Monday, 3 December 2007

SBS - Adding a network printer & the Add Printer Wizard

There are a couple of steps that need to happen in order for a networked printer to keep working after the printer technician who installed a new printer has left.

If one does not follow these steps, one is sure to receive a support phone call the moment the printer's DHCP lease expires and users can no longer print.

Since some printers are quite portable, we tend to assign a DHCP reservation versus setting a static IP in the printer's control panel or the built-in Web interface if it has one.

This saves one from a support call if someone decides to grab that printer and haul it down to a remote office operating across a VPN and thus on a different IP range altogether. This way we can remote into the system and reconfigure the Remote Office server's DHCP reservations, get the user to power cycle the printer, log off and on again, and they would be printing.

On the newer printers, one can set everything up, plug it into the network, pickup an IP address via DHCP, and configure the Device Name to help with printer identification and location.

Set the Printer's "Device Name" (if possible):

Once we have the IP address, we connect to the printer via a Web browser and we immediately set the "Device Name" to something like: HPLJ4345MFP-Bullpen.

Power cycle the printer, and that host name will show up in the DHCP manager as:


HP LaserJet 4345MFP After Device Name Change

Make sure to download the newest drivers for the printer, extract them to a network share, and head to the next step.

Create the DHCP Reservation:

On the SBS box, we head down to the Advanced Management section:
  1. Computer Management (local)
  2. Services and Applications
  3. DHCP
  4. Scope (192.168.x.x) SBS Scope
  5. Address Leases
  6. Expand the "Unique ID" column to see the entire MAC address
  7. Click on Reservations
  8. Click back on Address Leases (to see the MAC address)
  9. Right click on "Reservations" and click on "New Reservation"
  10. Name it: HPLJ4345MFP-BullPen
  11. Set an IP to it that rests in an Exclusion Range (We usually exclude 192.168.x.1-20 for printers, NAS, and other network peripherals): 192.168.99.10 (for this example)
  12. Give it a description
  13. Power cycle the printer
  14. Hit refresh in the DHCP management console a couple times after the printer has finished power cycling to see the Lease Expiration go from: Reservation (inactive) to Reservation (active).
Once we see that the printer has picked up the new address, connect to the printer via a Web browser to confirm.

There are other methods to the above one as far as setting the reservation, such as picking up the MAC address from the printer's Web interface, or printing it out before hand via a Configuration Page.

Add the Printer to SBS via the Add Printer Wizard:

Why use the SBS wizard as opposed to getting everything setup via the Printers and Faxes task manager? Because, using the wizard means that everyone who logs into their systems in the morning or after lunch will have the printer installed by default. This saves the extra step of having to install the printer manually.

Of course, if users require the printer right away, one would connect them up immediately as the log on/off process may not work immediately.

If one uses the Printer and Faxes method, the now setup printer may not show up in the SBS Printers Management console and the printer will not be installed on workstations by default.

So, in the SBS Management Console:
  1. Standard Management
  2. Printers
  3. Add a Printer (link)
  4. Welcome to the Add Printer Wizard (Next)
  5. Local Printer attached to this computer (uncheck "Automatically detect and install ..."
  6. Create a new port: Standard TCP/IP Port (Next)
  7. Welcome to the Add Standard TCP/IP Printer Port Wizard (Next)
  8. At Printer Name or IP Address: 192.168.99.10 (Next)
    • Port Name shows: IP_192.168.99.10
  9. Finish for the Standard TCP/IP Port
  10. Install the Printer Software using the newly downloaded and extracted drivers
    • Possible Option: Use Existing Driver? 1: Keep existing or 2: Replace existing. If having any print related issues with same driver based printers ... replace. Otherwise "Keep".
  11. Name the printer and select whether it is to be the default printer for the SBS box: HP LJ4345MFP-BullPen.
  12. Share Name will pickup some of the above name. Change it accordingly: HPLJ4345MFP-BullPen.
    • Possible Option: Share may not be accessible from MS-DOS workstations ... are you sure? Um, Yes! ;)
  13. Give a brief Location description.
  14. Add any applicable comments for users such as permissions levels and the like. (Next)
  15. Print a test page if necessary. (Next)
  16. Finish
The SBS box will install the necessary drivers, share the printer, announce it in Active Directory, and setup the SBS Logon Wizard to install the printer when users next logon to their workstations.

Note that Windows Vista workstations and newer printers may require users to manually install drivers in order to use the printer during logon.

Now would be the time to set any special user or print management permissions on the share.

Install the Printer on the Workstations:

The quick method is to GPUpdate /force on the SBS box and have the users log off and on again to pickup the new printer.

Otherwise, they will either need to pickup the printer via the share on the SBS box, or in some cases, create the TCP/IP port on their workstations and connect directly to the printer.

We have seen some situations where there were struggles with connecting a workstation to a printer via the SBS share and some applications ability to use that shared printer to print with. Thus the need to connect to the printer directly. So, that is something to keep an eye on for the myriad of client infrastructure environments we work with.

UPDATE: Hit post just a little too quickly! ;)

When the share is picked up via the SBS share on Windows Vista Enterprise x64:
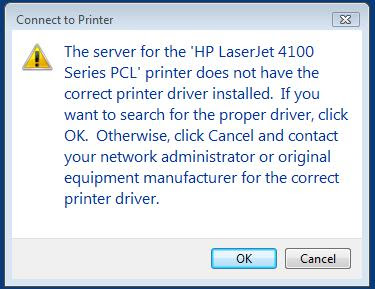
Connect to Printer
The server for the "HP LaserJet 4100 Series PCL' does not have the correct printer driver installed ...
When we go to the share to install the driver the Vista refused to install using the HP Universal PCL6 or PCL5 print drivers.

We needed to create a Standard TCP/IP port to the printer's IP address on the local workstation and allow Windows Vista to use the built-in HP drivers to install a PCL5 driver to get things working.

So, in the case of older printers, we may run into a bit of a conflict between the printer being detected via the SBS share and the Windows Vista built-in drivers for that printer.

Keep that in mind for situations where there are a lot of users needing the printer or where there are a number of users logging into the same machine. Each user profile may need the printer driver setup individually.

Philip Elder
MPECS Inc.
Microsoft Small Business Specialists

*All Mac on SBS posts are posted on our in-house iMac via the Safari Web browser.