Showing posts with label E-mail. Show all posts

Monday, 10 September 2018

Security: RBC Royal Bank: Best laid plans of mice and men

We did some banking work with our bank, RBC Canada. In the process they sent us a few "Secure Document Access" requests that the agent provided the password for via a phone conversation.

When the first one came in, it was a bit of a system shock.

image

RBC Royal Bank "Secure Message"

The highlight is ours. Huh?!?

Given the nature of today's phishing attacks a phone call was very quick to happen to our contact after receiving the above to verify its legitimacy.

We received a number of subsequent "secure" e-mails using the same method.

The encryption process we use, and our clients use, on the ExchangeDefender (xD) system is a link to an Internet property owned by xD with the appropriate SSL properties in place to assure the recipient that they are in the right place. That's after we indicate to the recipient in a prior e-mail of the upcoming process to obtain the encrypted content.

The RBC Royal Bank method is close to that but why the .HTM attachment requirement? That's just plain weird. :S

Sure enough, this is what was in an Inbox here this morning:

image

Phishing Message

It's a poorly crafted phish attempt at best.

image

E-mail Header

The trail is pretty clear as far as where it came from and the "how" looks to be fairly clear as well.

All it would have taken was a bit better in the way of timing on the phisher's part and a bit of distraction on our part and BOOM we could have been hooked. :(

RBC Royal Bank Canada needs to change their secure document transmission methodologies please.

And, Microsoft, please give us built-in DKIM abilities for on-premises Exchange instead of keeping that to online properties only. That's not polite in the least.*See Note Below

Outlook Header How-To

Outlook users, here's how to get the header information shown above:

  1. Double click on the e-mail
  2. Click the Message tab
  3. Click the break-out button on the bottom right of the Tags category
    • image
  4. Click anywhere in the small information window
    • image
  5. Keyboard:  CTRL+A then CTRL+C
  6. Click Close and close the e-mail
  7. Paste the content into the destined app (we use Notepad)

After examining a few headers it gets pretty easy to identify the legit and illegitimate messages hitting our Inbox every day. While the process may be a bit time consuming, figuring out whether something is legit or not could be the difference between DELETE and an encryption event or Inbox/Contacts harvesting.

Happy Monday everyone and thanks for reading! :)

2018-09-10 EDIT: Oops, that Microsoft sentence should have been CUT along with the other sentences that were in a previous paragraph. Suffice it to say, we've been working on DMARC/DKIM requests and discovered that Microsoft seems to be holding DKIM off from on-premises Exchange. Thus, we need to go third party to get to use that business critical security feature. :(

Philip Elder
Microsoft High Availability MVP
MPECS Inc.
Co-Author: SBS 2008 Blueprint Book
www.s2d.rocks !
Our Web Site
Our Cloud Service

Thursday, 7 June 2018

Exchange 2013+: Set Up a Receive Connector for MFP/Copier/Device Relay

The following are the two steps required to enable an internal anonymous relay in Exchange 2013/2016/20*.

Step 1: Create the Receive Connector

New-ReceiveConnector –Name MFP-APP-AnonRelay –Usage Custom –Bindings 0.0.0.0:25 –RemoteIPRanges 192.168.25.1-192.168.25.10,192.168.25.225-192.168.25.254 –Comment “Allows anonymous relay” –TransportRole FrontEndTransport –AuthMechanism None –PermissionGroups AnonymousUsers

Variables:

  • -Name: Change this if needed but must match for both steps
  • -RemoteIPRanges: Only put trusted device IP addresses in this section

Once the receive connector is set up it can be managed via EAC.

Step 2: Allow Anonymous Rights

Get-ReceiveConnector “MFP-APP-AnonRelay” | Add-ADPermission -User “NT AUTHORITY\ANONYMOUS LOGON” -ExtendedRights “Ms-Exch-SMTP-Accept-Any-Recipient”

Variable:

  • The Receive Connector name must match the one set in Step 1

Conclusion

Once the above steps are set up there is no need to set a username and password on any device that has an allowed IP.

For obvious reasons one should never put an Internet IP address in this rule! But, that being said, one always denies all SMTP 25/587 inbound traffic to a third party sanitation provider's subnets right (we use ExchangeDefender for our own and our client's needs)?

Also, this setup is for on-premises Exchange.

Philip Elder
Microsoft High Availability MVP
MPECS Inc.
Co-Author: SBS 2008 Blueprint Book
Our Web Site
Our Cloud Service

Friday, 16 October 2015

E-mail NDR: #5.1.1 SMTP; 550 Rejecting for Sender Policy Framework (SPF too many lookups)

One of our clients was having issues sending an e-mail to one of our regional ISP’s e-mail servers.

  • Remote Server returned ‘<inbound.server.com #5.1.1 SMTP; 550 Rejecting for Sender Policy Framework>’
    • SPF too many lookups

There was no further information. The specifics came from a very helpful mail technician at the ISP.

So, we started to dig around and came up with the following:

A ticket went through Third Tier’s Help Desk this week that was based on this problem with Dave Shakelford pointing to the following blog post:

So, what does all of this mean?

It means that we need to make sure all of our clients that send mail via an ISP SMTP server, third party sanitation and continuity service, or mail hosting service need to have a correct SPF record in place.

As the JangoMail blog post makes clear, we may have to jump through a few hoops to get it right, but get it right we must as our client’s mail is critical to their business.

Philip Elder
Microsoft Cluster MVP
MPECS Inc.
Co-Author: SBS 2008 Blueprint Book

Monday, 2 February 2015

Sample Client Phish Prevention E-mail

Here’s a sample of an e-mail we would send to our clients on a semi-frequent basis to help keep users wary and informed.

If there is ever a doubt about an e-mail claiming to represent anything from a bank to a newspaper NEVER click on any link in that e-mail.

Open a new browser session and navigate directly to the purported site and log on there.

In today’s day and age we need to be very mindful of clicking on anything.

For anything with a link in it hover your mouse over and a small pop-up will happen:

image
The above snip came from hovering over the Unsubscribe link in the email below.

As a rule, NEVER click on a link on any e-mail with perhaps the exception of the ones CONTACT sends out with software update links. Even then, hover your mouse over the link in her e-mail just in case someone is specifically targeting the firm!

One more point: We’ve been seeing a LOT of Word and Excel based macro virus transmission files. Anyone sending something should be requested to do so in PDF format if at all possible. For folks on the not-so computer savvy side they can click on FILE –> SAVE AS –> PDF (change Save As Type to).

While PDF files are not much safer than Office files they, at least at this point, marginally better. ;)

Happy Monday everyone. :)

Philip Elder
Microsoft Cluster MVP
MPECS Inc.
Co-Author: SBS 2008 Blueprint Book

Chef de partie in the SMBKitchen ASP Project
Find out more at
Third Tier: Enterprise Solutions for Small Business

Wednesday, 13 November 2013

Our Client CryptoLocker Warning E-Mail

This is a copy of an e-mail we are sending out on a somewhat frequent basis to our clients to keep being Internet Street Smart at the top of their minds:

Hello all,

I may have mentioned this in the past while but it bears being mentioned again.

There is a really bad malware being spread via links in e-mail that take the user to a bad site or attachments in an e-mail that contain the bad software. Its name is CryptoLocker.

If the link is clicked on or the attachment is opened the software starts up and goes on to encrypt, that is make unavailable, EVERY file the user has access to. There are two ways to get out of the mess once the infected system is found and quarantined:
1.    Best Option: Recover the files from Previous Versions (Volume Shadow Copy snapshot) … may be out by a few hours.
2.    Okay Option: Recover or from Backup … may be a bit out of time in the form of hours.
3.    Worst Option: Pay the bad guys to decrypt the data and risk identity theft among other problems of handing over a credit card number.

Simple rule of thumb: NEVER click on a link in an e-mail and avoid opening attachments if at all possible (Especially ZIP archives). And, if a link must be clicked on in an e-mail hover the mouse cursor over the link to see where it leads to. If it looks suspicious please ask!

Our systems are designed to provide maximum recoverability however the snapshots and backups are timed throughout the day. So, if there is an infection some work may be lost!

As always, please be very careful and aware that bad folks out there are always on the hunt for more victims. No business large or small is exempt from these folks nefarious activities.

We are aware of firms, fortunately not our own clients, that are on the brink of possibly being lost due to CryptoLocker and bad or unavailable backups!

Thanks and have a wonderful day! :)

We do our best to keep folks aware of what is happening out there but things are getting even more nasty for e-mail transmissions.

Philip Elder
MPECS Inc.
Microsoft Small Business Specialists
Co-Author: SBS 2008 Blueprint Book

Chef de partie in the SMBKitchen
Find out more at
www.thirdtier.net/enterprise-solutions-for-small-business/

Windows Live Writer

Thursday, 28 February 2013

How to test the Autodiscover._tcp SRV record for Exchange

We needed to test a domain's autodiscover setup that we had them configure since we are not confident in the hoster's abilities anymore.

  1. Open an elevated command prompt.
  2. NSLookup [Enter]
  3. set type=srv [Enter]
  4. _autodiscover._tcp.mpecsinc.ca [Enter]
    • image

And, the test for the hosting provider shows that they did indeed make a mess of it. Back to the drawing board. :(

The How-To for formatting the Autodiscover SRV record is in the TechNet article below. That method works for our own SBS 2011 Standard integrated Exchange and our client's setups as well.

We now use this SRV record for all of our client's Internet DNS setup.

Hat tip: Unify and Conquer: Quick Tip: Testing DNS SRV Records with NSLookup

Philip Elder
MPECS Inc.
Microsoft Small Business Specialists
Co-Author: SBS 2008 Blueprint Book

Chef de partie in the SMBKitchen
Find out more at
www.thirdtier.net/enterprise-solutions-for-small-business/

Windows Live Writer

Monday, 29 October 2012

Stormy Cloud: Vendor Deleted Mailboxes by Mistake and Could NOT Recover Them!

A vendor that shall remain nameless, not OWN/ExchangeDefender, that hosts a domain e-mail setup for a client that we are deploying Windows Server 2012 Essentials, Exchange 2013 Standard, RDS, and an LoB server for had an “internal miscommunication” and deleted the client’s entire e-mail setup on their own systems.

We started getting calls Saturday afternoon with our team walking up and down our steps and communications with the Cloud Vendor to make sure we were in the right.

It turns out that an update was posted to the service ticket:

image

Other than the spelling error for “waive” in the last sentence this particular vendor has really messed up.

How is it that they are unable to recover any mailboxes that they host? In this case they are POP3/SMTP/IMAP that is probably on some sort of Linux operation.

About 50% of the client’s users were only using the Webmail interface for their e-mail with little to no device interaction either. So, these folks are at a complete loss.

The Outlook POP3 based users are not so bad off.

Wow, what a way to start a Monday morning for many of the client’s users.

Philip Elder
MPECS Inc.
Microsoft Small Business Specialists
Co-Author: SBS 2008 Blueprint Book

Windows Live Writer

Tuesday, 4 January 2011

ExchangeDefender – Video How-To: Encrypt And Decrypt E-mail

One of the ways that we will be working on improving our client’s IT use experience is by creating both internal and public training videos.

This is our first public video how-to:

ExchangeDefender How-To: Encrypt and Decrypt (~1:10Min) ED based E-mail.

We step through the process of creating an encrypted e-mail. From there we go through the steps needed for the recipient of that encrypted e-mail. Included is the first time need to register on the ExchangeDefender site.

Philip Elder
MPECS Inc.
Microsoft Small Business Specialists
Co-Author: SBS 2008 Blueprint Book

*Our original iMac was stolen (previous blog post). We now have a new MacBook Pro courtesy of Vlad Mazek, owner of OWN.

Windows Live Writer

Friday, 29 October 2010

BlackBerry Training – BlackBerry Express Installation Walk Through

The documentation for the BESX install is just okay.

Courtesy of fellow MVP Jason Miller the following training video provides _all_ of the required preparation steps and actual install steps that are required to install BESX on SBS 2008 or on a standalone server.

The above step-by-step helped us a lot in figuring out where things went sideways for us on our standalone BESX install.

We are still not all the way through reworking the BESX install as our client is in production. We will be working on the setup tomorrow.

Philip Elder
MPECS Inc.
Microsoft Small Business Specialists
Co-Author: SBS 2008 Blueprint Book

*Our original iMac was stolen (previous blog post). We now have a new MacBook Pro courtesy of Vlad Mazek, owner of OWN.

Windows Live Writer

Thursday, 21 October 2010

Some Thoughts On Implementing ExchangeDefender

When it comes to implementing ExchangeDefender e-mail sanitation and continuity services there are a few steps that need to be taken to prepare the client for the forthcoming changes.

Keep a Report or Two

Keep a report or two in a folder in the e-mail client to show to the client’s users. It then becomes a one click process to show users how to gain access to their ExchangeDefender management portal.

We demonstrate how to whitelist an address or domain and how to set automatic encryption for e-mail recipients or the recipient’s domains.

We tend to run through a training process with key people in the organization a few days or a week before the actual implementation. Then when it comes time to demonstrate ExchangeDefender features to users a day or so before implementing ExchangeDefender services the key people will be a lot further along the learning curve and thus be a front line for many straight forward questions.

E-mail Volume

It is a good idea to go over with users how the volume of e-mail they are receiving will decrease quite substantially once the ExchangeDefender service is implemented.

It is also _very_ important to make sure that they know that once the services are online some of the folks that they normally correspond with may drop off the map so to speak. This may happen because the sender’s e-mail server IP may be on an RBL somewhere on the Internet. This explanation will tie into a discussion on whitelisting e-mail addresses and'/or domains.

Encrypt an E-mail

Encrypt an e-mail to a Hotmail or other e-mail account accessible while at the client’s site to demonstrate how to receive an ExchangeDefender encrypted e-mail. It is a good idea to do this ahead of time so that all we need to do is fire up our cell modem and retrieve the encrypted content.

We make sure to point out how HTML based signatures with images and code in a source e-mail will get distorted when the receiver goes to open the encrypted e-mail. A simple signature for encrypted e-mail is a recommendation that we make.

Camtasia Capture

Produce a few client specific Camtasia captures of the ExchangeDefender services being used by a test e-mail user on the client’s domain so that the names are familiar to users that will make reference to the videos at a later time.

Conclusion

In the end, we find that users have a great service experience when we take the time to make sure that users are prepared for the coming changes, have a good idea of how to use the system from get-go, and know that they have someone to turn to with any questions.

Philip Elder
MPECS Inc.
Microsoft Small Business Specialists
Co-Author: SBS 2008 Blueprint Book

*Our original iMac was stolen (previous blog post). We now have a new MacBook Pro courtesy of Vlad Mazek, owner of OWN.

Windows Live Writer

Monday, 18 October 2010

Installing BlackBerry Enterprise Server Express and Java

We are in the process of finishing up a rather large SBS 2008 Premium deployment. Part of the setup requires us to install BlackBerry Enterprise Server Express on the second server for this client.

Once we ran through the prerequisite BESX setup steps on SBS 2008 we ran the actual BESX install on the second server. BESX had the ability to install the needed Java software during the setup routine but the actual Java components setup kept failing on our Windows Server 2008 SP2 x64 system.

So, we downloaded the newest Java versions and installed them. We ran through the BESX install process again thinking (read assuming) that BESX would see the _newer_ versions as legitimate and move on. It did not and the install failed yet again.

The BESX install window indicates that it requires Java RE and SEDK version 6 update 18 in the install routine window just prior to running the component installs. There was no Java installed on this server prior to running BESX setup.

image 

So, we uninstalled all of the 32-bit and 64-bit versions of Java 6 Update 22, downloaded the earlier versions, installed them, and were finally able to install BESX on the standalone server.

There is a reference to the Holy Hand Grenade of Antioch’s usage instructions in here somewhere! :)

Philip Elder
MPECS Inc.
Microsoft Small Business Specialists
Co-Author: SBS 2008 Blueprint Book

*Our original iMac was stolen (previous blog post). We now have a new MacBook Pro courtesy of Vlad Mazek, owner of OWN.

Windows Live Writer

Wednesday, 7 July 2010

OWN Partners – Enable Encryption Policy Management For Existing ExchangeDefender Subscribers

As an ExchangeDefender Service Provider, we need to enable encryption policy management in the ExchangeDefender client admin portal:

image

  • Encryption: Disabled

This setting enables an admin Web page for adding, removing, and managing existing encryption policies for individual e-mail addresses or e-mail domains.

Once enabled in the admin portal either our client or we will see:

image

ExchangeDefender Encryption Policies can be defined based on the following criteria:

  1. Sender’s e-mail address
    • All e-mail sent by this user will be encrypted by default.
  2. Sender’s e-mail domain
    • All e-mail sent from this particular e-mail domain will be encrypted by default.
  3. recipient’s e-mail address
    • All e-mail sent to this recipient will be encrypted by default.
  4. Recipient’s e-mail domain
    • All e-mail sent to this e-mail domain will be encrypted by default.

By enabling default encryption policies, users save time since they will not need to place the [Encrypt] tag in the subject line each time they need to send a confidential or sensitive e-mail out to the same recipients.

Philip Elder
MPECS Inc.
Microsoft Small Business Specialists
Co-Author: SBS 2008 Blueprint Book

*Our original iMac was stolen (previous blog post). We now have a new MacBook Pro courtesy of Vlad Mazek, owner of OWN.

Windows Live Writer

Thursday, 29 April 2010

Creating a Non-Mail Enabled User in SBS 2008

In SBS 2003 if we left the e-mail alias field empty in the Add User wizard we would end up with a user account with no mailbox.

In SBS 2008 if we try the same thing we get an error asking us to fill out the e-mail alias field.

When we head into the Exchange Management Console found in SBS Native Tools Management we need to stop and consider what the various commands mean when we right click on the user’s mailbox account:

image

In the SBS 2003 days, Remove would mean the removal of the user’s mailbox. But, this actually goes through and removes the user’s AD account as well _without warning_.

In SBS 2008 with Exchange 2007 we actually need to Disable the user’s mailbox which effectively removes the AD account’s mailbox.

image

Occasionally there is a need for a user account with domain resource access without the need for a mailbox.

This is how we get to that point by creating the user in the SBS Console and subsequently disabling that mailbox.

There is one thing to consider though, if we run the Change User Role wizard in the SBS 2008 Console the wizard _will_ add a mailbox back to the user account.

This is what the user account looks like in the SBS Console after the mailbox has been disabled:

image

Note the absence of an e-mail address.

Philip Elder
MPECS Inc.
Microsoft Small Business Specialists
Co-Author: SBS 2008 Blueprint Book

*Our original iMac was stolen (previous blog post). We now have a new MacBook Pro courtesy of Vlad Mazek, owner of OWN.

Windows Live Writer

Thursday, 17 December 2009

Project Honey Pot – 1 Billionth Spam Message

Have a moment for a really good read?

Project Honey Pot has had their 1 Billionth Spam Message.

From the above linked blog post:

Every time Project Honey Pot receives a message we estimate that another 125,000 are sent to real victims. Our billionth message represents approximately 125 trillion spam messages that have been sent since Project Honey Pot started in 2004.

At this milestone, we wanted to take a second to report some of our findings. Our goal is not to rehash the same old insights but instead to give a new picture that only looking at five years and a billion data points can produce

Their findings are quite interesting with regards to the sources of spam, harvesting, and more.

It is well worth the read.

Philip Elder
MPECS Inc.
Microsoft Small Business Specialists
Co-Author: SBS 2008 Blueprint Book

*Our original iMac was stolen (previous blog post). We now have a new MacBook Pro courtesy of Vlad Mazek, owner of OWN.

Windows Live Writer

Tuesday, 1 December 2009

Two Excellent Blacklist Lookup Tools

Here are two excellent online tools for looking up a client’s IP to see whether they have been blacklisted when troubleshooting e-mail flow.

For a complete RBL rundown, this is the one:

image

Our results from this one:

image

The APEWS listing is for our ISP. The others are not relevant.

And, one that can be used from the sending mail server itself:

image

Note that this second link has a self-issued certificate so a certificate warning will greet you.

The IP address of the Internet gateway will be automatically present in the Multi-RBL Lookup Tool.

Our results from the second tool:

image

In our case we use ExchangeDefender both for our incoming e-mail and as our SmartHost. So, we do not need to worry too much about being blacklisted because of our ISP or the IP address we have here locally.

The other listings were due to the fact that we have SMTP traffic restricted to ExchangeDefender server IPs only.

Philip Elder
MPECS Inc.
Microsoft Small Business Specialists
Co-Author: SBS 2008 Blueprint Book

*Our original iMac was stolen (previous blog post). We now have a new MacBook Pro courtesy of Vlad Mazek, owner of OWN.

Windows Live Writer

Thursday, 17 September 2009

Why We Use ExchangeDefender

A while back we had a client that had booked a series of flights online.

A few minutes later, an e-mail with an attachment happened to arrive in his inbox with the airline’s “itinerary”. Without even thinking about it he opened the e-mail and the attachment and that was the point of no return.

The A/V, Trend, did not stop it.

So, we ended up in a bad situation that got worse when we discovered that the local laptop backups were not being done.

We had tried the cloud A/V and spam filtering that Trend had but we ended up having way too much grief with their service.

In comes Own Web Now’s ExchangeDefender.

The analogy we use when explaining why we prefer having the filtering done in the cloud before e-mail enters the corporate network works quite well.

The Anti-Virus program is like a 6’6” 275Lb bouncer that sits close to the front door. They can move about the place with relative ease and have access to all entry points in the place.

For the most part, the bouncer – name him/her whatever – catches any baddies that try to get in through the doors or the windows.

But, every once in a while a slim and short baddie does get by the bouncer because baddie is just too quick and new.

It then takes a bit of training for the bouncer to pick up on the new baddie and squash them at the point of entry. That delay can cause a big problem if the biddies' siblings happen to try and get in too.

With that imagery in mind, we can explain how Vlad’s service is set up to do just that long before the baddie even reaches the door. They get squashed out on the street! ;)

And, because the service is dedicated to this task alone, the filtering that is done will be that much better than anything the Anti-Virus vendors can do in real-time.

This morning, this was in an Inbox:

image

The file was culled before it reached the corporate network. A file culled out there is a file not clicked on by a user. Leaving that file to some form of Exchange based filtering or the endpoint workstation is a dangerous game we are no longer willing to play.

Given the fact that the cost of the ExchangeDefender service is very minimal relative to the level of services received it is not a difficult sell. We also include the ExchangeDefender service in our Hybrid Managed Services plans to add value to them too.

And, once our clients are onboard with our services and ExchangeDefender they do notice a big difference in the amount of time they no longer spend processing all of the junk e-mail.

Being a partner with Own Web Now is an important part of our business model (previous blog post). As we build up our client’s usage of the OWN services, the more confident we are going forward.

Philip Elder
MPECS Inc.
Microsoft Small Business Specialists
Co-Author: SBS 2008 Blueprint Book

*All Mac on SBS posts will not be written on a Mac until we replace our now missing iMac! (previous blog post)

Windows Live Writer

Saturday, 5 September 2009

SBS 2008 – MFP/Copier To Scan To E-mail Destined To A Companyweb SharePoint Library How To

One of our clients picked up a new Konica Minolta copier (previous blog post).

One of the requirements for the new copier was to have it scan documents and e-mail them to various users on the network. Another requirement was to have the copier scan documents to a folder.

Well, the folder idea was a bit of a pain due to the password rotation policies in place. We would end up either requiring that a restricted user be created with a pass phrase that never changes, or look for another method.

Since the copier was able to scan to e-mail, the simplest solution seemed to be to have it e-mail the attached PDF or other file to a Companyweb SharePoint Library.

The process was much easier said than done, though we managed to get things ironed out this afternoon with a lot of patience on the part of our client contact.

So, here are the steps we took in the order we took them along with a couple of errors we made during the whole process. Because of that, please read the entire post before heading out to make these configuration changes.

Configure the E-mail Enabled SharePoint Library

The first step in this process is to create the new document library that will be the destination for our copier e-mailed attachments.

We need to be logged into a workstation as either the domain admin or with a user account that has admin rights to the Companyweb site.

We click on the Site Actions button near the top right of the site and we create our new library:

image

Add a description if need be and click the Create button. Make sure to pay very careful attention to the information inputted in these fields.

Once the library is created, click on the Scans link now below the Fax Center in our own situation to bring it up:
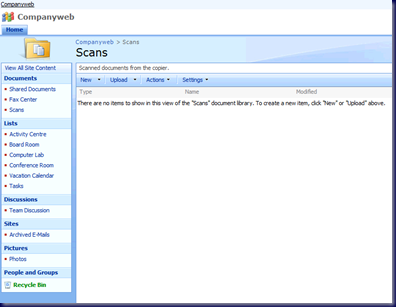
image

Create a New Receive Connector

Our next step is done on the SBS 2008 server itself.

In the Exchange Management Console, here we are using Windows SBS Native Tools Management, we need to get to the Hub Transport role under the Server Configuration Node:

image

Right click anywhere under the Receive Connectors list and click on New Receive Connector:

image 

We name the Receive Connector. In our case we called it Copier Send to E-mail.

After clicking next, we will leave the default local SMTP receive settings alone when it comes to the local IP addresses.

image

Take note however, that the FQDN setting needs to be filled out with the SBS server’s Fully Qualified Domain Name: MY-SBS.MySBSDomain.Local.

Next we have the From IPs. This is where we input the copier’s IP address. We added both copiers if they decided they wanted the other one e-mail enabled,

image

Once we click Next we are given a summary of the changes about to be made. We then clicked the New button to make it happen.

Receive Connector Properties

Once the Receive Connector has been created, we need to tweak it a bit to allow for anonymous SMTP connections from our two copier IP addresses.

Right click on the Copier Send To E-mail connector and click on Properties.

Click on the Authentication tab and make sure none of the check boxes are checked:

image

Then click on the Permissions Groups tab and put a check mark beside the Anonymous users setting:

image 

Our last step with regards to our Receive Connector is to run an Exchange Management Shell command to set the anonymous permissions into play:

  • Get-ReceiveConnector "Copier Send To E-mail" | Add-ADPermission -User "NT AUTHORITY\ANONYMOUS LOGON" -ExtendedRights "ms-Exch-SMTP-Accept-Any-Recipient"

Open the Exchange Management Shell by right clicking on it and then clicking on Run As Administrator.

Copy and paste the above command into the Management Shell. Note that the name of the Receive Connector in our example needs to be changed to whatever you have named the Receive Connector in order for things to work as expected.

This is what a successful command will look like:

image

We now have our SBS Exchange set up to allow the copiers to relay e-mail containing any scanned items through it.

Create An E-mail Enabled Contact

Our last step in this process is to create an e-mail enabled contact.

The e-mail address we created for the library was: Scans@companyweb. Companyweb is not a known or enabled e-mail domain anywhere in our SBS setup other than the SharePoint library and Exchange.

There may be a need for users to e-mail content into the library via their Outlook client, so we create the new contact.

Coming back to our open Windows SBS Native Tools Management console with the Exchange Management Console opened, we need to click on the Recipient Configuration node.

In the right hand Actions column click on New Mail Contact.

Fill out the Contact Information taking care to note that the Alias should be the same value as the e-mail address prefix (_____@MySBSDomain.Local):
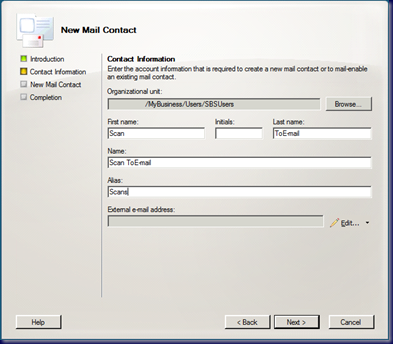
image

Click the Edit button next to the pencil to get:

image

Now for clarification’s sake, have a look at what was typed into the E-mail address field in this pop-up and head back up to the SharePoint library e-mail address. Notice any difference?

When everything was put together we could not get an e-mail to the SharePoint library but we could to the users when a scan was initiated at the copier. Somehow, through the whole process the e-mail address was seemingly case sensitive in Exchange and/or in the SharePoint library. The other possibility was that the address in the copier was different and the copier was case sensitive for e-mail.

Either way:

  • Make sure the e-mail address used is consistent case sensitivity wise throughout the set up process.

With that in mind, our input should have been: Scans@companyweb as it was in the SharePoint library.

Here is the filled out Contact Information step:
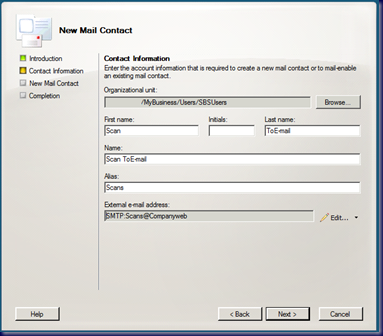
image

After clicking Next we are presented with a summary of the settings. Click the New button and we will now have an e-mail contact that will show up in the GAL thus allowing

Restart the Microsoft Exchange Transport Service

Once we have all of our configuration changes in place, as an extra precaution we restarted the Transport Service:

image

Test Scans

So, once we have the configuration in place everything should work as expected right?

Well . . . no.

The photocopier folks had their training person in to work with our client’s users on learning the copier and its features.

We did not have the scan to e-mail enabled before they arrived. When things did not work as expected, they made some changes on the copier according to our client contact.

Now, the copier needs to send e-mail to that library. The library uses what is essentially an Internet non-existent e-mail domain.

Here is the setting change that was made:

image

Notice the problem setting?

Our local Shaw SMTP server setting was put in the place of our client’s SBS IP address.

E-mail would flow to the users but not to the library.

Once we corrected that, we still could not get e-mail to flow.

We fired up the Exchange E-mail tracking to find out if the copier was even connecting to the server:

image

It was, but the e-mail was not reaching the library.

This is when we figured out that the only anomaly that we could see in the entire chain of events was the case in the e-mail address.

Once we had the e-mail address case settings the same in the:

  • Copier address list.
  • Exchange e-mail enabled contact.
  • SharePoint document library

We had the following result:

image

Our first PDF scan hits the library!

One of the neat things about this setup is the Alerts feature in SharePoint libraries. If there are one or two folks responsible for keeping the library tidy then anytime an e-mail attachment hits the library they can put the bug in someone’s ear to take care of it.

Overview steps:

  1. Configure the E-mail Enabled SharePoint Library.
  2. Create a New Receive Connector.
  3. Modify the Receive Connector's Properties.
  4. Create an E-mail Enabled Contact.
  5. Restart the Microsoft Exchange Transport Service.
  6. Test Scans and Troubleshooting.

Links

The above was brought about via a combination of resources:

Philip Elder
MPECS Inc.
Microsoft Small Business Specialists
Co-Author: SBS 2008 Blueprint Book

*All Mac on SBS posts will not be written on a Mac until we replace our now missing iMac! (previous blog post)

Windows Live Writer

Monday, 20 July 2009

OS X: Mac Mail POP Stops Working

We had a call to look into why the built-in OS X mail client was no longer pulling e-mail into the inbox.

The 24” iMac was running OS X 10.5 (Leopard) with most of the recent updates.

The e-mail stopped flowing on July 9 at 16:45hrs (4:45PM).

Click on the gear near the bottom left corner of Mac Mail and then click on Get Account Info and the window that came up would connect to the POP3 server and list all e-mail on the server including any new e-mail not being retrieved.

Because the Account Info dialogue allowed us to connect and view content on the POP3 server, we knew that we were not dealing with an authentication or improper credentials problem.

A search for a solution to the problem took a few different keyword iterations before anything reasonably close came up:

Now, the above link deals with an e-mail that is malformed with a 0KB size that causes the stall.

In our case, the e-mail that was next in line, when sorted by date, had a 35KB size and was a broadcast self-addressed e-mail with a number of BCC addresses in it.

Somehow, that e-mail was causing the hang-up because as soon as it was deleted using the Remove From Server button in the Account Info window the user’s e-mail started to flow.

Philip Elder
MPECS Inc.
Microsoft Small Business Specialists
Co-Author: SBS 2008 Blueprint Book

*All Mac on SBS posts will not be written on a Mac until we replace our now missing iMac! (previous blog post)

Windows Live Writer

Thursday, 11 June 2009

SBS 2003 to SBS 2008 Migration – 57 Mailbox Move Time

The migration we have been struggling to get running is well under way now.

The source server is a single Xeon X5300 series Quad Core Dell with 15K RPM SAS drives and a Gigabit connection.

The destination server is a dual Xeon E5400 series Quad Core Dell with 15K RPM SAS drives and a Gigabit connection.

Both servers were plugged into a Gigabit switch with a large backbone.

The total time to move 57 mailboxes running close to 50GB was 3 Hours and 20 Minutes!

image

We did not experience any lost e-mails or anything left behind on the old server which would have meant a rerun of the Mailbox Move Wizard.

All in all, it is good to see that this critical portion of the migration has run through without a hitch. :)

Philip Elder
MPECS Inc.
Microsoft Small Business Specialists
Co-Author: SBS 2008 Blueprint Book

*All Mac on SBS posts will not be written on a Mac until we replace our now missing iMac! (previous blog post)

Windows Live Writer

Thursday, 9 April 2009

SBS 2008 – Reply-To Address Error After Applying Exchange 2007 SP1 Rollup 7 – Workaround is to Uninstall

*Repost Begins (the original post)*

We have run into a strange issue after applying Rollup 7 last night to one of our SBS 2008 servers.

In this case, there are customized recipient policies to hand out return addresses based on the Custom Attribute 1 field’s entry. There are multiple e-mail domains on this particular SBS box.

Somehow, last night’s update has choked the return e-mail address stamp that comes on any e-mail sent by those with that custom attribute set!

The reply to address looks like this:

When we do a message tracking trace on for the user, the results show the Return Path as it should be UserN@TheirDomain.com, yet the above is on any e-mail they send out.

We have not yet applied Exchange 2007 Rollup 7 for SP1 to any of our other SBS 2008 boxes yet. It seems that default SBS 2008 installations should take the update with no issues as there has been very little feedback indicating otherwise.

More to come on the problem …

*Repost Ends*

It turns out that Rollup 7 will choke on Hidden Mailboxes.

image

Hide from Exchange address lists

The knowledgebase article: Microsoft KB969690: Unresolved sender for delivery status notifications after applying update rollup 7 for Exchange Server 2007 Service Pack 1.

The Knowledgebase article on the update itself: Description of Update Rollup 7 for Exchange Server 2007 Service Pack 1. Nothing here indicates that hidden mailboxes will cause things to choke up!

Now that we know what caused the problem, it is important to know that Exchange 2007 SP1 Rollup 7 should not be applied in cases where there are hidden mailboxes!

The only option we have now is to uninstall RU7, reinstall RU6, and we will be able to keep those addresses hidden. Thanks to Chris Puckett of Microsoft (Live Search) for pointing us in the right direction!

The problem will be fixed with Exchange 2007 Service Pack 2 according to the KB969690 article.

Philip Elder
MPECS Inc.
Microsoft Small Business Specialists
Co-Author: SBS 2008 Blueprint Book

*All Mac on SBS posts will not be written on a Mac until we replace our now missing iMac! (previous blog post)

Windows Live Writer