Showing posts with label SBS Setup. Show all posts

Tuesday, 31 July 2012

SMB Solution Sets Going Forward

This is a tweak of a post on Spiceworks - SBS End of Life.

***

SBS meets a specific market and did so quite well. As Tyler has mentioned it was relatively straightforward to get up and running and when done correctly ran for years requiring basic SBS specific maintenance.

Yes, we have lost the SBS pricing. But, as far as we can tell at this point the increase to the small business to have AD and Exchange in-house will only be marginally more. For those requiring SQL the step up will be a lot more.

The other side of that coin is that SBS brought together, IMNSHO, probably one of the strongest communities to back not only SBS but a whole host of SMB oriented products under one umbrella.

While the loss of SBS may seem like a huge shock for many, in the end it is only change and change is something we should all be used to working in the IT industry.

The cost comparisons between on-premises and Cloud based solutions are only now beginning in the SMB arena. As Cloud matures we will begin to see the real costs associated with Cloud based solutions versus their on-premises siblings and thus provide our clients with a well researched solution set that they can choose from.

Going forward we will have something in SMB that SBS did not provide us: Flexibility.

We can now design a full Microsoft solution stack based solution and CAL it up using the Core CAL Suite or even the Enterprise CAL Suite with the option to run with individual product CALs if the client so chooses.

There are a lot of awesome new products coming down the pipe that will be attractive to SMB that SBS did not give us.

  • Lync is definitely one of them.
  • Built-in Clustering technology now freely available in Windows Server 2012 STANDARD makes for some very lucrative highly available options that SMB may not have had before.
  • DirectAccess is another feature that SMB will find it difficult to be without _once they have it_!
    • Search will always be the on-premises Killer-App that Cloud cannot provide across diverse platforms.

We are on the edge of a truly amazing time.

The on-premises solution set is growing in ways we could only have dreamed of when SBS 2003 was released almost 10 years ago!

Tie that into the many Cloud based products that are mature and backed by geo-redundant and privacy respecting vendors and we have an out-of-the-park home run.

My .25 (2bits) for today. :)

Philip Elder
MPECS Inc.
Microsoft Small Business Specialists
Co-Author: SBS 2008 Blueprint Book

*Our original iMac was stolen (previous blog post). We now have a new MacBook Pro courtesy of Vlad Mazek, owner of OWN.

Windows Live Writer

Monday, 23 July 2012

SBS Migration Guide and SBS Setup Guide Updated

We have added quite a few steps to both our Migration Guide and our Setup Guide.

Please do use these guides for your own SBS 2011 Standard setup and migration processes!

Philip Elder
MPECS Inc.
Microsoft Small Business Specialists
Co-Author: SBS 2008 Blueprint Book

*Our original iMac was stolen (previous blog post). We now have a new MacBook Pro courtesy of Vlad Mazek, owner of OWN.

Windows Live Writer

SBS 2011 Setup Guide v1.13.0

This list is the guide that we use to set up our SBS 2011 boxes or VMs in a consistent manner. As with earlier versions of SBS, this version too will require a number of post OS install tweaks and configuration steps.

The following assumes that the server manufacturer’s prep disk was used to update the BIOS, motherboard firmware, RAID controller firmware, backplane firmware, and any other device’s onboard firmware prior to installing the SBS 2008 OS. The firmware update step is an absolutely critical one for the stability of the server.

Note that we do not input the Product Key into the OS until we are ready to put the server into production or are on the edge of finishing up a migration.

The SBS 2011 Setup Steps
  1. When installing into a VM set the time.
    • MPECS Inc. Blog: Hyper-V- Preparing A High Load VM For Time Skew
    • Standalone: When virtualizing SBS on a standalone server set the host to poll pool.ntp.org for the correct time. Configure the host’s firewall to allow NTP polling on the local subnet. Then set the SBS VM to poll the host’s IP or hostname for time using the above settings.
    • Clustered: Have the standalone DC polling pool.ntp.org and set as the authoritative time source for the domain. Have SBS and other VMs poll the standalone DC for their time using the above settings.
  2. Install the manufacturer’s drivers.
      1. RAID including RAID monitoring/status software.
      2. Chipset.
      3. Video.
      4. NIC (Do not team). Unplug or disable any extra NICs for now.
      5. Management suites from the hardware manufacturers will be installed later on in this process.
      6. We do not install System Center Essentials that is provided by Intel on our Intel based SBS 2008 servers.
    1. Desktop
        1. Set the desktop resolution for the monitor attached.
          • Keep in mind that some remote management modules such as Dell’s DRAC may not work if the monitor’s resolution is set too high.
        2. Enable desktop icons:
          1. Click Start –> type: Desktop Icons [Enter].
            • image
      1. GUI Customization
          1. Windows Explorer.
            • Extensions, Show hidden . . .
            • image
            • image
          2. Start Menu.
          3. Notification Area.
          4. Add a Desktop Toolbar to the Task Bar .
            • image
          5. Internet Explorer.
            1. Add http://download.microsoft.com to Trusted Sites.
          6. Task Manager Process Column Customization.
            • PID, memory usage, maximum memory usage, I/O Bytes (3)
        1. Partitioning
            • NEW: RAID 5 with 4x 15K SAS Spindles (four drives) is now our default RAID setup for small clients.
              • For our 8-15 seat clients we will configure 5 15K SAS spindles in RAID 5 plus a hot spare depending on their I/O requirements.
              • With the advent of the 300GB and 600GB Intel 320 Series SSDs we are looking to SSD going forward for those clients that require ultra-high performing storage systems.
              • For clients with around 15 seats or more we are starting to configure a standalone 1U server for virtualization or Hyper-V Cluster directly attached to a Promise VTrak RAID Subsystem (VTE310sD or VTE610sD) for maximum storage flexibility.
            • Name after the amount of storage is the drive label.
              • ~900GB Usable (4x 300GB 15K SAS)
              • C: 150GB SS-SBS (Rename to SBS server name)
              • S: 1.5x RAM xxGB SwapFile (Min. 10GB RAM * 1.5 with wiggle room)
                • 32GB SwapFile
                • SBS 2011 swap file configuration out of the box:
                  •  image
              • L: 718GB WorkingStorage
            • Note: Exchange 2010 has been designed from the ground up to utilize more RAM. Adding more RAM for Exchange performance would be our priority before adding more spindles to the RAID 10 set.
            • Also, we do not install SATA hard drives of any kind into server settings anymore. In our experience they are too problematic in RAID arrays no matter which manufacturer made them. 
            • MPECS Inc. Blog: SAS versus SATA and Hardware RAID versus Software RAID.
          • Move the optical drive letter to Z:.
          • Move the Swap File (Reboot).
          • SBS 2011: Do _not_ Copy and paste this services shutdown batch file onto the desktop (previous blog post).
            • The Exchange 2010 team has addressed the issues of having Exchange installed on a DC with this version. Exchange 2007 had shutdown timing issues thus the long shutdown times.
          • Install and configure Print Services Role: SBS 2008 Terminal Services and HP Printer Drivers (previous blog post).
            • image
          • Windows Native Tools Management Console modifications
            1. Add the Group Policy Management Console
            2. Add the Print Management snap-In (after adding the Print Server Role).
            3. Add the Share and Storage Management snap-in.
            4. Add the File Server Resource Manager snap-in.
            5. Add the Remote Desktop Services Manager snap-in.
            6. Add the Windows Server Backup snap-in.
              • image
          • Configure an authoritative time source for the SBS OS.
            1. Blog Post: Hyper-V- Preparing A High Load VM For Time Skew
              • This is the best methodology to date for setting up a VM’s Windows Time Service.
            2. Blog Post: SBS 2008 Physical And Hyper-V – Set Up the Domain Time Structure.
              • The default time.windows.com is not a reliable source.
            3. TechNet: Synchronize the Source Server time with an external time source for Windows SBS 2008 migration.
            4. Once the commands have run, an error message or two may show in the Event Logs soon to be replaced by a successful connection to the authoritative time source.
            5. Note Oliver Sommer’s comments in the above article.
          • Enable ShadowCopies on the WorkingStorage partition and set a schedule. We use before hours, coffee, lunch, coffee, and after hours for the schedule.
          • DHCP IPv4 Properties (DNS updates & credentials)
            • image
            • Enable Name Protection and set the credentials.
          • DHCP additional exclusions for printers (x.1-10 if not present) and servers (x.250-254).
          • DNS Settings for Scavenging at 7 days and AD integrated zones.
          • Verify NIC Binding Order Settings: Blog Post: Slow Network Speeds with SBS 2008 and 2011: NIC Binding Order
          • Create a 10GB Soft Quota (File Server Resource Manager).
          • Enable firewall logging and pop-ups: SBS 2008 Windows Firewall with Advanced Security troubleshooting (previous blog post).
            1. Customize the firewall setup for QuickBooks.
              1. QuickBooks Connection Diagnostic Tool Post (Previous blog post).
            2. Customize the firewall setup for Simply Accounting (Previous blog post).
          • Create the default Company Shared Folder with required NTFS and share permissions on the L: WorkingStorage partition.
              • Share Name: Company.
              • Quota: 10GB Soft.
              • Enable Access-based Enumeration.
              • NTFS Permissions:
                • Domain Admins = FULL.
                • Domain Users = Modify.
                • Leave default machine based permissions.
              • Share Permissions:
                • Everyone = FULL.
            • Create the ClientApps (previous blog post on GP and the ClientApps folder) on the L: WorkingStorage partition.
                • Share Name: ClientApps.
                • Quota: None.
                • Enable Access-based Enumeration. Subfolders can have custom permissions at a later date to exclude users or groups and thus hide those subfolders at a later date.
                • NTFS Permissions:
                  • Domain Admins = FULL
                  • Domain Users = FULL
                  • Domain Controllers = FULL
                  • Domain Computers = FULL
                • Share Permissions:
                  • Everyone = FULL
              • Make changes to the WSUS Setup:
                • WSUS Classifications: Enable all.
                • WSUS Sync Schedule: Increase synchronization frequency schedule depending on what products are installed on the server.
              • Getting Started Tasks – Out of Order
                1. Configure and take a backup now.
                2. Times: 12:30, 17:30, 23:30.
                  • Make sure that the backup times and the Volume Shadow Copy snapshots do not happen at the same time.
                3. Backup Now by right clicking on the configured backup and running it.
                4. Backup in between each batch of updates.

              • Windows Server 2008 R2 Service Packs
                1. Download and install the latest Windows Server 2008 R2 Service Pack (Bing Search)
                  1. Be aware that the install process may take a while.
                  2. image
              • Exchange 2010 Updates
              • Server Updates via WSUS/MU.
                • Update to the latest SBS Update Rollup first.
                • Run updates according to the following product groups:
                • Windows Server 2008 Standard R2
                  • Run OS Updates at around 10-15 per reboot cycle.
                  • Run OS Security Updates at around 5-10 per reboot cycle.
                • Exchange SP1/2/3 or Exchange Rollup RU1/2/3/etc 
                • .NET
                  • If .NET v1 is present update first.
                  • Do .NET v2 and v2.x updates one at a time.
                  • Do .NET v3 and v3.x updates one at a time.
                  • Do .NET v4 and v4.x updates one at a time.
                  • Reboot between each cycle as requested.
                • SQL
                  • Start with 2005 versions.
                  • Next to 2008 versions.
                  • Next to 2008 R2 versions.
                • WSUS, and others.
                • SharePoint Foundation Updates should be run separately.
              • Create a new User Role in the SBS Console.
                • Name: Standard User – Restricted.
                • Remove all Group Memberships.
                • Add the Domain Users security group only.
                • Remove OWA permission.
                • No RWW or VPN.
                • Verify permissions in the User Role after it is created.
                • This role is used for the local admin account deployed via Group Policy later in this guide.
              • Create and configure the Group Policy Central Store (Previous blog post).
              • OPTION: Raise both Domain and Forest Functional level to 2008 R2
                • This is accomplished in AD Domains and Trusts.
                • image
              • Group Policy Configurations (previous blog post):
                1. Windows Computer Policy:
                  1. Firewall Exceptions:
                    1. Enable Remote Event Log Management (previous blog post).
                    2. Remote Volume Management
                    3. Remote Desktop Protocol and RemoteFX Protocol
                  2. Set limits to the RDP setup on the server and clients (previous blog post).
                  3. Local Policies: User Rights Assignment.
                  4. Local Policies: Security Options.
                    • Enable UAC by default in Group Policy (previous blog post).
                    • NOTE: The UAC structure can be split up between Computers, SBSComputers, and SBSServers GPOs so that domain/local admin accounts only get prompted on servers.
                  5. Remote Connectivity: Restrict certain RDP related settings (previous blog post).
                2. Windows SBSUsers Policy:
                  1. Configure Screensaver Management. Our default is 45 minutes with logon.scr as the default SS. Password is always required.
                    • 2010-10-18: For Windows 7 we now use scrnsave.scr as the basis for all screensavers which is a blank screen.
                  2. Mapped Network Drive (M: = \\SS-SBS\Company) via Group Policy Preferences
                  3. Set the Companyweb as the default site in IE.
                  4. Add the RWW and OWA URLs to IE’s Favourites.
                3. Windows SBSComputers Policy:
                  1. Deploy a restricted domain user to _all_ system’s Local Admin Group.
                    1. Create a new user using the Standard User – Restricted Role.
                    2. Deploy to workstation’s Local Admin Group via Group Policy Preferences.
                    3. Remove the user’s mailbox (previous blog post).
                4. Windows Printer Deployment Policy:
                  1. Deploy printers to XP Professional x86 (previous blog post).
                  2. Deploy printers to Windows Vista using the Printer Management snap-in.
                5. Windows SBSComputers XP Pro Policy:
                  1. Deploy Windows Defender to Windows XP Professional (Optional).
              • Install the server hardware manufacturer’s management software suite.
              • Set the SBS Domain Password Polices (60-75 days, 10-12 characters minimum with complexity).
                • Note that all user’s passwords will reset to request a new password!
              • Enable Folder Redirection to SBS.
                • Changing the security settings in the default GPO for redirection will show FR as not enabled in the SBS Console.
                • We remove the Exclusive Access setting on any folders redirected to remove complications when it comes time to migrate the client to a new server.
              • OR: Enable Folder Redirection to an separate server (previous blog post).
              • Remove the Public share in the SBS Console.
              • Self-issued certificate: copy the package to the Network Admin\SBS folder in the Company shared drive. (We create a Network Admin folder in the Company Shared Folder at all client sites).
              • If using a GoDaddy certificate, make sure to install the GoDaddy Intermediate certificates (download page) into the Intermediate Certification Authorities store individually to avoid any issues later.
                1. Install the gd_cross_intermediate.crt first
                2. Install the gd_intermediate.crt second
                3. Disable All Uses for GoDaddy Class 2 root certificate in Trusted Root Certification Authorities if present.
                  • Check for this one after installing the actual certificate at step 5.
                4. Restart the IISAdmin service.
                5. Install the GoDaddy certificate using the wizard.
              • Move the relevant data folders to the L: partition. We move all but the Exchange databases.
                  1. WSS (SharePoint) Data.
                  2. Users’ Shared Folders.
                    1. Re-enable Access-based Enumeration
                  3. Users’ Redirected Folders Data.
                    1. Re-enable Access-based Enumeration
                  4. WSUS Update Repository Data.
                1. SBS Console Getting Started Tasks.
                    1. Connect to the Internet.
                    2. Customer Feedback options.
                    3. Set up your Internet address.
                    4. Configure a Smart Host for Internet e-mail.
                    5. Add a trusted certificate.
                    6. Configure server backup: Earlier in this checklist.
                    7. Add new users (use the multiple wizard under users if there are a lot of users to add).
                    8. Connect computers: http://connect.
                    9. Share Printers via Group Policy for Windows Vista and PushPrinterConnections.exe for Windows XP Pro SP3 (both links are previous blog posts).
                  1. Configure the Reports e-mail addresses.
                  2. Configure Workstations on the domain.
                  3. Official SBS Blog: How to Configure SBS 2011 Standard to Accept E-mail for Multiple Authoritative Domains
                  4. E-mail Enable the SharePoint Foundation Companyweb site (Official SBS Blog Post).  Then:
                  5. Enable an MFP or Copier to Scan To E-mail Destined To A Companyweb SharePoint Library (previous blog post).
                    1. Run the following in an elevated Exchange Management Shell to increase the allowed attachment size (100MB is our default):
                      1. Set-ReceiveConnector "Copier Send to E-mail" -MaxMessageSize 100MB
                    2. Make sure to verify the largest file size setting in SharePoint.
                      1. Aimless Ramblings: Large Files in SBS 2008’s Companyweb
                  6. OPTION: If using Exchange 2010 AntiSpam set up a library on Companyweb called Spam.
                    1. E-mail enable the library with spam@companyweb
                    2. Set Exchange AntiSpam to REDIRECT instead of DELETE to spam@companyweb
                  7. Change the Default Message Size Limits for outgoing and inbound messages in the Exchange Management Shell:
                    1. Set-TransportConfig –MaxSendSize 25MB –MaxReceiveSize 25MB
                    2. Set-ReceiveConnector “Windows SBS Internet Receive ServerName” –MaxMessageSize 25MB
                    3. Set-SendConnector “Windows SBS Internet Send ServerName” –MaxMessageSize 25MB
                    4. Check the status for each connector:
                      • Get-TransportConfig | ft name, MaxSendSize, MaxReceiveSize
                      • Get-ReceiveConnector | ft name, MaxMessageSize
                      • Get-SendConnector | ft name, MaxMessageSize
                      • Get-mailbox | ft name, MaxSendSize, MaxReceiveSize
                    5. Hat Tip: LAN-Tech: Quickie: changing message size limits on SBS STD 2008 and 2011
                  8. Enable Single Item Recovery in Exchange Server 2010 – Exchange Team Blog.
                  9. Enable and configure Windows Search Services on SBS 2008 or a Windows Server 2008 RTM/R2 file server and Libraries on Windows 7 (Official SBS Blog post).
                    1. Install the Search Service (On SBS 2011 it may already be installed).
                      1. If so: Click Start –> type Search.
                      2. Click Indexing Options in the results.
                        • imageimage
                      3. Verify that all company shared folders are being indexed.
                    2. Add the Company folder share (or Public folder share) to Windows 7 Libraries.
                    3. Click start and start typing and watch those network files results flow!
                  10. Fix the networking settings for Add-On Congestion Control Provider, Receive Window Auto-Tuning Level, Receive-Side Scaling State, Task Offload (previous blog post).
                    • SBS 2008 related … tentative at this point.
                  11. Download, install, and run the SBS 2011 Best Practices Analyzer.
                    • The BPA will pick up a lot of the little things that need to be configured such as advanced OS networking features that should be disabled and others.
                    • The SBS 2011 BPA requires the Microsoft Baseline Configuration Analyzer 2.0.
                  12. Change the initial domain administrator’s password if using an Answer File (remember to reset the DHCP credentials, and any Event Log event fired Task too).
                    • Note that if the admin account has not been logged off since changing the Password Policies, a log off and log on again will require a password change anyway.
                  13. Input the PID and Activate.
                  14. Control the Microsoft##SSEE WSUS Database’s memory Usage
                  15. Configure Custom Views and e-mail Task triggers for Event IDs (SBS Native Tools Management):
                  16. OPTIONS:
                  17. Customize the SBS Console Reports.
                  18. Run a backup. Crash the server. Restore the Backup. Deliver.

                  One thing to keep in mind when it comes to checklists is that they are never meant to be a replacement for the materials they summarize!

                  It is very important to understand why the various steps need to be accomplished, how those steps can change over time due to changes in the operating system, the hardware configurations underneath the OS, and the technician’s own growth in experience and understanding.

                  The “why” leads to an ability to understand how things are going wrong when they do. Note that we are saying, “when” and not “if” things go wrong.

                  Troubleshooting

                  Post OS Setup

                  Philip Elder
                  MPECS Inc.
                  Microsoft Small Business Specialists
                  Co-Author: SBS 2008 Blueprint Book

                  *Our original iMac was stolen (previous blog post). We now have a new MacBook Pro courtesy of Vlad Mazek, owner of OWN.

                  Windows Live Writer

                  Wednesday, 11 July 2012

                  Software Assurance for SBS And PAO Ending and Some Stack Configurations And How SBS 2011 Standard Can Continue To Teach Us

                  [EDIT] Please note that Server STD in this case is Windows Server 2012 Standard that comes with 1+2 virtualization rights.

                  [2012-07-14: EDIT] We updated the two cluster solution sets with the appropriate license structure for Windows Server 2012 Standard. My apologies for the initial error.

                  So, we now know that Microsoft will be officially releasing Windows Server 2012 next month.

                  Software Assurance

                  As a result, Software Assurance for SBS and the Premium Add-On will no longer be offered after the end of this month.

                  So, we have been encouraging clients that are looking for an on-premises solution that SBS 2011 Standard fits to start their Open Value Agreements by the end of the month.

                  The SA make-good should be about even or in their favour to some degree.

                  Going forward we will still have access to SBS 2011 Standard through the OEM channel and Open License for outright license purchase but no more Software Assurance.

                  Third Tier had a Webinar/Discussion last night about the Future of Small Business IT. Unfortunately I was not able to attend but a recording should be available sometime soon. The Webinar would be a good way to spend some time catching up on how things may be moving forward.

                  Our Guides and Solution Set

                  For now, we will be looking to build out our guides for the new solution set. We will include licensing structures as well as our usual in-depth setup guides for each component we need to deliver an on-premises solution.

                  Here are some solution sets we have on our plate at the moment:

                  1. Simple Solution (1x Server STD, 1x Exchange, Server/Exchange CALs):
                    1. VM1: DC, File Services, Folder Redirection, Fax
                      1. GPOs defined for Microsoft Update (MU) via Internet
                    2. VM2: Exchange/OWA/ActiveSync
                  2. Simple Solution - Advanced (2x Server STD, 1x Exchange, Server/Exchange/RDS CALs)
                    1. VM1: DC, File Services, Folder Redirection, Fax, Reverse Proxy
                    2. VM2: Exchange/OWA/ActiveSync
                      1. Reverse Proxy provides for 1 public IP for OWA/ActiveSync/WSS
                    3. VM3: WSUS and SharePoint Foundation
                      1. GPOs defined for all systems to pull updates from WSUS.
                      2. SQL Express for WSF here.
                    4. VM4: Remote Desktop Services/RemoteApp
                  3. Advanced Solution - Basic 2 Node Cluster (2x Server STD/Node, 1x Exchange, Server/Exchange/RDS CALs)
                    1. VM1: DC, File Services, Folder Redirection, Fax, Reverse Proxy
                    2. VM2: Exchange/OWA/ActiveSync
                      1. Reverse Proxy provides for 1 public IP for OWA/ActiveSync/WSS
                    3. VM3: WSUS and SharePoint Foundation
                      1. GPOs defined for all systems to pull updates from WSUS.
                      2. SQL Express for WSF/WSUS here.
                    4. VM4: Remote Desktop Services/RemoteApp
                      1. RDWeb can replace RWW/RWA with some tweaking.
                  4. Advanced Solution - Advanced 2 Node Cluster (4x 3x Server STD/Node, 1x Exchange, 1x SQL STD, Server/Exchange/RDS/SQL CALs)
                    1. VM1: DC, File Services, Folder Redirection, Fax, Reverse Proxy
                    2. VM2: Exchange/OWA/ActiveSync
                      1. Reverse Proxy provides for 1 public IP for OWA/ActiveSync/WSS
                    3. VM3: WSUS and SharePoint Foundation
                      1. GPOs defined for all systems to pull updates from WSUS.
                    4. VM4: Remote Desktop Services/RemoteApp
                      1. RDWeb can replace RWW/RWA with some tweaking.
                    5. VM5: SQL and SQL Services
                      • NOTE: For full VM portability, that is the ability to move guests between nodes or onto 1 node for things like maintenance that node must have the correct number of either STD licenses or a Datacenter license.

                  The above four options are not far off from what we have been deploying all along. The catch is that we now need to delve into the bits and pieces.

                  SBS Can Teach Us

                  But, we have been doing that already haven't we? We have been ripping apart the SBS wizards for over 10 years now to see what they do and how they do it.

                  The SBS Development Team has given us an awesome model/template in SBS 2011 Standard for all of our networks going forward.

                  • Active Directory
                    • Organizational Unit Structures
                    • Group Policy Configuration
                    • WMI Filtering
                  • Exchange
                    • Receive and Send Connector Structures
                    • Private and Public Mailbox Setup
                    • Mailbox Migration Techniques
                  • File Services
                    • Folder Redirection
                    • Folder Sharing
                  • SharePoint
                    • Site configuration for URL sets
                    • Alternate port mapping
                    • E-mail in and out

                  Obviously this list is really brief, however, we have a goldmine of knowledge in the SBS product line that should not be left untapped.

                  We _highly_ suggest that digging into SBS 2011 Standard and working out what the wizards do and how they do it (logs) will be a significant part of moving forward in today's ever changing IT World!

                  Conclusion

                  We are feeling pretty positive about where things are going with the changes here. We have yet to see what the prices for our solution stacks will be going forward relative to the current stacks but we are confident that the price increases to SMB will be reasonable.

                  Remember, take that upfront sticker price (if not doing Open Value) and divide by 36 (life of the solution in months) then divide the result by the number of users to get the total cost _per user_ per month to put everything into perspective.

                  UPDATE: 2012-07-14: We have changed the solution sets for the cluster setups since the total number of VMs running on a 2 node cluster must be _fully_ licensed on each node. So, 4 VMs means we need two Windows Server 2012 Standard licenses per node.

                  Philip Elder
                  MPECS Inc.
                  Microsoft Small Business Specialists
                  Co-Author: SBS 2008 Blueprint Book

                  *Our original iMac was stolen (previous blog post). We now have a new MacBook Pro courtesy of Vlad Mazek, owner of OWN.

                  Windows Live Writer

                  Monday, 7 May 2012

                  SBS 2011 Setup Guide and SBS 2003 to SBS 2011 Migration Guide QR Codes

                  There are so many times where we need to answer a quick question that is found or linked to in our SBS 2011 Setup and Migration Guides.

                  Mobile is sometimes the only way to get what we need since we prefer not to browse from the server, our laptop may not be readily available, or any other number of Murphy type situations that interfere with quick access.

                  The following QR Codes will make mobile access that much quicker:

                  image

                  image

                  Thanks again to everyone that has commented or commended us on our guides!

                  Philip Elder
                  MPECS Inc.
                  Microsoft Small Business Specialists
                  Co-Author: SBS 2008 Blueprint Book

                  *Our original iMac was stolen (previous blog post). We now have a new MacBook Pro courtesy of Vlad Mazek, owner of OWN.

                  Windows Live Writer

                  Thursday, 22 March 2012

                  SBS 2011 Setup Guide v1.11.0 Update Released

                  We bumped up our Setup Guide for SBS 2011 after making two significant additions:

                  image

                  We added the post MFP step to configure the Receive Connector for the MFPs to 100MB.

                  We also added the step to use PowerShell in the Exchange Management Shell to quickly change the default message sizes for inbound and outbound e-mail.

                  Thanks to fellow MVP Rob of LAN-Tech for the pointer.

                  Philip Elder
                  MPECS Inc.
                  Microsoft Small Business Specialists
                  Co-Author: SBS 2008 Blueprint Book

                  *Our original iMac was stolen (previous blog post). We now have a new MacBook Pro courtesy of Vlad Mazek, owner of OWN.

                  Windows Live Writer

                  Friday, 27 January 2012

                  Setting Remote PC Access Permissions for users in SBS 2011 Essentials

                  There certainly are some differences between the two SBS versions.

                  To give users permissions for PC access via the Remote Web Access portal we need to check the PCs in the user’s properties:

                  image

                  The only items to be found under the PC’s properties has to do with the client backup feature.

                  Philip Elder
                  MPECS Inc.
                  Microsoft Small Business Specialists
                  Co-Author: SBS 2008 Blueprint Book

                  *Our original iMac was stolen (previous blog post). We now have a new MacBook Pro courtesy of Vlad Mazek, owner of OWN.

                  Windows Live Writer

                  Wednesday, 25 January 2012

                  Fonality–Setting up Windows Server/SBS DHCP After the Fact

                  We ran the SBS 2011 install via Answer File for this new network setup that we are working on.

                  They already had a peer to peer setup in place with SonicWall devices serving DHCP and acting as edge.

                  Two Fonality servers were set up in redundant mode.

                  So, prior to running the SBS OS install we deleted the SonicWall DHCP subnet scope to make sure we had SBS based DHCP this morning.

                  Well, no go.

                  We had the SBS is Installed Successfully green check mark but no system had an IP address.

                  Checking in the SBS Native Tools console we saw that DHCP had no scope.

                  We ran the Internet Address Wizard and:

                  image

                  The SBS wizard found a DHCP server at the Fonality’s primary server IP. We logged into the admin site with no DHCP Server options anywhere to be found.

                  image

                  In the end we needed to call them to have them log in via their own backend management and turn the DHCP services off for both the primary and secondary servers.

                  Moral of the story: If there are any third party devices and/or services in place before, or coming in afterwards, verify with the vendors whether anything in them will conflict with a Windows Domain/DNS/DHCP setup and have their “This is how you set things up on a Windows Domain/DNS/DHCP based network” documentation at hand.

                  The Fonality and other systems on this particular network require DHCP scope options along with custom DNS Forwarders for the phone “domain” among other things.

                  Got coffee? ;)

                  UPDATE: Fonality’s Support Site for DHCP and DNS setup on a Windows Network

                  Philip Elder
                  MPECS Inc.
                  Microsoft Small Business Specialists
                  Co-Author: SBS 2008 Blueprint Book

                  *Our original iMac was stolen (previous blog post). We now have a new MacBook Pro courtesy of Vlad Mazek, owner of OWN.

                  Windows Live Writer

                  Wednesday, 4 January 2012

                  Our SBS 2011 Setup Guide Has Been Updated: v1.10.0

                  Our very comprehensive SBS 2011 Setup Guide has been updated with the following changes:

                  • Added the NIC Binding check step to make sure that networking is set up properly on an SBS server with multiple NICs built in.
                  • Added the SBS Blog caveat post for the need to run PSConfig after SharePoint Foundation updates.

                  As always, backup the server just after the OS install has been completed and then after each significant milestone in the server build.

                  Philip Elder
                  MPECS Inc.
                  Microsoft Small Business Specialists
                  Co-Author: SBS 2008 Blueprint Book

                  *Our original iMac was stolen (previous blog post). We now have a new MacBook Pro courtesy of Vlad Mazek, owner of OWN.

                  Windows Live Writer

                  Monday, 2 January 2012

                  Some Small Business Server 2011 Essentials Resources

                  We are running through our first full production deployment of SBSe 2011.

                  It takes some getting used to as the install requires a router on the network that delivers an IP address via DHCP!

                  The TechNet site has a build wiki that has a lot of good information in it:

                  We did not use any form of Answer File for this first run through. We used the Q&A to set things up.

                  Once we had the server’s desktop we were in for a couple of surprises based on the two questions asked by the setup wizard:

                  1. We chose an admin logon: Franklin Roosevelt
                    • User came up:
                      • Username: Admin
                      • User Logon: Franklin Roosevelt
                  2. We chose a Standard User: Douglas MacArthur
                    • User came up:
                      • Username: User
                      • User Logon: Douglas MacArthur

                  That was a bit of a surprise to us. So, going forward we will not put a space in the usernames and rename them after the fact so that the logon and username actually match.

                  Note that we can change the first and/or last name associated with the user in the SBS Console but we are not able to change the actual logon name.

                  So, we checked out what was in ADUC and sure enough we could change it there. But, when we brought up the properties in the SBS Dashboard (not Console) we saw:

                  image

                  Error

                  Cannot retrieve or change the user account information. If this problem persists, restart the server, and then try again.

                  So, we ran a few updates and let the server go.

                  And still we received the same error message. This means that anyone that gets married will require a new user ID and thus a recreation of their profile.

                  Back to the point of order:

                  We plan on installing DHCP on the SBSe 2011 server.

                  As per the above blog post we will also stop and disable the Windows Server LAN Configuration service.

                  From there we will run through many of the steps found in our SBS 2011 Standard setup guide.

                  Philip Elder
                  MPECS Inc.
                  Microsoft Small Business Specialists
                  Co-Author: SBS 2008 Blueprint Book

                  *Our original iMac was stolen (previous blog post). We now have a new MacBook Pro courtesy of Vlad Mazek, owner of OWN.

                  Windows Live Writer

                  Saturday, 17 September 2011

                  SBS 2011: Configure SBS Connect Wizard for Windows 8

                  Our post on tweaking the SBS 2008 Connect Wizard is here:

                  The Official SBS Blog Post:

                  There are a few differences in the settings for SBS 2011. Make sure to make a backup of the GP.XML file and the supportedOS.XML files before modifying them in any way.

                  After installing  the Windows 8 desktop OS:

                  1. On SBS 2011 Open SBS Native Tools Console.
                  2. Open the Group Policy Management Console.
                    1. If it is not there add it and save the MMC so that it is there later.
                  3. Navigate to the Windows SBS Client Policy GPO and copy the GUID (Unique ID).
                  4. Paste the GUID into the following path:
                    1. \Windows\sysvol\domain\Policies\{YOUR-GUID-HERE}\machine\SBS
                  5. Click Start –> NotePad –> Right click and Run As Admin.
                  6. File –> Open –> Paste the above path in and open GP.XML.
                    • Make sure File Type is set to All Files (*.*).
                  7. Append the following to (Version>= . . . ) found in the GP.XML
                    • and ‘6.2.8102’
                    • image
                    • image
                  8. Save and close NotePad.
                  9. Click Start –> NotePad –> Right click and Run As Admin.
                    1. File –> Open –> Paste the following path and open supportedOS.XML.
                      • C:\Program Files\Windows Small Business Server\Bin\WebApp\ClientDeployment\packageFiles\
                      • Make sure File Type is set to All Files (*.*).
                  10. Replace the supportedOS.XML file contents with the following:
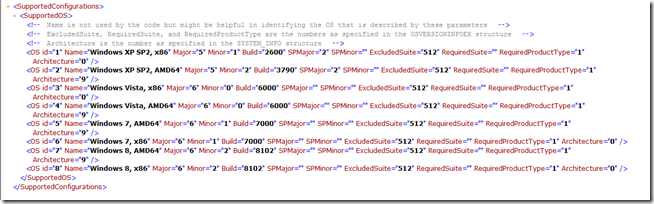
                    • <SupportedConfigurations>
                        <SupportedOS>
                          <!-- Name is not used by the code but might be helpful in identifying the OS that is described by these parameters -->
                          <!-- ExcludedSuite, RequiredSuite, and RequiredProductType are the numbers as specified in the OSVERSIONINFOEX structure -->
                          <!-- Architecture is the number as specified in the SYSTEM_INFO structure –>
                    •     <OS id="1" Name="Windows XP SP2, x86" Major="5" Minor="1" Build="2600" SPMajor="2" SPMinor="" ExcludedSuite="512" RequiredSuite="" RequiredProductType="1" Architecture="0"/>
                          <OS id="2" Name="Windows XP SP2, AMD64" Major="5" Minor="2" Build="3790" SPMajor="2" SPMinor="" ExcludedSuite="512" RequiredSuite="" RequiredProductType="1" Architecture="9"/>
                          <OS id="3" Name="Windows Vista, x86" Major="6" Minor="0" Build="6000" SPMajor="" SPMinor="" ExcludedSuite="512" RequiredSuite="" RequiredProductType="1" Architecture="0"/>
                          <OS id="4" Name="Windows Vista, AMD64" Major="6" Minor="0" Build="6000" SPMajor="" SPMinor="" ExcludedSuite="512" RequiredSuite="" RequiredProductType="1" Architecture="9"/>
                          <OS id="5" Name="Windows 7, AMD64" Major="6" Minor="1" Build="7000" SPMajor="" SPMinor="" ExcludedSuite="512" RequiredSuite="" RequiredProductType="1" Architecture="9"/>
                          <OS id="6" Name="Windows 7, x86" Major="6" Minor="1" Build="7000" SPMajor="" SPMinor="" ExcludedSuite="512" RequiredSuite="" RequiredProductType="1" Architecture="0"/>
                          <OS id="7" Name="Windows 8, AMD64" Major="6" Minor="2" Build="8102" SPMajor="" SPMinor="" ExcludedSuite="512" RequiredSuite="" RequiredProductType="1" Architecture="9"/>
                          <OS id="8" Name="Windows 8, x86" Major="6" Minor="2" Build="8102" SPMajor="" SPMinor="" ExcludedSuite="512" RequiredSuite="" RequiredProductType="1" Architecture="0"/>
                        </SupportedOS>
                      </SupportedConfigurations>
                    • image
                  11. On the Windows 8 system: Open IE and open the http://connect wizard.
                  12. At the _bottom_ of the IE window click the Turn on Intranet settings button.
                    • image
                  13. Click the Yes button to the “Are you sure . . . ?” prompt.
                  14. Click the Start Connect Computer Program link.
                    • image
                  15. Step through the Connect Wizard.

                  image

                  The Windows 8 machine/VM will step through and complete its configuration.

                  Please use the supportedOS.XML file and the paths TXT file found in the above ZIP archive. The GP.XML file found in the archive is from an SBS 2008 setup so please ignore it for SBS 2011.

                  RDP and Windows 8

                  NOTE: We are experiencing a problem connecting to the VM via RDP on Windows SBS 2011 networks even with the firewall exceptions in place. At this point we are not sure if there is a problem using the RDP client in Windows 7/Windows Server 2008 R2 or if there is a bug in the Windows 8 OS RDP setup.

                  Philip Elder
                  MPECS Inc.
                  Microsoft Small Business Specialists
                  Co-Author: SBS 2008 Blueprint Book

                  *Our original iMac was stolen (previous blog post). We now have a new MacBook Pro courtesy of Vlad Mazek, owner of OWN.

                  Windows Live Writer

                  Friday, 16 September 2011

                  SBS 2008: Configure SBS Connect Wizard for Windows 8

                  We stood up a desktop OS version of the Windows Developer Review (Win8) yesterday. When we went to run the SBS 2008 Connect Wizard where the VM was located we ran into the following error:
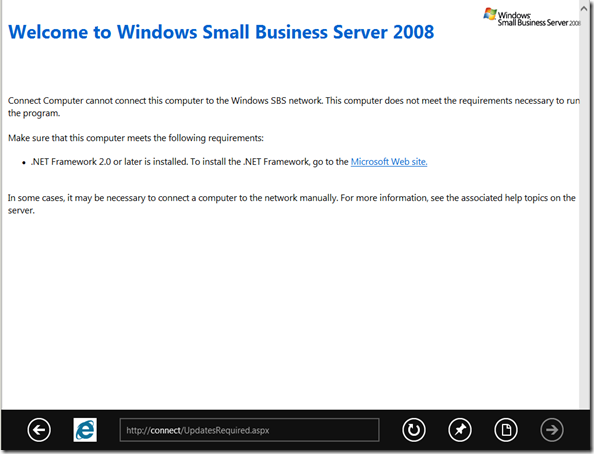
                  image

                  It’s asking for .NET 2 or later yet .NET 4 is installed in the Windows 8 desktop OS by default.

                  So, we went into the Turn Windows Features On or Off and enabled .NET 3.5.1:
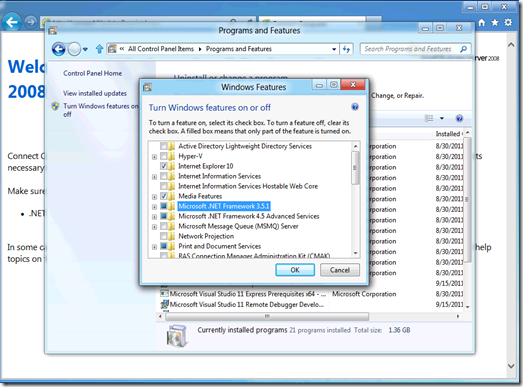
                  image

                  The install process jumped onto the Internet and pulled down whatever it needed so there was a good 5 to 10 minute delay while that process went on.

                  Once the .NET install routine was finished we cleared out the IE cache and started again:
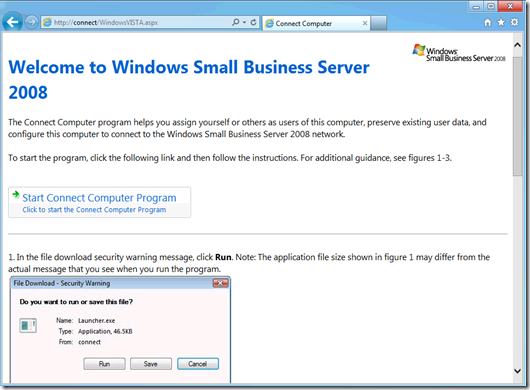
                  image

                  We now had our Connect Wizard start screen. So, we started the wizard and got hit with:
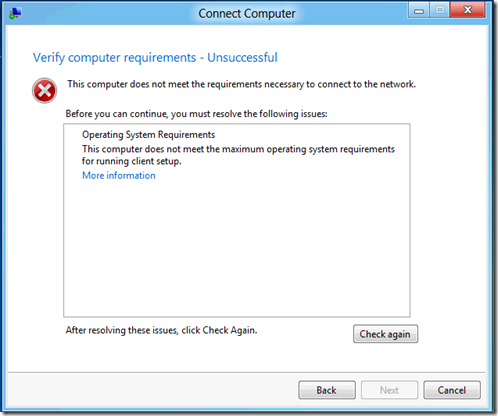
                  image

                  Connect Computer: Verifying computer requirements – Unsuccessful

                  This computer does not meet the requirements necessary to connect to the network.

                  Since we were messing around with the beta of Windows 7 back when it was not too hard to figure out that we needed to tweak things on SBS 2008 for Windows 8 to be recognized.

                  The paths needed:

                  • \Windows\sysvol\domain\Policies\{YOUR-GUID-HERE}\machine\SBS
                  • %programfiles%\Windows Small Business Server\Bin\webapp\ClientDeployment\packageFiles\

                  Copy and paste the above paths into NotePad on the SBS server.

                  The supportedOS.xml code is:

                  <SupportedConfigurations>
                    <SupportedOS>
                      <!-- Name is not used by the code but might be helpful in identifying the OS that is described by these parameters -->
                      <!-- ExcludedSuite, RequiredSuite, and RequiredProductType are the numbers as specified in the OSVERSIONINFOEX structure -->
                      <!-- Architecture is the number as specified in the SYSTEM_INFO structure -->

                      <OS id="1" Name="Windows XP SP2, x86" Major="5" Minor="1" Build="2600" SPMajor="2" SPMinor="" ExcludedSuite="512" RequiredSuite="" RequiredProductType="1" Architecture="0"/>
                      <OS id="2" Name="Windows XP SP2, AMD64" Major="5" Minor="2" Build="3790" SPMajor="2" SPMinor="" ExcludedSuite="512" RequiredSuite="" RequiredProductType="1" Architecture="9"/>
                      <OS id="3" Name="Windows Vista, x86" Major="6" Minor="0" Build="6000" SPMajor="" SPMinor="" ExcludedSuite="512" RequiredSuite="" RequiredProductType="1" Architecture="0"/>
                      <OS id="4" Name="Windows Vista, AMD64" Major="6" Minor="0" Build="6000" SPMajor="" SPMinor="" ExcludedSuite="512" RequiredSuite="" RequiredProductType="1" Architecture="9"/>
                      <OS id="5" Name="Windows 7, AMD64" Major="6" Minor="1" Build="7000" SPMajor="" SPMinor="" ExcludedSuite="512" RequiredSuite="" RequiredProductType="1" Architecture="9"/>
                      <OS id="6" Name="Windows 7, x86" Major="6" Minor="1" Build="7000" SPMajor="" SPMinor="" ExcludedSuite="512" RequiredSuite="" RequiredProductType="1" Architecture="0"/>
                      <OS id="7" Name="Windows 8, AMD64" Major="6" Minor="2" Build="8102" SPMajor="" SPMinor="" ExcludedSuite="512" RequiredSuite="" RequiredProductType="1" Architecture="9"/>
                      <OS id="8" Name="Windows 8, x86" Major="6" Minor="2" Build="8102" SPMajor="" SPMinor="" ExcludedSuite="512" RequiredSuite="" RequiredProductType="1" Architecture="0"/>
                    </SupportedOS>
                  </SupportedConfigurations>

                  Please note that the above code contains both 32bit and 64bit entries for Windows 8.

                  The code looks like this in the file:

                  image

                  The code for the GP.XML file is:

                  <?xml version="1.0" encoding="utf-8"?>
                  <GPSetting>
                    <MSI xmlns:xsi="http://www.w3.org/2001/XMLSchema-instance" xmlns:xsd="http://www.w3.org/2001/XMLSchema" Name="WMIProvider" Location="\\DOMAIN.LOCAL\SysVol\DOMAIN.LOCAL\ClientAgent\machine\WMIProvider.msi" PlatForm="0" WMIFilter="select * from Win32_OperatingSystem Where (Version&gt;='5.1.2600' and '6.0.6000'&gt;Version and ServicePackMajorVersion&gt;=2 and ProductType=1) or (Version&gt;='6.0.6000' and '6.2.0000'&gt;Version and ProductType=1)" />
                    <MSI xmlns:xsi="http://www.w3.org/2001/XMLSchema-instance" xmlns:xsd="http://www.w3.org/2001/XMLSchema" Name="IWorkerGadget32" Location="\\DOMAIN.LOCAL\SysVol\DOMAIN.LOCAL\ClientAgent\machine\IWorkerGadget.msi" PlatForm="1" WMIFilter="select * from Win32_OperatingSystem Where Version&gt;='6.0.6000' and '6.2.0000' and '6.2.8102'&gt;Version and ProductType=1" />
                    <MSI xmlns:xsi="http://www.w3.org/2001/XMLSchema-instance" xmlns:xsd="http://www.w3.org/2001/XMLSchema" Name="IWorkerGadget64" Location="\\DOMAIN.LOCAL\SysVol\DOMAIN.LOCAL\ClientAgent\machine\IWorkerGadget64.msi" PlatForm="2" WMIFilter="select * from Win32_OperatingSystem Where Version&gt;='6.0.6000' and '6.2.0000' and '6.2.8102'&gt;Version and ProductType=1" />
                  </GPSetting>

                  Instead of making the changes indicated in the SBS Blog we appended the Windows 8 version in the second two entries: and ‘6.2.8102’

                  Change DOMAIN.LOCAL (bold emphasis ours) to your own SBS domain in each of the entries as indicated above.

                  They look like this:

                  image

                  How To

                  1. Install the Windows 8 OS.
                  2. Update Integration Services
                  3. Install .NET 3.5.1 into the Windows 8 OS by adding the feature.
                  4. At the command prompt in Windows 8: ver [Enter]
                    1. Note the version number.
                  5. Copy and Paste the paths into NotePad (paths are in a TXT file at the end of this post)
                  6. Find the required GUID in GPMC on SBS.
                  7. Copy and Paste the GUID (the GUID can be highlighted copied from GPMC) into the path above.
                  8. Open the GUID path and copy the GP.XML file out into a safe place.
                  9. Open an elevated NotePad session: Start –> NotePad –> Right Click search result and Run As Admin.
                  10. File –> Open –> navigate to GP.XML and open (copy and paste the path from NotePad).
                  11. Make the necessary edits.
                  12. Save.
                  13. Open the supportedOS.XML path and copy the supportedOS.XML file out into a safe place.
                  14. File –> Open –> navigate to the supportedOS.XML file (copy and paste the path from NotePad)
                  15. Make the necessary edits.
                  16. Save.
                  17. Re-run the Connect Wizard on the Windows 8 VM/machine.

                  The Windows 8 VM/Machine will now meet the requirements:
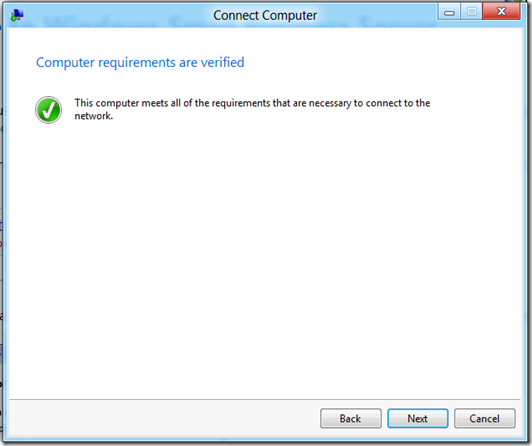
                  image

                  supportedOS.XML Edit

                  We found the Windows 8 version by running the following command at the command prompt:
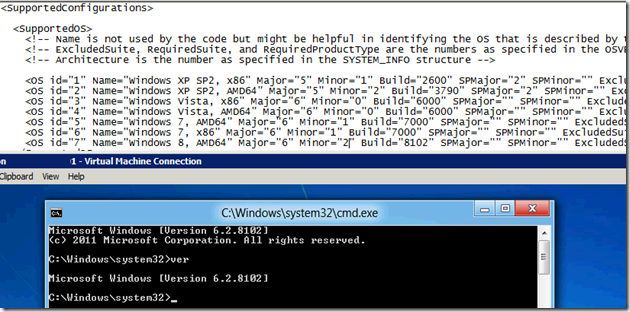
                  image

                  • ver [Enter]

                  We then made sure that our copy and paste of the Windows 7 OS id settings were updated appropriately.

                  • The OS id always increments by 1
                  • AMD64 is 64bit
                  • x86 is 32bit
                  • Architecture=”9” is 64bit
                  • Architecture=”0” is 32bit

                  Full Screen Mode

                  If installing the Windows 8 OS into a VM it is a must to have the console session in Full Screen mode as the Windows key is needed to switch between Metro and the Desktop.

                  Windows 8 Search

                  Okay, so where did the Search field go?!?

                  It turns out that after clicking on the Start button and having the Metro GUI kick in we need only start typing for it to come up with some results:
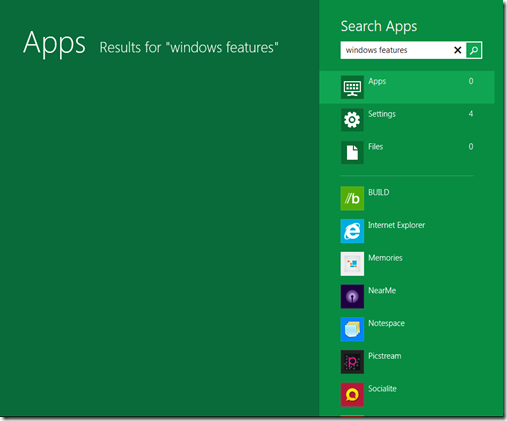
                  image

                  Not having the VM in Full Screen mode means a lot of CTRL+ALT+Delete to get to the Task Manager. :(

                  There may be a better way, but things are just a tad new for all of us outside of Microsoft.

                  A copy of the edited GP.XML, supportedOS.XML, and a TXT file with the paths can be found here:

                  The XML files in IE

                  GP.XML:
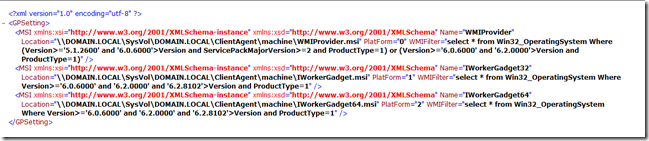
                  image

                  supportedOS.XML:

                  image

                  Philip Elder
                  MPECS Inc.
                  Microsoft Small Business Specialists
                  Co-Author: SBS 2008 Blueprint Book

                  *Our original iMac was stolen (previous blog post). We now have a new MacBook Pro courtesy of Vlad Mazek, owner of OWN.

                  Windows Live Writer

                  Monday, 22 August 2011

                  SBS 2008 and 2011 Active Directory Password Complexity

                  To manage the password setup in SBS 2008 and SBS 2011 Active Directory we use the SBS Console:

                  1. Open the SBS Console.
                  2. Click on the Users and Groups tab.
                  3. If not already selected, click on the Users tab.
                  4. Under Tasks click on Change password policies.
                    • image
                  5. Set the password policy settings accordingly.
                    • image
                  6. Click Apply and OK.
                    1. NOTE: All users will be required to change their passwords on their next log on if any changes are made to these settings!

                  This wizard is normally used during the set up process only.

                  If this wizard is used somewhere in the middle of an SBS Migration or SBS Swing Migration the consequences may be dire. It is best left as the final step _after_ at least one week of the post-migrated server being in production.

                  Philip Elder
                  MPECS Inc.
                  Microsoft Small Business Specialists
                  Co-Author: SBS 2008 Blueprint Book

                  *Our original iMac was stolen (previous blog post). We now have a new MacBook Pro courtesy of Vlad Mazek, owner of OWN.

                  Windows Live Writer

                  Monday, 18 July 2011

                  SBS 2011 – Remote Desktop Gateway Management

                  The RD Gateway services are installed and configured by default during the SBS 2011 OS install and then by the Getting Started Tasks Wizards in the SBS Console.

                  Technically, we are licensed to use the RD Gateway service via the Remote Web Access portal.

                  If we create RDP files to gain direct access to our desktops on the SBS network or we install and configure an RDS server then we are required to have RDS CALs for each user.

                  When we have RD Gateway services being utilized in this manner though we may require access to the RD Gateway service.

                  To do so, we need to install the RD Gateway UI via an elevated command prompt.

                  • dism /online /Enable-Feature:Gateway-UI.

                  Note that there will be some errors that come up when opening the RD Gateway console that can be safely ignored. The errors are SBSisms.

                  Hat Tip: Susan Bradley

                  Philip Elder
                  MPECS Inc.
                  Microsoft Small Business Specialists
                  Co-Author: SBS 2008 Blueprint Book

                  *Our original iMac was stolen (previous blog post). We now have a new MacBook Pro courtesy of Vlad Mazek, owner of OWN.

                  Windows Live Writer